
Most of the operations you perform in Google Cloud Storage must be authenticated. The only exceptions are operations on objects that allow anonymous access. Objects are anonymously accessible if the
AllUsers
group has
READ
permission. The
AllUsers
group includes anyone on the Internet.
If you are working with the Google Cloud Storage API directly, you can perform authentication using one of the methods described below. If you are using Google Cloud Storage with the web-based Google Developers Console or a tool like gsutil , then authentication is performed on your behalf.
Tip: Are you looking for Developer Keys to use with the XML API for interoperable access with Amazon S3?
Contents
OAuth 2.0 Authentication
Important: You need to use SSL (HTTPS) when you use OAuth 2.0 authentication. If you are using Python, you should also make sure that you are using an HTTPS library that validates certificates. The Python 2.x httplib does not do this but the library used by gsutil does.
Google recommends OAuth 2.0 authentication for interacting with the Google Cloud Storage API. OAuth 2.0 authentication eliminates the need to provide sensitive account information, such as a username and password, to any applications that need access to your data. Instead, you can use the OAuth 2.0 protocol to obtain and give out OAuth tokens. OAuth tokens authenticate tools and applications to access Google Cloud Storage API on your behalf and also provide the ability to restrict access using scopes. You can authorize different applications with separate tokens, and revoke tokens individually, if necessary.
OAuth tokens use scopes to determine the level of access to your data. For example, Google Cloud Storage has three specific scopes: read-only, read-write, or full-control. You can assign OAuth tokens to applications which then use their respective tokens to authenticate access to your data. Based on the scope of the token, the application is only allowed to perform certain types of actions. For example, by using OAuth 2.0 authentication, you can specify that application A with a read-only access token can only read your data on your behalf, while application B with a read-write access token can read and modify data on your behalf. Neither application can read or modify access control lists on objects and buckets; only an application with a full-control-scoped token could do so.
The details of the authorization process, or "flow," for OAuth 2.0 vary somewhat depending on what kind of application you're writing. The following general process applies to all application types:
- When you create your application, you register it with Google . Google then provides information you'll need later, such as a client ID and a client secret.
- Activate the Google Cloud Storage JSON API in the APIs section of the Google Developers Console. (If it isn't listed in the Console, then skip this step.)
- When your application needs access to user data, it asks Google for a particular scope of access.
- Google displays an consent screen to the user, asking them to authorize your application to request some of their data.
- If the user approves, then Google gives your application a short-lived access token .
- Your application requests user data, attaching the access token to the request.
- If Google determines that your request and the token are valid, it returns the requested data.
For more information, see the Using OAuth 2.0 to Access Google APIs .
Depending on the type of application, there are several ways to set up OAuth 2.0 authentication. For more information, see the Using OAuth 2.0 to Access Google APIs .
Google Cloud Storage API OAuth scopes are as follows:
| Type | Description | Scope URL |
|---|---|---|
read-only
|
Only allows access to read data, including listing buckets. |
https://www.googleapis.com/auth/devstorage.read_only
|
read-write
|
Allows access to read and change data. |
https://www.googleapis.com/auth/devstorage.read_write
|
full-control
|
Allows full control over data, including the ability to modify ACLs. |
https://www.googleapis.com/auth/devstorage.full_control
|
To make requests using OAuth 2.0, include the application's access token in the Authorization header, as follows:
            Authorization: Bearer

             <oauth access token>
The following is an example of a GET request that uses OAuth 2.0 authentication:
GET / HTTP/1.1
Host: storage.googleapis.com
Accept-Encoding: identity
Content-Length: 0
x-goog-api-version: 2
Authorization: Bearer ya29.AHES6ZRVmB7fkLtd1XTmq6mo0S1wqZZi3-Lh_s-6Uw7p8vtgSwg
If your application does not have an access token, you need to set up your application to use OAuth 2.0 authentication with the Google Cloud Storage API. When you grant your application an access token, keep in mind that it is not possible to grant an access token that has more control than you have. For example, if an ACL only grants you read-only access to a bucket, it is not possible for you to give read-write access to an application, even if you grant the application a read-write access token. For information on how to grant your application an access token, see Using OAuth 2.0 to Access Google APIs .
If you previously authorized your application for OAuth 2.0, your application should also have a refresh token, which can be used to acquire a new access token. For more information, see "Getting additional access tokens" at Using OAuth 2,0 to Access Google APIs .
Note:
If your requests are being routed through a proxy, you may need to check with your network administrator to ensure that the
Authorization
header containing your credentials is not stripped out by the proxy. Without the
Authorization
header, you will receive a
MissingSecurityHeader
error and your request will be rejected. For more information about accessing Google Cloud Storage through a proxy server, see the
FAQ
.
Cookie-based Authentication
Google Cloud Storage lets you provide browser-based authenticated downloads to users who do not have Google Cloud Storage accounts. To do this, apply Google account-based ACLs to the object and then provide users with a URL that is scoped to the object. The URL for browser-based authenticated downloads is:
             https://storage.cloud.google.com/

              bucket

             /

              object
For example, to let Jane download an object named /europe/france/paris.jpg that's in a bucket named travel-maps, you grant [email protected]
READ
permission for the object /europe/france/paris.jpg. Then you provide Jane with the following URL:
https://storage.cloud.google.com/travel-maps/europe/france/paris.jpg
When Jane clicks the URL in her browser she's automatically prompted to sign in to her Google account (if she's not already logged in). After she is authenticated, and her browser has acquired a cookie with an encapsulated identity token, she is redirected to the object in the Google Cloud Storage repository. Google Cloud Storage then verifies that Jane is allowed to read the object, and the object is downloaded to Jane's computer.
The following figure shows how the authentication process for browser-based authenticated downloads works.

Note:
All requests to the
storage.cloud.google.com
URI require authentication. This is true even if an object's ACL grants
READ
permission to the
AllUsers
group. If you want users to download anonymously accessible objects without authenticating, use the
storage.googleapis.com
URI.
Service Account Authentication
Google Cloud Storage lets you use service accounts to authenticate your application. Service accounts are special accounts that represent software rather than people. Every project has a service account associated with it, which may be used for authentication and to enable advanced features such as Signed URLs and browser uploads using POST .
When you use a service account to authenticate your application, you do not need to obtain an initial OAuth token using the web flow. Instead, you can obtain a private key from the Google Developers Console , which you then use to send a signed request for an access token. You can then use the access token like you normally would. For more details, see Using OAuth 2.0 for Server to Server Applications .
Generating a private key
You can create a private key in the Developers Console by creating an OAuth Client ID for a service account. In the creation process, you are prompted to download the key immediately after creating it. Google does not store a copy.
To generate a private key:
- Go to the Google Developers Console .
- Select a project to which the service account will be associated.
- In the left sidebar, under APIs & AUTH , select Credentials .
- Click Create new Client ID .
-
In the
Create Client ID
window, choose
Service account
.

- Click Create Client ID .
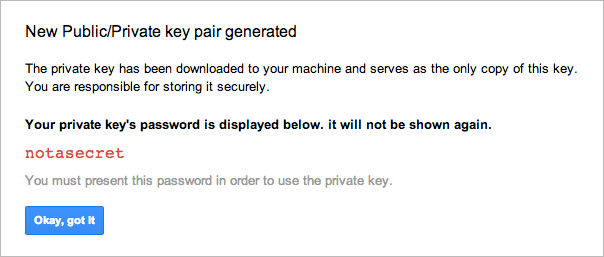
-
A
New Public/Private key pair generated
window is displayed and the private
key is downloaded automatically. Note the private key's password and click
Okay, got it
.
This key is provided in PKCS12 format, which is supported by many different programming languages and libraries. If needed, you can convert the key into other formats using openssl (see Converting the private key to other formats ).
For more information about security and identity in projects, see the Google Developers Console Help .
Note: If you forget to download the key, you can always create another one for your project in the Google Developers Console. In the API & auth section, select Credentials , find the Service Account your created for your application, and click Generate new key . The same dialog shown above appears and the key is downloaded automatically.
About the Client ID
The OAuth client ID uniquely identifies the account being used for the authentication. After you create a Client ID for a service account (see Getting a private key ), you will see information for your client ID similar to the following example:

Notice that there are two identifiers of the service account, the
Client ID
and the
Email address
. You must use the
Email address
for RSA signatures,
for example, for
Signed URLs (Query String Authentication)
.
The two identifiers are closely related, you can convert from the
Client ID
identifier
to the
Email address
identifier by
replacing
.apps.googleusercontent.com
with
@developer.gserviceaccount.com
.
For example, this
Client ID
:
1234567890123-abcdefghijklmnopqrstuvwxz01234567.apps.googleusercontent.com
would become
1234567890123-abcdefghijklmnopqrstuvwxz01234567@developer.gserviceaccount.com
Converting the private key to other formats
After you create a Client ID for a service account (see Getting a private key ) and download the private key, you might need to convert the key to other formats. The key is provided in PKCS12 format, which is supported by many different programming languages and libraries. However, it can be converted into other formats using openssl .
# Convert the key from pkcs12 to pkcs1 (PEM).
$ openssl pkcs12 -in path/to/key.p12 -nodes -nocerts > path/to/key.pem
If prompted for a password, use
notasecret
.
You can use openssl to generate a digest of the data to sign:
# Generate a signature digest using the PEM key.
$ openssl dgst -sign path/to/key.pem -sha256 path/to/data_to_sign | base64 -w0
You can also use openssl to convert the PEM file format to DER format. Some libraries (e.g., PyCrypto) require keys be in DER format.
# Convert the key from pkcs1 (PEM) to DER.
$ openssl rsa -in path/to/key.pem -inform PEM -out path/to/key.der -outform DER