Object Change Notification can be used to notify an application when an object is updated or added to a bucket.
Contents
How Object Change Notification Works
A client application can send a request to watch for a bucket's change notification events in order to be notified about changes to a bucket's objects.
Completing a watch request creates a new notification channel . A notification channel is the means by which a notification message is sent to an application watching a bucket. Only one type of notification channel, a web hook, is currently supported.
After a notification channel is initiated, Google Cloud Storage notifies the application any time an object is added, updated, or removed from the bucket. For example, when you add a new picture to a bucket, an application could be notified to create a thumbnail.
The figure below shows an example data flow for an application that processes change notifications. Any application server that can receive HTTPS POST requests can be used to process change notifications.

Object Change Notification Components
Object Change Notification Details
Terminology
The following table contains a description of several terms used throughput the Object Change Notification documentation:
| Term | Description |
|---|---|
| Application URL | The URL of your application. This is the address where notifications will be sent. Note that this must be an HTTPS URL; HTTP URLs are not permitted. |
| Channel Identifier | The identifier for a notification channel. Must be unique within a particular bucket, i.e., if there are multiple notification channels for a single bucket, each notification channel must have a distinct channel identifier. This identifier will be sent to your application along with each notification message. |
| Resource Identifier | An opaque identifier for the resource being watched. The resource identifier is required for stopping a notification channel. You can retrieve this identifier from the response to a watch request or from the body of notification event messages. |
| Client Token | (optional) Client tokens can be used to validate notifications events. To do this, set a custom client token with your watch request. Notification messages will contain this token so you can verify that they are authentic. |
Watching a Bucket
To start watching a bucket for change notification events, you can use the gsutil notification command:
gsutil notification watchbucket [-i ChannelId] [-t ClientToken] ApplicationUrl gs://BucketName
This will create a notification channel that sends notification events to the given application URL for the given bucket. The notification channel will include the custom client token and channel identifier if specified.
An example POST request generated by gsutil for watching a bucket:
POST /storage/v1beta2/b/BucketName/o/watch?alt=json HTTP/1.1
Host: www.googleapis.com
Content-Length: 200
User-Agent: google-api-python-client/1.0
Content-Type: application/json
Authorization: Bearer OAuthToken

{
  "token": "ClientToken",
  "type": "web_hook",
  "id": "ChannelId",
  "address": "ApplicationUrl"
}
Notification Authorization
When watching a bucket, the notification channel being created will be associated with the Google Developers Console project of the application initiating the API request. This means, for example, that if a user gives access to an installed application or web application via an OAuth2 flow, a notification channel created by the application will be associated with the application's project, not the project containing the bucket being watched.
There are two steps to configuring authorization in an object change notification scenario:
- Creating a Service Account
- Configuring gsutil to Use the Service Account
- Identifying a Domain to Receive Notifications
Creating a Service Account
Since a service account is associated with a project, using a service account to watch a bucket will create a notification channel in the service account's project.
To authorize a new service account:
- Go to the Google Developers Console .
- Select a project to which the service account will be associated.
- In the left sidebar, under APIs & AUTH , select Credentials .
- Click Create new Client ID .
-
In the
Create Client ID
window, choose
Service account
.

- Click Create Client ID .
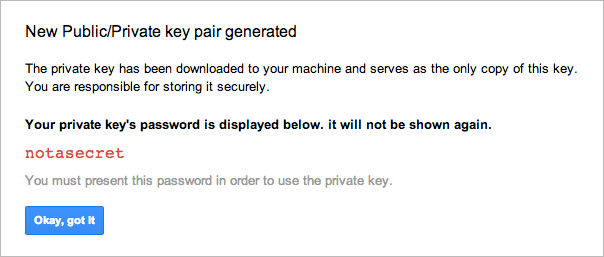
-
A
New Public/Private key pair generated
window is displayed and the private
key is downloaded automatically. Note the private key's password and click
Okay, got it
.
-
Find the Service Account you just created, and note the
generated
Email address
or keep the browser open when you configure
gsutil.
If you have existing Client IDs, the new Service account will be at the end of the list. You can always return to the Developers Console to generate a new key.
Configuring gsutil to Use the Service Account
To configure
gsutil
to use the service account, you can use the Google Cloud SDK
to add the service account as a credentialed account for working with Google
Cloud Platform resources, including Object Change Notification. After adding the credentials,
all subsequent
gsutil
commands will use the service account credentials.
To create credentials based on the service account:
-
Make sure you have the latest version of the
Cloud SDK
.
You can update your components by running:
$ gcloud components update
-
Use the
gcloud auth activate-service-accountcommand, and specify service account email address and private key.$ gcloud auth activate-service-account service-account-email --key-file path/to/key.p12
where:
-
service-account-emailis the service account email address. It will look something like this:1234567890123-abcdefghijklmonpqrstuvwxz01234567@developer.gserviceaccount.com. -
path/to/key.p12is the key you were prompted to download when you created the service account. If you lost the key, you can return to the Credentials page in the Google Developers Console and generate a new key.
-
-
Confirm that the service account is the active credentialed account.
$ gcloud auth list
Credentialed accounts:
- 1234567890123-abcdefghijklmonpqrstuvwxz01234567@developer.gserviceaccount.com (active)
You should see
activeby the service account credentials. Now, anygsutilobject notification commands you run use the service account credentials.
Identifying a Domain to Receive Notifications
Watch requests will only succeed if the notification URL is a domain whitelisted by the notification channel's project.
To whitelist a domain:
- Verify that you own the domain using the Google Webmaster Tools verification process.
- Log in to the Google Developers Console .
- Make sure you have the correct project selected.
- In the left sidebar, click APIs & AUTH , and then click Push .
-
Click
Add domains
to bring up a dialog box where you can enter whitelisted
domains:

-
Click
Add domains
to save your changes.
If you have verified ownership of the domains you added, your changes are made. If you have not verified ownership for one or more domains, an error message is displayed and your changes are not made.
Removing a Notification Channel
To stop a notification channel, you can use the gsutil notification command:
gsutil notification stopchannel ChannelId ResourceId
This will stop all notification events to the specified resource identifier and channel identifier pair. Additional active channels for the same resource will be unaffected. The resource and channel identifiers can be found in the response of a watch request or in the body of notification event messages.
An example POST request generated by gsutil for stopping a channel:
POST /storage/v1beta2/channels/stop HTTP/1.1
Host: www.googleapis.com
Content-Length: 200
User-Agent: google-api-python-client/1.0
Content-Type: application/json
Authorization: Bearer OAuthToken

{
  "resourceId": "ResourceId",
  "id": "ChannelId"
}
Notification Event Message Types
There are three types of notification event message types:
- Sync
-
A notification event is sent when a new notification channel is created after issuing a watch request. After receiving the sync event, all later changes to the bucket will be sent to the application URL configured for the channel.
The notification will be sent as a POST request to the configured application URL. There is no body in the request. The sync notification metadata is contained in the request's headers. The following is an example of the sync notification request:
POST /ApplicationUrlPath
Accept: */*
Content-Type: application/json; charset="utf-8"
Content_Length: 0
Host: ApplicationUrlHost
User-Agent: APIs-Google; (+http://code.google.com/apis)
X-Goog-Channel-Id: ChannelId
X-Goog-Channel-Token: ClientToken
X-Goog-Resource-Id: ResourceId
X-Goog-Resource-State: sync
X-Goog-Resource-Uri: https://www.googleapis.com/storage/v1beta2/b/BucketName/o?alt=json
- Object Addition, Update, or Deletion
-
A notification event is sent when a new object is added to a bucket, an existing object's content or metadata has been modified, or an object is deleted from a bucket.
The notification will be sent as a POST request to the configured application URL. The body of the request contains a JSON-encoded message as shown in the following notification request:
POST /ApplicationUrlPath
Accept: */*
Content-Length: 1097
Content-Type: application/json; charset="utf-8"
Host: ApplicationUrlHost
User-Agent: APIs-Google; (+http://code.google.com/apis)
X-Goog-Channel-Id: ChannelId
X-Goog-Channel-Token: ClientToken
X-Goog-Resource-Id: ResourceId
X-Goog-Resource-State: ResourceState
X-Goog-Resource-Uri: https://www.googleapis.com/storage/v1beta2/b/BucketName/o?alt=json

{
 "kind": "storage#object",
 "id": "BucketName/ObjectName",
 "selfLink": "https://www.googleapis.com/storage/v1beta2/b/BucketName/o/ObjectName",
 "name": "ObjectName",
 "bucket": "BucketName",
 "generation": "1367014943964000",
 "metageneration": "1",
 "contentType": "binary/octet-stream",
 "updated": "2013-04-26T22:22:23.832Z",
 "size": "10",
 "md5Hash": "xHZY0QLVuYng2gnOQD90Yw==",
 "mediaLink": "https://www.googleapis.com/storage/v1beta2/b/BucketName/o/ObjectName?generation=1367014943964000&alt;=media",
 "owner": {
  "entity": "user-007b2a38086590de0a47c786e54b1d0a21c02d062fcf3ebbaf9b63edb9c8db0c",
  "entityId": "007b2a38086590de0a47c786e54b1d0a21c02d062fcf3ebbaf9b63edb9c8db0c"
 },
 "crc32c": "C7+82w==",
 "etag": "COD2jMGv6bYCEAE="
}
where ResourceState is:-
exists- for object additions and updates. -
not_exists- for object deletions.
For a description of the contents of the JSON message, see the Object Resource Description .
-
Reliable Delivery
Object Change Notification will attempt to deliver notifications to your application in a reliable way. Since your application might not always be available, the following rules are followed:
- If a notification delivery attempt fails, additional attempts will be made. The period of delay between delivery attempts is determined with an exponential backoff algorithm, starting with 30 seconds and increasing up to 90 minutes.
-
If your application responds with one of the following HTTP response codes, the notification delivery attempt is treated as a failure:
- 401 Unauthorized
- 404 Not Found
- 500 Internal Server Error
- 502 Bad Gateway
- 503 Service Unavailable
- 504 Gateway Timeout
-
If your application responds with one of the following HTTP response codes, the notification is treated as successfully delivered:
- 102 Processing
- 200 OK
- 201 Created
- 202 Accepted
- 204 No Content
- If your application cannot be reached after 20 seconds, the notification delivery attempt is treated as a failure.
Client Application Example
This section shows the steps you must perform to create an App Engine client application which processes change notification events.
The following figure shows the timeline of the steps involved to set up this example application, from creating a bucket to processing the related change notification events:

Object Change Notification Timeline
The example application contains a class called
MainPage
.
When the user updates or adds an object to the bucket, the
MainPage
class processes the notification event.
For simplicity, the
post
method that does the actual processing just logs a message with the time
the notification was received. You can replace this code with your actual processing logic.
-
Configuring the application
.
Create the configuration fileapp.yamlto specify the client application that handles the bucket's change notification events.application: <ApplicationId> version: 1 runtime: python27 api_version: 1 threadsafe: true handlers: - url: /.* script: change_notification_client.app
-
Assigning the application's access permission to the bucket
.
Grant to the application FULL_CONTROL access to the bucket by running the following command:gsutil acl ch -u ApplicationId@appspot.gserviceaccount.com:FC gs://BucketName
-
Creating the Application
.
The following example implements a client application for handling a bucket's change notification events:"""Notification handling for Google Cloud Storage.""" import json import logging import webapp2 class MainPage(webapp2.RequestHandler): """Process notification events.""" def get(self): logging.info("Get request to notification page.") self.response.write("Welcome to the notification app.") def post(self): # pylint: disable-msg=C6409 """Process the notification event. This method is invoked when the notification channel is first created with a sync event, and then subsequently every time an object is added to the bucket, updated (both content and metadata) or removed. It records the notification message in the log. """ logging.debug( '%s\n\n%s', '\n'.join(['%s: %s' % x for x in self.request.headers.iteritems()]), self.request.body) # The following code is for demonstration. Replace # it with your own notification processing code. if 'X-Goog-Resource-State' in self.request.headers: resource_state = self.request.headers['X-Goog-Resource-State'] if resource_state == 'sync': logging.info('Sync message received.') else: an_object = json.loads(self.request.body) bucket = an_object['bucket'] object_name = an_object['name'] logging.info('%s/%s %s', bucket, object_name, resource_state) else: logging.info("Other post.") logging.getLogger().setLevel(logging.DEBUG) app = webapp2.WSGIApplication([('/', MainPage)], debug=True) -
Start watching the bucket for object changes
.
Create a notification channel to your application by watching the bucket with gsutil:gsutil notification watchbucket ApplicationUrl gs://BucketName
whereApplicationUrlis the URL of your App Engine application, e.g.,https:// ApplicationId .appspot.com/. -
Testing the Application
.
To see if the application works as expected, perform the following steps:-
To assure that the application has been deployed and works correctly, execute the following
curlcommand:curl -X Post https://<ApplicationId>.appspot.com
If you used your own domain name to deploy the application, use it instead ofappspot.comin the previous command. - Go to the Logs section of your application in the App Engine dashboard. Refresh the list of the logged messages, if needed. Verify that the log message issued by the application is logged.
-
Add an object to the bucket. You can use the
gsutil
tool
as follows:
gsutil cp <ObjectName> gs://<BucketName>/
Google Cloud Storage notifies the application, which then logs a message. -
Go to the
Logs
section of your application in the App Engine dashboard. Refresh the
list of the logged messages, if needed. You should be getting a message similar to this:

Object Change Notification Message
-
To assure that the application has been deployed and works correctly, execute the following
-
Remove the notification channel
Remove the notification channel by specifying the channel and resource identifiers returned when you issued the notification command to watch the bucket.gsutil notification stopchannel <channel_id> <resource_identifier>