This page discusses how you can control access to your Google Cloud SQL instances, including how to grant access to applications.
Contents
- Levels of access control
- Configuring instance-level access control
- Configuring MySQL database access control
Levels of access control
Configuring access control for an instance is about controlling who or what can access the instance. Access control occurs on two levels. The first level authorizes access from either a Google App Engine application, identified by its application ID, or any application running on a host identified by its IP address. The second level uses the regular MySQL Access Privilege System to control which users have access to what data.
Figure 1 depicts the two levels of access control that a connection passes through to access a database resource.
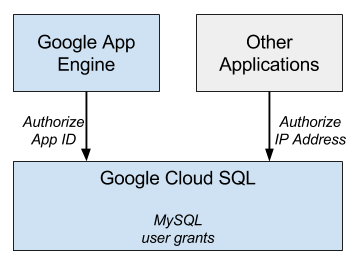
- Application or host level access
-
To enable access to an instance from a Google App Engine application or an application running on a regular host, you must authorize the host application ID or IP address, respectively. You can do this by editing the instance and granting access as shown in Configuring application access control .
- MySQL database access
-
After a connection to an instance has been negotiated, the user or application is logged in to the MySQL instance using the MySQL authorization system. By default, all instances have a user named
rootwith a blank password and root permissions on the instance. It is strongly recommended that you set a strong password for the root user, and create additional users to manage finer grained access to your database. See MySQL Access Privilege System for more information about managing MySQL users.
Configuring instance-level access control
This section shows how to configure access to applications connecting to your instance.
Configuring access control for App Engine applications
You can grant individual Google App Engine applications access to a Google Cloud SQL instance. One application can be granted access to multiple instances, and multiple applications can be granted access to a particular instance. To grant access to a Google App Engine application, you need its application ID which can be found at the Google App Engine administration console under the Applications column.
Developers Console
To grant access to an App Engine application:
- Go to the Google Developers Console and select a project by clicking on the project name.
- In the sidebar on the left, click STORAGE , and then click Cloud SQL to show a list of Cloud SQL instances for the project.
- Find the instance to which you want to grant access and click the instance name.
- Click Edit .
- In the Authorized App Engine Applications section, enter your Google App Engine application ID in the Applications box.
-
Click the
+
(plus) next to the
Applications
box to add more
applications.
You can grant access to multiple applications, by entering them one at a time.
- Click Confirm to apply your changes.
After you have added authorized applications to your Google Cloud SQL instance, you can view a list of these applications in the instance's Dashboard , in the section titled Authorized Applications .
For more information about Google App Engine, see the Google App Engine documentation .
To remove access for an App Engine application:
Follow the steps above and click the - (minus) next to the Authorized App Engine Applications box for the App Engine application.
Cloud SQL Command Line
To grant access to an App Engine application:
- Install the Cloud SQL command line if you haven't already (see Managing Instances Using the Cloud SDK ).
-
Use the
sql instances patchcommand to modify an existing instance (your-instance-name) and grant access to the App Engine applicationgae-app-name:$ gcloud sql instances patch your-instance-name --authorized-gae-apps gae-app-name
To remove access for an App Engine application:
-
Use the
sql instances patchcommand to remove access to an existing instance (your-instance-name) for all previously authorized App Engine applications:$ gcloud sql instances patch your-instance-name --clear-gae-apps
cURL
To grant access to an App Engine application:
-
Obtain an OAuth2 access token that you can use in the following commands.
For example, you can obtain a token by using the gauth command which is part of the Google Cloud SDK.
-
List the existing authorized App Engine applications for the instance.
For more information the resources of an instance you can access with the API, see instance resource definition .
curl --header 'Authorization: Bearer accessToken' \ --header 'Content-Type: application/json' \ https://www.googleapis.com/sql/v1beta3/projects/your-project-id/instances/your-instance-name \ -X GET -
Add a new App Engine application to the existing list of authorized App Engine applications.
curl --header 'Authorization: Bearer accessToken' \
     --header 'Content-Type: application/json' \
     https://www.googleapis.com/sql/v1beta3/projects/your-project-id/instance/your-instance-name \
     --data '{"settings" : {"authorizedGaeApplications" : ["existing-app-engine-app", "new-app-engine-app"] }}' \
     -X PATCH
To remove access for an App Engine application:
-
To revoke access for an App Engine application use the following command.
curl --header 'Authorization: Bearer accessToken' \
     --header 'Content-Type: application/json' \
     https://www.googleapis.com/sql/v1beta3/projects/your-project-id/instances/your-instance-name \
     --data '{"settings" : {"authorizedGaeApplications" : [""]}}' \
     -X PATCH
Configuring access control for IP connections
You can grant any application access to a Google Cloud SQL instance by authorizing the IP addresses that the application uses to connect. This includes connecting from a Google Compute Engine (GCE) instance. If you are connecting from App Engine, you do not need to configure access for IP addresses, you need only specify the App Engine identifier (see Configuring access control for App Engine applications ).
To find out the IP address of a computer where you are running an application so that you can authorize access to your Cloud SQL instance from that address, do the following:
- If you are not behind a proxy, use a command line tool like ifconfig (for Linux or Mac OS X) or ipconfig (Windows), or use a browser to determine your IP address (for example, search for What's My IP ).
- If you are behind a proxy, use a tool or service to determine your true IP address, for example, Proxy Test .
You can not specify a private network (for example, 10.x.x.x) as an authorized network.
As part of granting access to an application, you must also assign an IP address to your Cloud SQL instance for external access to succeed.
Developers Console
To grant access to an external application:
- Go to the Google Developers Console and select a project by clicking on the project name.
- In the sidebar on the left, click STORAGE , and then click Cloud SQL to show a list of Cloud SQL instances for the project.
- Find the instance to which you want to grant access and click the instance name.
- Click Edit .
- In the Assign IP Address section, click assign an IP address to assign an IP to the instance.
-
In the
Authorized IP Addresses
box, enter an IP
address to whitelist using
CIDR
notation.
If you are using a GCE instance you need to define an external IP address for the instance. For more information, see External Addresses .
There are a number of ways to find the IP address where you are running the
mysqlcommand line. For Linux/Unix and Mac OS, runifconfigin a shell prompt. For Windows, runipconfigin a command window.Figure 2 shows a whitelisted address range for an instance.

Figure 2: Authorizing IP addresses - Click the + (plus) next to the Authorized IP Addresses box to add more addresses.
- When you are done, click Confirm to update the instance.
To remove access for an external application:
Follow the steps above and click the - (minus) next to the Authorized IP Addresses box that represents the IP address range used by the external application to connect.
Cloud SQL Command Line
To grant access to an external application:
- Install the Cloud SQL command line if you haven't already (see Managing Instances Using the Cloud SDK ).
-
Use the
sql instances patchcommand to modify an existing instance (your-instance-name) and grant access to an IP rangeip-address-range:$ gcloud sql instances patch your-instance-name --authorized-networks ip-address-range
-
Use the
sql instances patchcommand to assign an IP address to the instance:$ gcloud sql instances patch your-instance-name --assign-ip
-
Use the
sql instances getcommand to retrieve the IP address assigned:$ gcloud sql instances get your-instance-name
In the output, find the "ipAddress" field. This value is what you will use in your connection strings.
To remove access for all external applications:
-
Use the
sql instances patchcommand to remove access to an instance (your-instance-name) for all previously authorized IP addresses:$ gcloud sql instances patch your-instance-name --clear-authorized-networks
cURL
To grant access to external applications:
-
Obtain an OAuth2 access token that you can use in the following commands.
For example, you can obtain a token by using the gauth command which is part of the Google Cloud SDK.
-
List the existing authorized IP ranges.
For more information the resources of an instance you can access with the API, see instance resource definition .
curl --header 'Authorization: Bearer accessToken' \ --header 'Content-Type: application/json' \ https://www.googleapis.com/sql/v1beta3/projects/your-project-id/instances/your-instance-name \ -X GET -
Assign a new IP range to the existing list of IP ranges.
curl --header 'Authorization: Bearer accessToken' \
     --header 'Content-Type: application/json' \
     https://www.googleapis.com/sql/v1beta3/projects/your-project-id/instance/your-instance-name \
     --data : '{"settings" : {"ipConfiguration" : {"enabled" : true, "authorizedNetworks": ["existing-ip-range", "new-ip-range"] }}}' \
     -X PATCH
To remove access for all external applications:
-
To revoke access for all external applications use the following command.
curl --header 'Authorization: Bearer accessToken' \
     --header 'Content-Type: application/json' \
     https://www.googleapis.com/sql/v1beta3/projects/your-project-id/instances/your-instance-name \
     --data '{"settings" : {"ipConfiguration" : {"enabled" : false }}}' \
     -X PATCH
Configuring MySQL database access control
If a connection does not explicitly specify a user, Google Cloud SQL
connects using the
root
user, which has
admin MySQL privileges on the instance. To connect as a custom
user, you must create a new MySQL user account. For example, you can use
the
CREATE USER
SQL command. We strongly
recommend that when you create a new account that you assign a password for
the user.
For information about creating MySQL users, see
Adding
User Accounts
in the MySQL documentation.
Setting the root account password
When you set the root password using the Google Developers Console, you are setting the 'root'@'%' MySQL account.
Developers Console
To set the MySQL root account password:
- Go to the Google Developers Console and select a project by clicking on the project name.
- In the sidebar on the left, click STORAGE , and then click Cloud SQL to show a list of Cloud SQL instances for the project.
- Find the instance to which you want to change the root password and click the instance name.
- Click Access Control .
- In the Set Root Password box, enter a new password and click Set .
Cloud SQL Command Line
To set the MySQL root account password:
- Install the Cloud SQL command line if you haven't already (see Managing Instances Using the Cloud SDK ).
-
Use the
sql instances set-root-passwordcommand to modify an existing instance (your-instance-name) and set a password for the MySQL root user:$ gcloud sql instances set-root-password your-instance-name --password password
$ gcloud sql instances set-root-password your-instance-name --password-file path-to-file
cURL
To set the MySQL root account password:
-
Obtain an OAuth2 access token that you can use in the following commands.
For example, you can obtain a token by using the gauth command which is part of the Google Cloud SDK.
-
Set the MySQL root password of an existing instance.
For more information the resources of an instance you can access with the API, see instance resource definition .
curl --header 'Authorization: Bearer accessToken' \
     --header 'Content-Type: application/json' \
     https://www.googleapis.com/sql/v1beta3/projects/your-project-id/instances/your-instance-name/setRootPassword \
     --data '{"setRootPasswordContext" : {"password" : "password"}}' \
     -X POST
Viewing MySQL users and adding a new user
You can view MySQL users in any tool that can execute SQL statement. In the example below, we show how to use the MySQL Client to view users and add a new user. The examples shows the default users for a newly created Google Cloud SQL database where you have specified the root password for the instance and you are using the root user to connect to the instance. You can run these commands using the MySQL Command-Line Tool .
The output of the SELECT command shows the hash for a
root
user
with password "!R3yH4dw#C".
mysql> SELECT User, Host, Password FROM mysql.user;
+------+-----------+-------------------------------------------+
| User | Host      | Password                                  |
+------+-----------+-------------------------------------------+
| root | localhost |                                           |
| root | 127.0.0.1 |                                           |
| root | ::1       |                                           |
|      | localhost |                                           |
| root | %         | *BFB60DA8A615B20CB80BD885B904CB5086C6750C |
+------+-----------+-------------------------------------------+
5 rows in set (0.06 sec)
mysql> CREATE USER 'testuser'@'%' IDENTIFIED BY 'some-password';
Query OK, 0 rows affected (0.06 sec)
mysql> SELECT User, Host, Password FROM mysql.user;
+----------+-----------+-------------------------------------------+
| User     | Host      | Password                                  |
+----------+-----------+-------------------------------------------+
| root     | localhost |                                           |
| root     | 127.0.0.1 |                                           |
| root     | ::1       |                                           |
|          | localhost |                                           |
| root     | %         | *BFB60DA8A615B20CB80BD885B904CB5086C6750C |
| testuser | %         | *60F988771147943DEDD313EF0E4E080FCA55DFE3 |
+----------+-----------+-------------------------------------------+
6 rows in set (0.06 sec)
Google Cloud SQL does not support
SUPER
privileges which means that
GRANT ALL PRIVILEGES
statements will not work. As an alternative,
you can use
GRANT ALL ON `%`.*
.