A Google Cloud SQL instance is a MySQL database hosted in Google's cloud. This page discusses how you can manage your Cloud SQL instances using the Google Developers Console .
To manage the instance, you must be a project team owner or editor. If this is not the case, ask a current owner on the project team to add you to the team by following the instructions in Adding a project member .
Contents
- Creating an instance
- Editing an instance
- Restarting an instance
- Deleting an instance
- Configuring SSL for an instance
- Adding a project member
Creating an instance
When you create a Google Cloud SQL instance, the instance name is the only required configuration setting. All other instance settings have default values that you can accept or modify.
To create an instance:
- Go to the Google Developers Console .
- Create a new Developers Console project, or open an existing project by clicking on the project name.
- In the sidebar on the left, click STORAGE , and then click Cloud SQL to show a list of Cloud SQL instances for the project.
- Click New Instance to create a new Cloud SQL instance in your project.
-
Enter a name for the instance.
An instance name can contain between 1 and 99 lowercase letters, hyphens, or numbers and cannot start with a number or hyphen. The instance name you specify is automatically combined with your project name, and any domain-specific names as shown here:
-
Non-domain:
your-project-name : your-instance-name -
Domain-specific:
              your-domain

             :

              your-project-name

             :

              your-instance-name
-
Non-domain:
- Optionally, continue to configure the instance. Or, to accept the default values for the instance settings, skip this step.
-
Click
Confirm
to create the instance.
It may take several moments before the instance is ready to use. The Status field on the instance summary page displays "Running" when your instance is ready to use.
After you create an instance, you can start using it. Here are several common next steps for using your Google Cloud SQL instance:
- Set a root password (see Configuring MySQL database access control ).
- Configure the instance for SSL connections (see Configuring SSL for an instance ).
- Import data into your newly created instance ( see Importing and Exporting Data ).
- Enable users or applications to access your Cloud SQL instance (see Configuring Access ).
- Connect to your instance from Google App Engine (see Connecting to Google Cloud SQL from App Engine Applications ).
Editing an instance
After you create an instance, you can edit the instance at any time to change its settings. For example, you might want to change the backup window or the billing plan of the instance as your application needs change. For all instance settings except instance size (tier), Google Cloud SQL applies the change immediately. For changes to the instance size, Google Cloud SQL automatically starts and stops the instance for a few moments to make the change. During this time, applications will not be able to connect to the instance. This is typically not a problem for applications designed to deal with temporary disruptions to database connectivity.
To edit general settings:
- Go to the Google Developers Console and select a project by clicking on the project name.
- In the sidebar on the left, click STORAGE , and then click Cloud SQL to show a list of Cloud SQL instances for the project.
- Select an instance to edit by clicking the instance name.
- Click Edit .
-
Make your changes to the instance settings.
You can configure:- Tiers and billing plans, see Packages Billing Plan .
- Preferred location, which can be either a Google Compute Engine zone or a Google App Engine application. When you choose a location, Google guarantees low latency between the location and your Cloud SQL instance.
- Backups and point-in-time recovery, see Backups and Recovery .
- Replication modes, see the FAQ .
- Access to your instance, see Configuring Application Access Control .
- Custom MySQL flags for your instance, see Setting MySQL Flags .
- Click Confirm to apply the changes.
To edit access control settings:
- Go to the Google Developers Console and select a project by clicking on the project name.
- In the sidebar on the left, click STORAGE , and then click Cloud SQL to show a list of Cloud SQL instances for the project.
- Select an instance to edit by clicking the instance name.
- Select the Access Control tab.
-
Make your changes to the access control settings.
From this panel, you can:- Add or remove an IP address assigned to the instance.
- Set the root password. For more information, see Configuring MySQL database access control .
- Add or remove authorized networks from which external applications can connect. For more information, see Configuring access control for IP connections .
- Add or remove an authorized App Engine application ID. For more information, see Configuring access control for App Engine applications
Restarting an instance
Restarting an instance drains the connections from an instance and stops the instance. The instance remains shut down until there is a new connection request for instance, at which time Google Cloud SQL spins up the instance to service the request. You should rarely need to restart an instance.
To restart an instance:
- Go to the Google Developers Console and select a project by clicking on the project name.
- In the sidebar on the left, click STORAGE , and then click Cloud SQL to show a list of Cloud SQL instances for the project.
- Select an instance to restart by clicking the instance name.
- Click Restart .
- In the Restart database instance dialog box, click OK .
Deleting an instance
Warning: All of an instance's data will be permanently lost when that instance is deleted. You may want to export your instance before you delete it, or delete it after a scheduled backup has occurred.
To delete an instance:
- Go to the Google Developers Console and select a project by clicking on the project name.
- In the sidebar on the left, click STORAGE , and then click Cloud SQL to show a list of Cloud SQL instances for the project.
- Select an instance to delete by clicking the instance name.
- Click Delete .
- In the Delete database instance dialog box, click OK .
Notes:
- After you delete an instance, it might still appear in your project with an "unknown" size but with a "Being deleted" status. This is normal and the instance should disappear completely after a brief period of time.
- You cannot reuse a name for up to two months after you have deleted an instance.
Configuring SSL for an instance
Google Cloud SQL supports connecting to an instance using the Secure Socket Layer (SSL) protocol. After you create an instance, we recommend that you configure it so that you can connect to it using SSL. The Google Developers Console provides you with all the necessary certificate and key files you need to establish a secure connection. For more information about using SSL connection with MySQL, see Using SSL Connections in the MySQL Reference Manual.
To configure SSL for your instance:
- Go to the Google Developers Console and select a project by clicking on the project name.
- In the sidebar on the left, click STORAGE , and then click Cloud SQL to show a list of Cloud SQL instances for the project.
- Select an instance to configure by clicking the instance name.
- Click Access Control .
-
Generate the Certificate Authority (CA) certificate.
-
In the
SSL Configuration
section, click
Enable SSL
.
After you enable SSL, you will see a SSL Configuration and SSL Certificates section as shown in Figure 1.
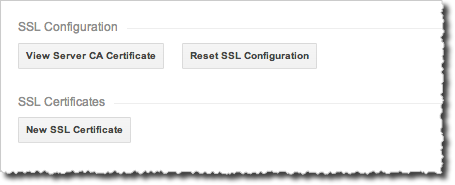
Figure 1: Instance SSL options. - In the SSL Configuration section, click View Server CA Certificate to view the server CA certificate.
-
In the dialog box, copy the CA Certificate to a file, for example,
ca-cert.pem
,
and store it for later use.
Be sure to copy all of the certificate, including the first line "-----BEGIN CERTIFICATE-----" and the last line "-----END CERTIFICATE-----".
-
In the
SSL Configuration
section, click
Enable SSL
.
-
Generate a client public key certificate and private key.
- In the SSL Certificates section, click New SSL Certificate .
- In the New SSL Certificate dialog box, give the certificate a unique name and click Add .
- In the first panel of the New SSL Certificate Create dialog box, copy the certificate private key to a file, for example, client-key.pem , and store it securely. Be sure to copy all of the key, including the first line "-----BEGIN RSA PRIVATE KEY-----" and last line "-----END RSA PRIVATE KEY-----".
-
In the second panel of the
New SSL Certificate Create
dialog box, copy the client
certificate to a file, for example,
client-cert.pem
, and save for later use.
Be sure to copy all of the certificate, including the first line "-----BEGIN CERTIFICATE-----" and the last line "-----END CERTIFICATE-----". Unlike the private key, you can return to the Google Developers Console and view the certificate.
-
Click
Close
to close the
New SSL Certificate Created
dialog.
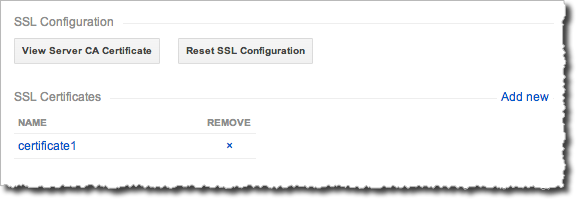
Figure 2: Instance with one SSL certificate.
- Click Restart to restart the instance and enable the certificate.
At this point, you have enabled the instance to use SSL and you have:
- A CA certificate saved as ca-cert.pem .
- A client public key certificate saved as client-cert.pem .
- A client private key saved as client-key.pem .
Depending on which tool you use to connect, these three items are specified
in different ways. For example, when connecting using MySQL client, these three
files are the values for the
--ssl-ca
,
--ssl-cert
, and
--ssl-key
command options, respectively. For an example connection
using MySQL client and SSL, see
Connecting with MySQL Client
.
To delete an SSL certificate:
- Click the x next to the certificate you want to remove.
- Restart the instance to complete the deletion process.
Adding a project member
If you are the project owner, you may need to add a project member who has permissions to manage the instance. You can add other project owners and editors using the Google Developers Console or the Google Cloud SDK. The steps below show how to add a team member using the Google Developers Console. If you use the Google Cloud SDK, you need to authenticate the machine from which you are connecting. For more information, see the Google Cloud SDK Getting Started .
Because an instance is associated with a single project, project rights apply to all instances in that project; you cannot specify different instance rights for different instances in the same project. For example, if you add a new team member as an editor, the team member can edit any instance in the project. As a best practice, you should give the minimum amount of access to accomplish the task at hand.
To add a project member:
- Sign into the Google Developers Console .
- Select a project to which to add a project member by clicking the project name.
- Click Permissions in the console side bar.
- Click Add member
-
In the
Add member
dialog box, specify the user's
email and choose a permission.
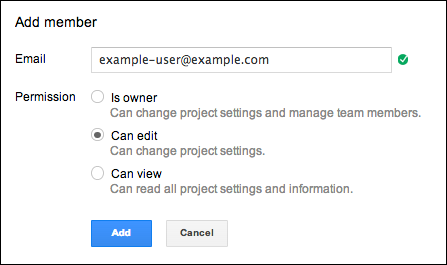
Figure 3: Adding a project member. - Click Add to add the team member.
The permission you assign to a project member controls what actions the member can take as shown in the following list.
- no rights - If a user has no project permissions, they cannot manage any instances in the project.
- View - The View permission allows the user to view usage and log information. The user cannot modify any instance or project settings, nor can the user import or export databases.
- Edit - The Edit permission includes the View permissions, plus the ability to manage instance settings as well as any project settings except team management and project deletion, and import or export data.
- Own - The Own permission includes the all Edit permissions, plus the user can add, edit, and remove team members, and delete the project.
You can change the permission assigned to a project member at any time after the member is added to the project.