Please note that the contents of this offline web site may be out of date. To access the most recent documentation visit the online version .
Note that links that point to online resources are green in color and will open in a new window.
We would love it if you could give us feedback about this material by filling this form (You have to be online to fill it)


Optimizing Content Efficiency

HTTP caching

Fetching something over the network is both slow and expensive: large responses require many roundtrips between the client and server, which delays when they are available and can be processed by the browser, and also incurs data costs for the visitor. As a result, the ability to cache and reuse previously fetched resources is a critical aspect of optimizing for performance.

Great news, every browser ships with an implementation of an HTTP cache! All we have to do is ensure that each server response provides correct HTTP header directives to instruct the browser on when and for how long the response can be cached by the browser.

  • If you are using a Webview to fetch and display web content in your application, you may need to provide additional configuration flags to ensure that the HTTP cache is enabled, its size is set to a reasonable number to match your use case, and that the cache is persisted. Check the platform documentation and confirm your settings!

HTTP request

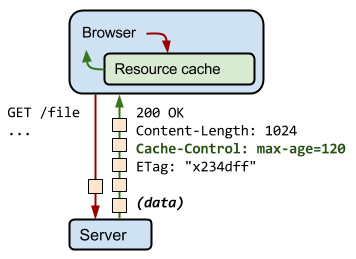
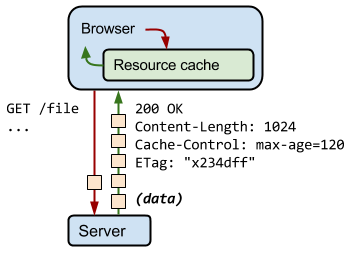
When the server returns a response it also emits a collection of HTTP headers, describing its content-type, length, caching directives, validation token, and more. For example, in above exchange the server returns a 1024 byte response, instructs the client to cache it for up to 120 seconds, and provides a validation token (“x234dff”) that can be used after the response has expired to check if the resource has been modified.

Validating cached responses with ETags

TL;DR

  • Validation token is communicated by the server via the ETag HTTP header
  • Validation token enables efficient resource update checks: no data transfer if the resource has not changed.

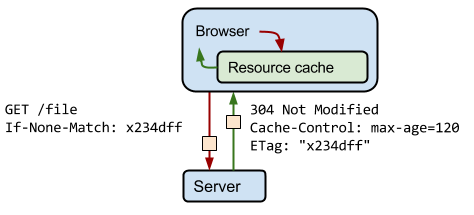
Let’s assume 120 seconds have passed since our initial fetch and the browser has initiated a new request for the same resource. First, the browser checks the local cache and finds the previous response, unfortunately it cannot use it as the response has now “expired”. At this point it could simply dispatch a new request and fetch the new full response, but that’s inefficient because if the resource has not changed then there is no reason to download the exact same bytes that are already in cache!

That’s the problem that validation tokens, as specified in the ETag header, are designed to solve: the server generates and returns an arbitrary token which is typically a hash or some other fingerprint of the contents of the file. The client does not need to know how the fingerprint is generated, it only needs to send it to the server on the next request: if the fingerprint is still the same then the resource has not changed and we can skip the download.

HTTP Cache-Control example

In above example the client automatically provides the ETag token within the “If-None-Match” HTTP request header, the server checks the token against the current resource, and if it has not changed returns a “304 Not Modified” response which tells the browser that the response it has in cache has not changed and can be renewed for another 120 seconds. Note that we do not have to download the response once more - this saves time and bandwidth.

As a web developer, how do you take advantage of efficient revalidation? The browser does all the work on our behalf: it will automatically detect if a validation token has been previously specified, it will append it to an outgoing request, and it will update the cache timestamps as necessary based on received response from the server. The only thing that’s left for us to do is to ensure that the server is, in fact, providing the necessary ETag tokens: check your server documentation for necessary configuration flags.

Remember

  • Tip: HTML5 Boilerplate project contains sample configuration files for all the most popular servers with detailed comments for each configuration flag and setting: find your favorite server in the list, look for appropriate settings, and copy / confirm that your server is configured with recommended settings.

Cache-Control

TL;DR

  • Each resource can define its caching policy via Cache-Control HTTP header
  • Cache-Control directives control who can cache the response, under which conditions, and for how long

The best request is a request that does not need to communicate with the server: a local copy of the response allows us to eliminate all network latency and avoid data charges for the data transfer. To achieve this, the HTTP specification allows the server to return a number of different Cache-Control directives that control how, and for how long, the individual response can be cached by the browser and other intermediate caches.

Remember

  • Cache-Control header was defined as part of the HTTP/1.1 specification and supersedes previous headers (e.g. Expires) used to define response caching policies. All modern browsers support Cache-Control, hence that is all we will need.

HTTP Cache-Control example

“no-cache” and “no-store”

“no-cache” indicates that the returned response cannot be used to satisfy a subsequent request to the same URL without first checking with the server if the response has changed. As a result, if a proper validation token (ETag) is present, no-cache will incur a roundtrip to validate the cached response, but can eliminate the download if the resource has not changed.

By contrast, “no-store” is much simpler, as it simply disallows the browser and all intermediate caches to store any version of the returned response - e.g. one containing private personal or banking data. Everytime the user requests this asset, a request is sent to the server and a full response is downloaded each and every time.

“public” vs. “private”

If the response is marked as “public” then it can be cached, even if it has HTTP authentication associated with it, and even when the response status code isn’t normally cacheable. Most of the time, “public” isn’t necessary, because explicit caching information (like “max-age”) indicates that the response is cacheable anyway.

By contrast, “private” responses can be cached by the browser but are typically intended for a single user and hence are not allowed to be cached by any intermediate cache - e.g. an HTML page with private user information can be cached by that user’s browser, but not by a CDN.

“max-age”

This directive specifies the maximum time in seconds that the fetched response is allowed to be reused for from the time of the request - e.g. “max-age=60” indicates that the response can be cached and reused for the next 60 seconds.

Defining optimal Cache-Control policy

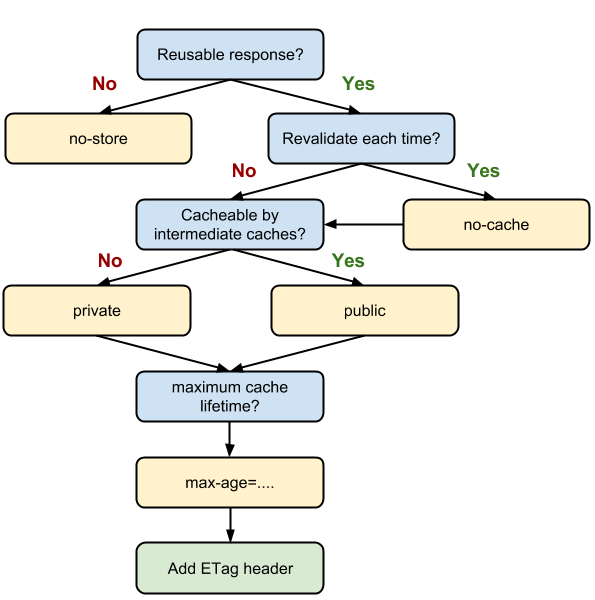
Cache decision tree

Follow the decision tree above to determine the optimal caching policy for a particular resource, or a set of resources used by your application. Ideally, you should aim to cache as many responses as possible on the client for the longest possible period, and provide validation tokens for each response to enable efficient revalidation.

Cache-Control directives Explanation
max-age=86400 Response can be cached by browser and any intermediary caches (i.e. it is "public") for up to 1 day (60 seconds x 60 minutes x 24 hours)
private, max-age=600 Response can be cached by the client’s browser only for up to 10 minutes (60 seconds x 10 minutes)
no-store Response is not allowed to be cached and must be fetched in full on every request.

According to HTTP Archive, amongst the top 300,000 sites (by Alexa rank), nearly half of all the downloaded responses can be cached by the browser, which is a huge savings for repeat pageviews and visits! Of course, that doesn’t mean that your particular application will have 50% of resources that can be cached: some sites can cache 90%+ of their resources, while others may have a lot of private or time-sensitive data that can’t be cached at all.

Audit your pages to identify which resources can be cached and ensure that they are returning appropriate Cache-Control and ETag headers.

Invalidating and updating cached responses

TL;DR

  • Locally cached responses are used until the resource 'expires'
  • Embedding a file content fingerprint in the URL enables us to force the client to update to a new version of the response
  • Each application needs to define its own cache hierarchy for optimal performance

All HTTP requests made by the browser are first routed to the browser cache to check if there is a valid cached response that can be used to fulfill the request. If there is a match, the response is read from the cache and we eliminate both the network latency and the data costs incurred by the transfer. However, what if we want to update or invalidate a cached response?

For example, let’s say we’ve told our visitors to cache a CSS stylesheet for up to 24 hours (max-age=86400), but our designer has just committed an update that we would like to make available to all users. How do we notify all the visitors with what is now a “stale” cached copy of our CSS to update their caches? It’s a trick question - we can’t, at least not without changing the URL of the resource.

Once the response is cached by the browser, the cached version will be used until it is no longer fresh, as determined by max-age or expires, or until it is evicted from cache for some other reason - e.g. the user clearing their browser cache. As a result, different users might end up using different versions of the file when the page is constructed; users who just fetched the resource will use the new version, while users who cached an earlier (but still valid) copy will use an older version of its response.

So, how do we get the best of both worlds: client-side caching and quick updates? Simple, we can change the URL of the resource and force the user to download the new response whenever its content changes. Typically, this is done by embedding a fingerprint of the file, or a version number, in its filename - e.g. style. x234dff .css.
Cache hierarchy

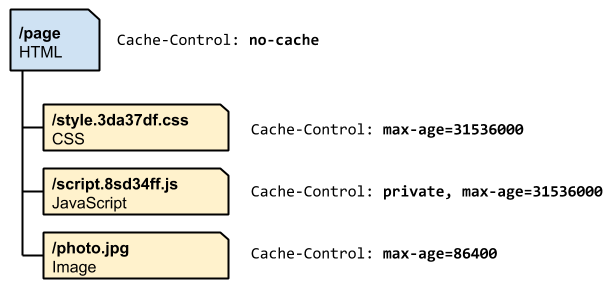
The ability to define per-resource caching policies allows us to define “cache hierarchies” that allow us to control not only how long each is cached for, but also how quickly new versions are seen by visitor. For example, let’s analyze the above example:

  • The HTML is marked with “no-cache”, which means that the browser will always revalidate the document on each request and fetch the latest version if the contents change. Also, within the HTML markup we embed fingerprints in the URLs for CSS and JavaScript assets: if the contents of those files change, than the HTML of the page will change as well and new copy of the HTML response will be downloaded.
  • The CSS is allowed to be cached by browsers and intermediate caches (e.g. a CDN), and is set to expire in 1 year. Note that we can use the “far future expires” of 1 year safely because we embed the file fingerprint its filename: if the CSS is updated, the URL will change as well.
  • The JavaScript is also set to expire in 1 year, but is marked as private, perhaps because it contains some private user data that the CDN shouldn’t cache.
  • The image is cached without a version or unique fingerprint and is set to expire in 1 day.

The combination of ETag, Cache-Control, and unique URLs allows us to deliver the best of all worlds: long-lived expiry times, control over where the response can be cached, and on-demand updates.

Caching checklist

There is no one best cache policy. Depending on your traffic patterns, type of data served, and application-specific requirements for data freshness, you will have to define and configure the appropriate per-resource settings, as well as the overall “caching hierarchy”.

Some tips and techniques to keep in mind as you work on caching strategy:

  1. Use consistent URLs: if you serve the same content on different URLs, then that content will be fetched and stored multiple times. Tip: note that URLs are case sensitive !
  2. Ensure the server provides a validation token (ETag): validation tokens eliminate the need to transfer the same bytes when a resource has not changed on the server.
  3. Identify which resources can be cached by intermediaries: those with responses that are identical for all users are great candidates to be cached by a CDN and other intermediaries.
  4. Determine the optimal cache lifetime for each resource: different resources may have different freshness requirements. Audit and determine the appropriate max-age for each one.
  5. Determine the best cache hierarchy for your site: the combination of resource URLs with content fingerprints, and short or no-cache lifetimes for HTML documents allows you to control how quickly updates are picked up by the client.
  6. Minimize churn: some resources are updated more frequently than others. If there is a particular part of resource (e.g. JavaScript function, or set of CSS styles) that are often updated, consider delivering that code as a separate file. Doing so allows the remainder of the content (e.g. library code that does not change very often), to be fetched from cache and minimizes the amount of downloaded content whenever an update is fetched.
Updated on 2014-01-05

Except as otherwise noted, the content of this page is licensed under the Creative Commons Attribution 3.0 License , and code samples are licensed under the Apache 2.0 License . For details, see our Site Policies .