Ads
Include AdSense Ads on Your Site
Follow the steps in this guide to learn how to include ads in your site. Create an AdSense account, create ad units, place the units in your site, configure payment settings, and get paid.
Follow the steps in this guide to learn how to include ads in your site. Create an AdSense account, create ad units, place the units in your site, configure payment settings, and get paid.
TL;DR
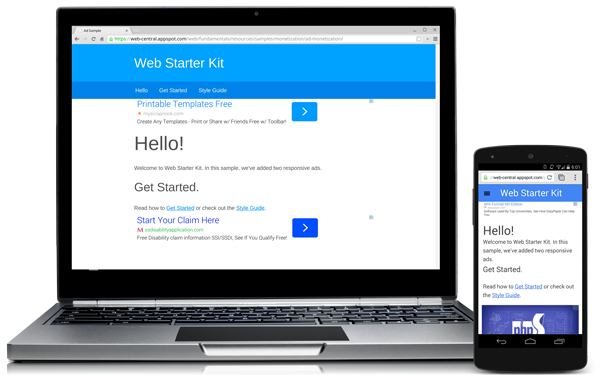
In this walk-through, you’ll build a simple page that includes responsive ads using Google AdSense and the Web Starter Kit:

If you’re unfamiliar with the Web Start Kit, refer to the Set Up Web Starter Kit documentation.
In order to include ads in your site and get paid, you’ll need to follow these simple steps:
In order to serve ads on your site, you’ll need an active AdSense account. If you don’t already have one, you’ll need to create one and agree to the AdSense terms of service. When you create your account, you’ll need to verify:
An ad unit is a set of ads that are displayed on your page as a result of JavaScript you add to your page. You have three options for sizing your ad units:
You are building a responsive site; use responsive ad units. Responsive ads automatically resize based on the size of the device and the width of the parent container. Responsive ads work in line with your responsive layout, ensuring your site looks great on any device.
If you don’t use responsive ad units, you will have to write a lot more code to control how ads appear based on a user’s device. Even if you must specify the exact size of your ad units, use responsive ad units in advanced mode .
To make your code simpler and save you time and effort, the responsive ad code automatically adapts the ad unit size to your page layout. The code calculates the required size dynamically based on the width of the ad unit’s parent container, then picks the best-performing ad size that fits in the container. For example, a mobile-optimized site with a width of 360px might show a 320x50 ad unit.
Track the current top performing ad sizes in the Google AdSense Guide to ad sizes .
After creating your ad unit, AdSense provide a snippet of code to include on your site, similar to the code below:
<script async src="//pagead2.googlesyndication.com/pagead/js/adsbygoogle.js"></script>
<!-- Top ad in web starter kit sample -->
<ins class="adsbygoogle"
  style="display:block"
  data-ad-client="XX-XXX-XXXXXXXXXXXXXXXX"
  data-ad-slot="XXXXXXXXXX"
  data-ad-format="auto"></ins>
<script>
  (adsbygoogle = window.adsbygoogle || []).push({});
</script>
Note
data-ad-client
and
data-ad-slot
will be unique for each ad you generate.
data-ad-format=auto
tag in the generated ad code enables the smart sizing behavior for the responsive ad unit.
To include the ad on the page, we need to paste the provided AdSense snippet into our markup. If you want to include multiple ads, you can either re-use the same ad unit, or create multiple ad units.
index.html
in the
app
folder.
main
tag.
Remember
Wondering when your AdSense payment will arrive? Trying to figure out whether you’ll be paid this month or next month? Be sure you’ve completed all of the steps below:
Refer to Intro to AdSense payments for any additional questions.
Updated on 2014-07-31
Except as otherwise noted, the content of this page is licensed under the Creative Commons Attribution 3.0 License , and code samples are licensed under the Apache 2.0 License . For details, see our Site Policies .