This page discusses how to import and export data to and from Google Cloud SQL using the Google Developers Console .
Contents
- Introduction
- Prerequisites for importing and exporting
- Importing data Exporting data
- Checking operation progress
Introduction
The Google Developers Console allows you to efficiently import and export entire databases via Google Cloud Storage. While you can also import and export data using mysqldump files and standard tools such as MySQL Client , using Google Cloud Storage is often the fastest way to import and export large databases entirely. The Google Developers Console supports importing and exporting compressed or uncompressed mysqldump files.
You can also schedule backups for your data, as discussed in Backups and Recovery .
Prerequisites for importing and exporting
Before you can import and export data into Google Cloud SQL, you need the following:
- A Google Cloud Storage account.
-
Google Cloud SQL can only import and export data from Google Cloud Storage. If you are already using Google Cloud Storage, you can skip this step. Otherwise, see how to activate Google Cloud Storage .
-
READandWRITEaccess to a Google Cloud Storage bucket. -
If you want to import a mysqldump file, you need
READaccess to a Google Cloud Storage bucket where the mysql dump file is stored andREADaccess to the mysqldump file itself. If you want to export a mysqldump file, you needWRITEaccess to the Google Cloud Storage bucket where the file will be stored. You can set permissions for Google Cloud Storage data through the Google Developers Console using project team roles , or through Google Cloud Storage access control lists .
After you have satisfied the prerequisites, use the steps below to import and export your data.
Importing data
You can import other MySQL databases to your Google Cloud SQL instance using the
mysqldump
program and a Google Cloud Storage account. There are
two parts to importing your database to Google Cloud SQL:
- Uploading your existing MySQL database to Google Cloud Storage
- Importing your MySQL data to your Google Cloud SQL instance
Upload your existing MySQL database to Google Cloud Storage:
You must upload your MySQL database to Google Cloud Storage first before you can import it into Google Cloud SQL using the Google Developers Console.
Important
: If your database contains binary
data, you
must
use the
--hex-blob
option when
using
mysqldump
to generate your
.sql
file. This
ensures that all your binary data is imported accurately.
-
From a command line, run
mysqldumpas follows:mysqldump --databases database_name [-h instance-ip -u username -p password] \ --hex-blob --default-character-set=utf8 > database_file.sql
Keep in mind of the following when using
mysqldump:-
If your database contains binary data, you must use the
--hex-bloboption.Google Cloud SQL currently only supports UTF8 strings. If your tables contain binary fields, you must use the
--hex-bloboption when you runmysqldumpto ensure that all your data is successfully imported. For more information about the--hex-bloboption, see the mysqldump reference . -
If you are not using any features that require MyISAM,
you should consider using the InnoDB.
InnoDB is the default storage engine in MySQL 5.5 and is also the recommended storage engine for Google Cloud SQL. You may convert your tables from MyISAM to InnoDB by piping the output of mysqldump through a sed script as follows:
mysqldump --databases database_name [-h instance-ip -u username -p password] --hex-blob --default-character-set=utf8 |
sed 's/ENGINE=MyISAM/ENGINE=InnoDB/g' > database_file.sql
Warning: You should not do this if your
mysqldumpfile contains themysqlschema. Those files must remain in MyISAM. -
It is quicker to import a large database if the dump file is compressed with
gzipYou can compress your dump file from the command line using
               gzip

                database_file

               .sql
.
-
If your database contains binary data, you must use the
-
Download and install
gsutil, which enables you to upload data into a bucket in Google Cloud Storage from the command line. -
Create a bucket with
gsutilusing the following command:gsutil mb gs://bucketname
Note: You need to be either a project owner or project editor to create a bucket in Google Cloud Storage. If you are not a project editor or project owner, you need to be given
WRITEaccess to a Google Cloud Storage bucket to be able to upload files to it. For more information about project roles in Google Cloud Storage, see the Using Projects guide in the Google Cloud Storage documentation. For more information about bucket permissions, see the Access Control guide. -
Upload your file into your Google Cloud Storage bucket using the following
command:
gsutil cp database_file.sql gs://bucketname
-
Check that your file was uploaded by using the following command:
gsutil ls -l gs://bucketname
Your database file should appear in the listings as
             gs://

              bucketname

             /

              database_file

             .sql
along with its size in bytes:611083 2011-05-26T19:05:01 gs://mydatabase/myfile.sql
You can compare the size of the uploaded file with the original file to make sure all your data was uploaded successfully.
Importing your MySQL data to your Google Cloud SQL instance:
- Go to the Google Developers Console and select a project by clicking on the project name.
- In the sidebar on the left, click STORAGE , and then click Cloud SQL to show a list of Cloud SQL instances for the project.
- Select the instance into which to import data.
- Click Import .
-
In the
Import Data
dialog box, specify the following:
- A Google Cloud Storage path to a bucket that contains the MySQL dump file or the path to the MySQL dump file.
- The name of a database in the instances into which you are importing. You can leave this value empty if you specified a file in the path.
- Click the OK to start the import.
Note: You can perform only one import or export operation at a time for each instance. It is not possible to begin an import or export operation for an instance and then immediately began another import or export operation for the same instance while the first operation is in progress.
Exporting data
Using the Google Developers Console, you can export all databases from your Google Cloud SQL instance, or you can export a single database in your instance. You cannot export individual tables from a database.
Data exported from the Google Developers Console is exported to a file in the Google Cloud Storage bucket you specify. You can compress the exported data using gzip compression by adding a ".gz" file extension. Compressing can save significant storage space on Google Cloud Storage and reduce your storage costs, especially when you are exporting large instances.
Export your Google Cloud SQL instance:
- Go to the Google Developers Console and select a project by clicking on the project name.
- In the sidebar on the left, click STORAGE , and then click Cloud SQL to show a list of Cloud SQL instances for the project.
- Select the instance from which to export data.
- Click Export .
-
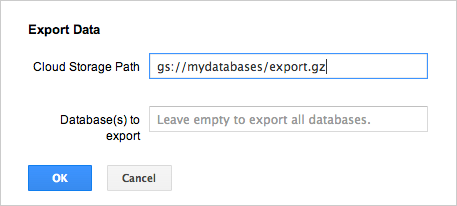
In the
Export Data
dialog box, specify the following:
- A Google Cloud Storage path to a file that will contain the MySQL exported data. The path includes a bucket name and file name. Add ".gz" to the file name to compress the exported data using gzip compression.
- The name of a database to export. If you leave this value blank, all databases are exported.
- Click OK to start the export.
Checking operation progress
You can see the progress of your import and export operations next to the Status field on the instance summary page.
- When an operations succeeds, Google Developers Console displays a green check mark.
- If an operation fails, a yellow warning triangle appears.
You can also check the Operations Log for messages related to import and export operations.