Authentication: Adding Client IDs to Backend and Library
In order for your Android client to access backend API methods protect by OAuth, you must specify your backend API's web client ID and your Android client ID in the backend API whitelist. You must also add the backend API's web client ID to your Android client app.
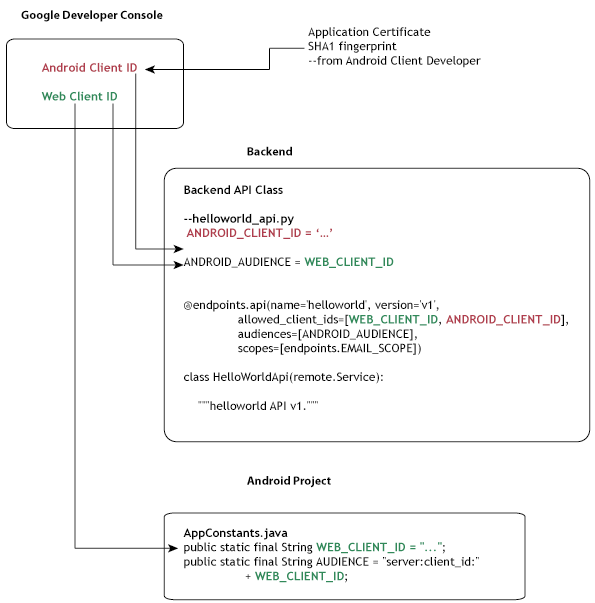
The following map shows where the client IDs are used in the backend API and in the Android project:
Obtaining a web client ID
Android apps must reference the backend API's web client ID as well as an Android client ID. If you completed the Web Client Tutorial , you already have this ID, and can obtain it by visiting the Google Developers Console for your project and locating the project's web client ID via the APIs & auth area of the console.
Obtaining an Android client ID
You get the Android client ID by registering your Android app. To register your Android client app:
-
Open a terminal window and generate an SHA1 fingerprint for the debug certificate by invoking the following:
keytool -exportcert -alias androiddebugkey -keystore ~/.android/debug.keystore -list -vWhen prompted for a password, use
android. -
Save the SHA1 fingerprint for use later in these instructions. The SHA1 fingerprint is part of the output of the preceding step; it looks something like this:
Certificate fingerprint: SHA1: DA:39:A3:EE:5E:6B:4B:0D:32:55:BF:EF:95:60:18:90:AF:D8:07:09 -
Open the Google Developers Console and select your project in the projects list to open it and make it the active project.
-
In the sidebar on the left, select APIs & auth > Credentials > Create New ClientID .
-
Select Installed Application for the application type in the Create Client ID form.
-
Select Android as the Installed application type .
-
Specify the package name
com.google.devrel.samples.helloendpoints. -
Specify the SHA1 fingerprint you generated earlier in this procedure and click Create Client ID .
-
Locate and save the resulting client ID as you need to copy this value into the backend API project later.
Adding the Android client ID to the backend API
In order for your Android client to be recognized by the backend API, you must set the API audience to the backend API's web client ID, and you must add the Android client ID to the client ID whitelist in the backend API.
To do this:
-
In the backend API project, open the file
helloworld_api.pyand and replace the dummy text value for the Android client ID with the value you created in the previous procedure. In the file, notice that the Android audience is set to the backend API web client ID. -
Notice how the decoration in
helloworld_api.pyuses the constant you just set to the Android client ID:import endpoints from protorpc import messages from protorpc import message_types from protorpc import remote WEB_CLIENT_ID = 'replace this with your web client application ID' ANDROID_CLIENT_ID = 'replace this with your Android client ID' IOS_CLIENT_ID = 'replace this with your iOS client ID' ANDROID_AUDIENCE = WEB_CLIENT_ID package = 'Hello' @endpoints.api(name='helloworld', version='v1', allowed_client_ids=[WEB_CLIENT_ID, ANDROID_CLIENT_ID, IOS_CLIENT_ID, endpoints.API_EXPLORER_CLIENT_ID], audiences=[ANDROID_AUDIENCE], scopes=[endpoints.EMAIL_SCOPE]) class HelloWorldApi(remote.Service): """helloworld API v1.""" -
Redeploy the backend API.
Regenerating the client library
After you add or update the authentication configuration for your backend API,
you'll need to generate the client library again, following the instructions in
Setup
.
Make sure you copy the re-generated library to your project's
\libs
directory.
This completes the required changes to backend API and to the client library. Now, we need to make the required changes to the Android project.
Next...
Continue on to Authentication: Adding Auth Support in Client Project .