Creating the Hello Endpoints Complete Sample Backend API
In this part of the tutorial, we'll use the App Engine Maven artifact
hello-endpoints-archetype
to create a complete sample backend API, which we'll
then briefly walk through to discuss certain key parts of the code.
Hello Endpoints Description
The Hello Endpoints sample backend API supports:
- A simple GET that retrieves either of two canned responses based on user choice
- A simple GET that retrieves all of the canned responses
- A POST that provides a user-supplied greeting and multiplier to the backend API which then returns the greeting repeated the number of times specified by the multiplier.
- OAuth protected method requiring user sign-in, which simply returns the user's email address.
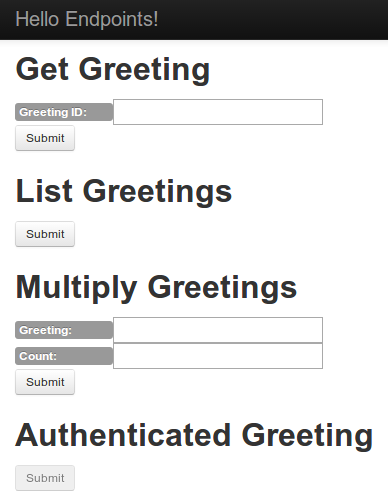
The UI provided by the included sample web client is as follows:
Creating the project
To create the
HelloEndpoints
backend API:
-
In a terminal window, change to the directory where you want to build the project.
-
Invoke the following Maven command:
mvn archetype:generate -Dappengine-version=1.9.9 -Dfilter=com.google.appengine.archetypes: -
Supply the number corresponding to
hello-endpoints-archetypefrom the list of App Engine archetypes. -
Select the most recent version from the displayed list of available archetype versions by accepting the default.
-
When prompted to
Define value for property 'groupId', supply a namespace of your choosing, for example:com.example.demo. (The typical convention is to use a namespace starting with the reversed form of your domain name.) -
When prompted to
Define value for property 'artifactId', supply the project namehelloendpoints. -
Accept the defaults for the remaining prompts.
-
Wait for the project to finish generating, then take a look at the resulting project layout:
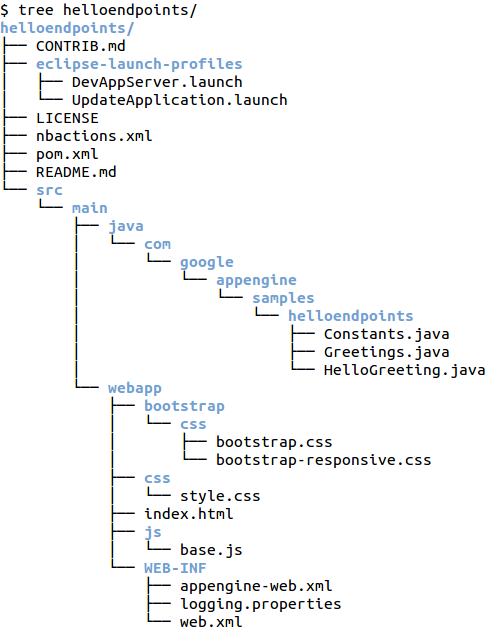
The layout looks very similar to the the layout already described in Creating a Simple Hello World Backend API . The main difference is that the backend API is already defined in the the Java source.
Greetings.javais the JavaBean class used for the responses from the backend API andHelloGreetings.javacontains the backend API definition. We'll describe the code inHelloGreetings.javalater in the code walkthrough .Also, note the complete web client defined in
src/main/webapp/js/base.jsandsrc/main/webapp/index.html, along with the related CSS files. We won't go into this web client in this tutorial, but you can find a full description of the web client in the web client tutorial . -
Edit the file
src/main/webapp/WEB-INF/appengine-web.xmlto set<application>to the project ID you obtained earlier during Setup . -
Edit the file
src/main/java/com/google/appengine/samples/helloendpoints/Constants.javaas follows:-
Set
WEB_CLIENT_IDto the web client ID you obtained earlier during Setup . -
Add the following line to the
Constantsclass:public static final String API_EXPLORER_CLIENT_ID = com.google.api.server.spi.Constant.API_EXPLORER_CLIENT_ID;This line is needed for testing of OAuth protected methods in the API Explorer.
-
Set
-
Edit the file
src/main/java/com/google/appengine/samples/helloendpoints/Greetings.javato addConstants.API_EXPLORER_CLIENT_IDto the list ofclientIDsin the@Apiannotation. -
Edit the file
src/main/webapp/js/base.jsto setgoogle.devrel.samples.hello.CLIENT_IDto the web client ID you obtained earlier during Setup . -
Build the project by invoking
mvn clean installWait for the project to build. When the project successfully finishes you will see a message similar to this one:
[INFO] BUILD SUCCESS
[INFO] ------------------------------------------------------------------------
[INFO] Total time: 17.169s
[INFO] Finished at: Thu Jun 05 13:56:32 PDT 2014
[INFO] Final Memory: 23M/234M
Running and testing the API locally
To test the backend API locally:
-
From the main directory
helloendpoints/, start the API in the development server as follows:mvn appengine:devserverWait for the dev server to start up. When it finishes starting up, you will see a message similar to this one:
[INFO] INFO: Module instance default is running at http://localhost:8080/ [INFO] Jun 03, 2014 9:44:47 AM com.google.appengine.tools.development.AbstractModule startup [INFO] INFO: The admin console is running at http://localhost:8080/_ah/admin [INFO] Jun 03, 2014 9:44:47 AM com.google.appengine.tools.development.DevAppServerImpl doStart [INFO] INFO: Dev App Server is now running -
Visit the backend API via the built-in API Explorer at this URL:
http://localhost:8080/_ah/api/explorerAlternatively visit the web client at
http://localhost:8080. -
To send requests to the backend API, visit the API Explorer in your browser at this URL:
http://localhost:8080/_ah/api/explorerThis opens up the API Explorer for your backend. Notice the list of APIs displayed with helloworld API in that list.
-
Click helloworld API to display the available methods. Notice how the name specified in your
@Apiannotation (helloworld) is prepended to the API class and method name. -
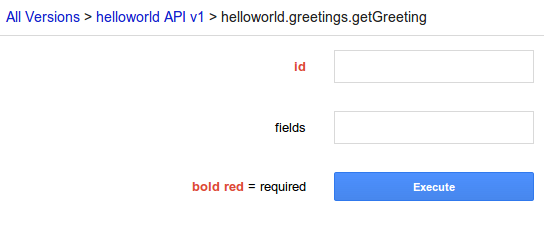
Click helloworld.greetings.getGreetings to display the Explorer form for it:
-
Our simple backend has two "canned" messages in an array. Get the first message by entering a value of
0in the Id text box, then click Execute .Notice the display of the request and response. In the Response, you'll see the OK result and the returned message, hello world! .
-
Enter a value of
1in the Id text box, then click Execute ; this time the message is goodbye world! . -
Test the other methods as desired. The
listGreetingmethod returns the canned list of greetings,multiplyrepeats a user-posted greeting the specified number of times, andauthedis an OAuth protected method. -
To test the "authed" method:
- In the far left of the API Explorer, toggle the button labeled Authorize requests using OAuth 2.0 to ON .
- When prompted to Select OAuth 2.0 Scopes , select the checkbox labeled https://www.googleapis.com/auth/userinfo.email then click Authorize .
- Click helloworld.greetings.authed .
-
Click
Execute
and observe the authorization in the request, and a
greeting with the user name
[email protected]in the response. (This is the only user name you'll get when testing locally; to get a real user name, you have to deploy to App Engine.)
Deploying to and running on App Engine
After you finish testing, you can deploy to App Engine. To deploy to App Engine:
-
Make sure you are logged into the Google account you used to create the Google Developers Console project.
-
Visit the Google Developers Console .
-
Click on your project in the console's project list.
-
Click APIs & auth > Credentials .
-
Click Edit Settings for the web client ID you used for your backend API.
-
-
Specify the App Engine URL of your backend API in the textbox labeled
AUTHORIZED JAVASCRIPT ORIGINS. For example,
https://your_project_id.appspot.com, replacingyour_project_idwith your real project ID.
-
Specify the App Engine URL of your backend API in the textbox labeled
AUTHORIZED JAVASCRIPT ORIGINS. For example,
-
From the main project directory,
helloendpoints/, invoke the commandmvn appengine:update -
Follow the prompts: if you are presented with a browser window containing a code, copy it to the terminal window.
-
Wait for the upload to finish, then visit the URL you specified above for the Authorized Javascript Origins (
https://your_project_id.appspot.com).If you don't see the web client app, or if the client doesn't behave as expected, check for a successful deployment .
Congratulations!
You've just built and deployed a backend API and a web client to production App Engine!
We haven't looked at the backend API code yet. So let's walk through the code next to get an understanding of how a backend API is implemented.