To create a new project, you'll need to use an App Engine-provided Maven App
Engine artifact called
appengine-skeleton-archetype
, as described in
Creating the project
. The App Engine Maven artifact is
what creates the project layout and files required to deploy and run on App
Engine.
After project creation, you'll need to configure the new project, as described in Configuring the project .
Creating the project
To create the project:
-
Change to a directory where you want to build your project.
-
From the command line invoke Maven as follows:
mvn archetype:generate -
When prompted to Choose a number or apply filter , supply the value
com.google.appengine.archetypes:skeleton-archetypeto display a short list of archetypes matching the filter. -
When prompted to Choose a number or apply filter , supply the number displayed for the value
remote -> com.google.appengine.archetypes:appengine-skeleton-archetype, which currently is the number1. -
When prompted to Define value for property 'groupId' , supply the value
com.google.appengine.demos. -
When prompted to Define value for property 'artifactId' , supply the value
guestbook. -
When prompted to Define value for property 'version' , accept the default value.
-
When prompted to Define value for property 'package' , accept the default value.
-
When prompted to confirm your choices, accept the default value (Y).
-
Wait for the project to finish generating. At this point, the basic project layout with required files is complete. Inside the directory where you created the project, you'll have a subdirectory named
guestbook, which contains apom.xmlfile and two subdirectories:guestbook-earandguestbook-war, similar to the layout shown here: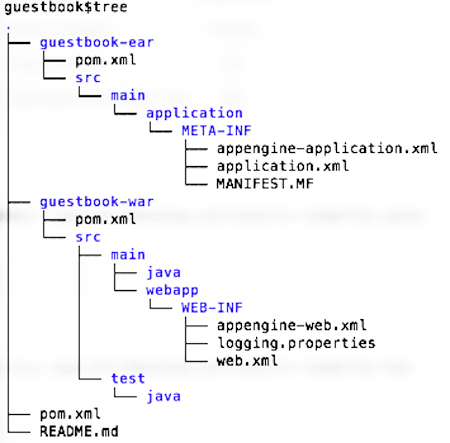
We'll describe what to do inside these two subdirectories later. (Notice that the location where you'll add your own Java source code is inside
guestbook-war/src/main/java.)
Now you are ready to configure the project.
Configuring the project
To configure the project:
-
You'll need a project ID in order to deploy your app to production App Engine. Create a new project as follows:
- Visit Google Developers Console in your web browser, and click Create Project .
- Supply the project name Guestbook and accept the project ID that is auto-generated for you.
- Click Create .
Make a note of the project ID, since you'll need it in the next step.
-
Return to the terminal window for your Maven project, and edit the file
guestbook/guestbook-ear/src/main/application/META-INF/appengine-application.xml, so that the element<application>contains the project ID you just obtained above. -
Edit
guestbook/pom.xmlin the main application directory so that<appengine.target.version>inside the<properties>element points to the most recent App Engine SDK version. Currently, this is 1.9.9.Your completed work should look like this:
<properties> <project.build.sourceEncoding>UTF-8</project.build.sourceEncoding> <appengine.target.version>1.9.9</appengine.target.version> </properties> -
In the main app directory
guestbook, invoke Maven as follows to make sure the project is buildable:mvn clean installYou should get a success message
[INFO] BUILD SUCCESS.
You are now ready to add your own application code and UI.