Using Apache Maven
Apache Maven is a software project management and comprehension tool. It is capable of building WAR files for deployment into App Engine. The App Engine team provides both a plugin and Maven Archetypes for the purpose of speeding up development.
Requirements
You need the following:
-
You must use Java 7. If you don't have Java 7, Download and install it.
-
Set your
JAVA_HOMEenvironment variable. If you are abashuser-
For a typical Linux installation, add a line similar to the following to your
.bashrcfile:export JAVA_HOME=/usr/local/tools/java/jdk1.7.0_45.jdk -
If you use Mac OSX and the default Terminal app, your shell session doesn't load
.bashrcby default. So you may need to add a line similar to the following to your.bash_profile:[ -r ~/.bashrc ] && source ~/.bashrc -
If you use Mac OSX but don't use the default terminal app, for example, you use a terminal management app such as tmux, you may need to add a line similar to the following line to your
.bashrcfile:export JAVA_HOME=/Library/Java/JavaVirtualMachines/jdk1.7.0_45.jdk/Contents/Home
-
-
If you don't have Maven installed, download and install Maven.
A note about Maven projects and Eclipse
A Maven project has a different layout than an Eclipse project. So, if you wish to use a Maven project with Eclipse, you'll need to use Eclipse for Java Enterprise Edition (EE), which has Maven support, and you'll need to use one of the following approaches:
- Import the Maven project into Eclipse for Java EE.
- Import a Maven project for App Engine into Eclipse for Java EE as a Web Tools Platform (WTP) project , as described in Importing an Existing Maven Project .
-
Set up two debug configurations, one for the Maven project in
devserver (
mvn appengine:devserver), and one for a Remote Java Application that you use to connect the Eclipse debug client to thedevserver jvm. For details on how to do this, see the response to the StackOverflow question How do I make Eclipse and mvn appengine:devserver talk to each other? .
Maven terms you need to know
During project creation, Maven prompts you to supply
groupId
,
artifactId
,
version
, and the
package
for the project. What are these in Maven?
| Term | Meaning |
|---|---|
groupId
|
A namespace within Maven to keep track of your artifacts. When people consume your project in their own Maven Project, it will serve as an attribute of the dependency they will end up specifying. |
artifactId
|
The name of your project within Maven. It is also specified by consumers of your project when they depend on you in their own Maven projects. |
version
|
The initial Maven version you want to have your project generated with. It's a good idea to have
version
suffixed by
-SNAPSHOT
because this will provide support in the Maven release plugin for versions that are under development. For more information, see the
Maven guide
to using the release plugin.
|
package
|
The Java package created during the generation. |
Installing Maven
If you do not already have Maven version 3.1 or greater installed on your system, visit the Apache Maven web site to download and install it.
When Maven is installed and the
mvn
command is on your command path, you can
run the following command to verify that it works, and see which version is
installed:
mvn -v
Make sure the version is 3.1 or greater.
Maven App Engine archetypes
Maven Archetypes allow users to create Maven projects using templates that cover common scenarios. App Engine takes advantage of this Maven feature to provide some useful App Engine archetypes at Maven Central. The current App Engine artifacts are listed in the table below:
| Application Type | Artifact | Description |
|---|---|---|
| App Engine app* |
guestbook-archetype
|
Generates the guestbook demo sample, complete and ready to run and test. |
| App Engine app* |
appengine-skeleton-archetype
|
Generates a new, empty App Engine project ready for your own classes and resources, but with required files and directories. |
| Cloud Endpoints API backend |
hello-endpoints-archetype
|
Generates a simple starter Cloud Endpoints backend API project, ready to build and run. |
| Cloud Endpoints API backend |
endpoints-skeleton-archetype
|
Generates a new, empty Cloud Endpoints backend API project ready for your own classes and resources, with required files and directories. |
*
App Engine app
in this context means a regular App Engine app,
not
an
app serving as a Cloud Endpoints backend API.
Creating App Engine applications or backend APIs using the archetypes
The following table shows how to use App Engine Maven archetypes to create an App Engine app or a Cloud Endpoints backend API. Click on the desired app type to see the instructions.
App Engine App
To create an App Engine App:
-
Change directory to a directory where you want to build the project.
-
Invoke the following Maven command:
mvn archetype:generate -
When prompted to
Choose a number or apply filter, supply the valuecom.google.appengine.archetypes:. The various App Engine archetypes will be located and displayed in a short list preceded with a number, for example:1: remote -> com.google.appengine.archetypes:appengine-skeleton-archetype (-) -
If you want to create the complete, ready-to-run demo Guestbook app, supply the number corresponding to
guestbook-archetype.If you want to create an empty project that contains the required directory structure and files, ready for your own classes, supply the number corresponding to
appengine-skeleton-archetype. -
If prompted, select the most recent version from the displayed list of available archetype versions.
-
When prompted to
Define value for property 'groupId', supply the namespace for your app; for example,com.mycompany.myapp. (For the Guestbook demo app, supply the valuecom.google.guestbook.) -
When prompted to
Define value for property 'artifactId', supply the project name; for example,myapp. (For the Guestbook demo app, supply the valueguestbook.) -
When prompted to
Define value for property 'version', accept the default value. -
When prompted to
Define value for property 'package', accept the default value. -
When prompted to confirm your choices, accept the default value (
Y). -
Wait for the project to finish generating. then change directories to the new project directory, for example
guestbook/. -
Build the project by invoking
mvn clean install -
Wait for the project to build. When the project successfully finishes you will see a message similar to this one:
BUILD SUCCESS Total time: 10.724s Finished at: Thur Jul 04 14:50:06 PST 2013 Final Memory: 24M/213M -
If you created the sample Guestbook demo app:
-
Test the application locally in the development server as follows:
mvn appengine:devserverWait for the dev server to start up. When it finishes starting up, you will see a message similar to this:
Jul 04, 2013 2:56:42 PM com.google.appengine.tools.development.DevAppServerImpl start INFO: The server is running at http://localhost:8080/ Jul 04, 2013 2:56:42 PM com.google.appengine.tools.development.DevAppServerImpl start INFO: The admin console is running at http://localhost:8080/_ah/admin -
Visit the application at the default URL and port
http://localhost:8080/used by the development server. You will see the guestbook demo app. -
To shut down the app and the development server, press Control+C in the Windows/Linux terminal window you started it in, or CMD+C on the Mac.
-
-
If you created a new, empty app, you need to do some quick configuration.
-
Before starting to code your own classes for the app, familiarize yourself with the basic project layout and the required project files is complete: inside the directory where you created the project, you'll have a subdirectory named
myapp, which contains apom.xmlfile and two subdirectories:myapp-earandmyapp-war, similar to the layout shown here: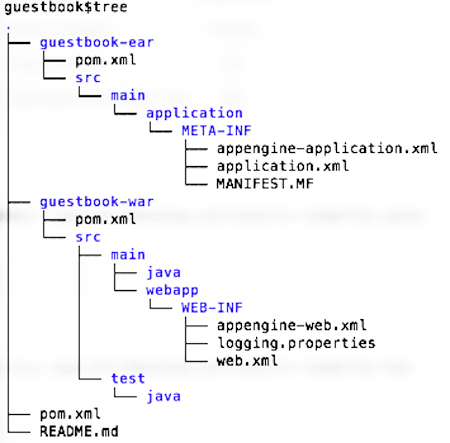
We'll describe what to do inside these two subdirectories later. (Notice that the location where you'll add your own Java source code is inside
myapp-war.) -
Change directory to the main app directory, for example,
myapp, which contains apom.xmlfile and themyapp-earandmyapp-warsubdirectories. -
Edit
pom.xmlinmyappso that points to the most recent App Engine SDK version, which currently is 1.9.9:<properties> <project.build.sourceEncoding>UTF-8</project.build.sourceEncoding> <appengine.target.version>1.9.9</appengine.target.version> </properties> -
Now add your classes as desired.
-
Cloud Endpoints Backend API
To create a Cloud Endpoints backend API project:
-
Change directory to a directory where you want to build the project.
-
Invoke the following Maven command:
mvn archetype:generate -Dappengine-version=1.9.9 -Dfilter=com.google.appengine.archetypes:where
-Dappengine-versionis set to the most recent App Engine Java SDK version. -
If you want to create the complete, ready-to-run Hello Endpoints backend API, supply the number corresponding to
hello-endpoints-archetype.If you want to create an empty project that contains the required directory structure and files, ready for your own classes, supply the number corresponding to
endpoints-skeleton-archetype. -
Select the most recent version from the displayed list of available archetype versions by accepting the default.
-
When prompted to
Define value for property 'groupId', supply the namespace for your app; for example,com.mycompany.myapp. (For the Hello Endpoints sample backend API, supply the valuecom.google.appengine.samples.helloendpoints.) -
When prompted to
Define value for property 'artifactId', supply the project name; for example,myapp. (For the Hello Endpoints sample, supply the valuehelloendpoints.) -
When prompted to
Define value for property 'version', accept the default value. -
When prompted to
Define value for property 'package', accept the default value. -
When prompted to confirm your choices, accept the default value (
Y). -
Wait for the project to finish generating. then change directories to the new project directory, for example
helloendpoints/. -
Build the project by invoking
mvn clean install -
Wait for the project to build. When the project successfully finishes you will see a message similar to this one:
[INFO] BUILD SUCCESS [INFO] ------------------------------------------------------------------------ [INFO] Total time: 14.846s [INFO] Finished at: Tue Jun 03 09:43:09 PDT 2014 [INFO] Final Memory: 24M/331M -
If you created the sample Hello Endpoints sample backend API:
-
Test the application locally in the development server as follows:
mvn appengine:devserverWait for the dev server to start up. When it finishes starting up, you will see a message similar to this one:
[INFO] INFO: Module instance default is running at http://localhost:8080/ [INFO] Jun 03, 2014 9:44:47 AM com.google.appengine.tools.development.AbstractModule startup [INFO] INFO: The admin console is running at http://localhost:8080/_ah/admin [INFO] Jun 03, 2014 9:44:47 AM com.google.appengine.tools.development.DevAppServerImpl doStart [INFO] INFO: Dev App Server is now running -
Visit the URL
http://localhost:8080to send requests to the backend API
-
-
If you created a new, empty app:
-
Familiarize yourself with the basic project layout shown here:

YourFirstAPI.javais a starter file for your own API. (You aren't required to use this name.) -
Add your classes as desired.
-
Compile and build your project using Maven
To build an app created with the Maven App Engine archetypes:
-
Change directory to the main directory for your project, for example,
guestbook/ -
Invoke Maven as follows:
mvn clean install -
Wait for the project to build. When the project successfully finishes you will see a message similar to this one:
BUILD SUCCESS Total time: 10.724s Finished at: Thur Jul 04 14:50:06 PST 2014 Final Memory: 24M/213M -
Optionally, test the application using the following procedure.
Testing your app with the development server
During the development phase, you can run and test your app at any time in the development server by invoking the App Engine Maven plugin. The procedure varies slightly depending on the artifact used to create the project, so click on the appropriate tab below:
App Engine App
To test your app:
-
If you haven't already done so, build your app (
mvn clean install). -
Change directory to the top level of your project's EAR hierarchy (for example, to
myapp-ear) and invoke Maven as follows:mvn appengine:devserverWait for the the server to start. When the server is completely started with your app running, you will see a message similar to this one:
Jul 04, 2014 2:56:42 PM com.google.appengine.tools.development.DevAppServerImpl start INFO: The server is running at http://localhost:8080/ Jul 04, 2013 2:56:42 PM com.google.appengine.tools.development.DevAppServerImpl start INFO: The admin console is running at http://localhost:8080/_ah/admin -
Use your browser to visit
http://localhost:8080/to access your app. -
Shut down the app and the development server by pressing Control+C in the Windows/Linux terminal window where you started it, or CMD+C on the Mac.
Cloud Endpoints Backend API
To test your app:
-
If you haven't already done so, build your app (
mvn clean install). -
Change directory to your project's main directory
/myapp) and invoke Maven as follows:mvn appengine:devserverWait for the the server to start. When the server is completely started with your app running, you will see a message similar to this one:
Jul 04, 2014 2:56:42 PM com.google.appengine.tools.development.DevAppServerImpl start INFO: The server is running at http://localhost:8080/ Jul 04, 2013 2:56:42 PM com.google.appengine.tools.development.DevAppServerImpl start INFO: The admin console is running at http://localhost:8080/_ah/admin -
Use your browser to visit
http://localhost:8080/to access your app, or, alternatively, to test the API using the built-in Google API Explorer, visithttp://localhost:8080/_ah/api/explorer. -
Shut down the app and the development server by pressing Control+C in the Windows/Linux terminal window where you started it, or CMD+C on the Mac.
Uploading your app to production App Engine
The upload procedure varies slightly depending on the artifact used to create the project, so click on the appropriate tab below:
App Engine App
To upload an app created with the the
appengine-skeleton-archetype
:
-
Change directory to the top level of your project's EAR hierarchy (for example,
myapp/myapp-ear) and invoke Maven as follows:mvn appengine:update -
You will be prompted for an authorization code in the terminal window and your web browser will launch with a consent screen which you must accept in order to be authorized. Follow the prompts to copy any codes from the browser to the command line.
Cloud Endpoints Backend API
To upload an app created with the the
endpoints-skeleton-archetype
:
-
Change directory to your project's main directory (for example,
/myapp) and invoke Maven as follows:mvn appengine:update -
You will be prompted for an authorization code in the terminal window and your web browser will launch with a consent screen which you must accept in order to be authorized. Follow the prompts to copy any codes from the browser to the command line.
Configuring
pom.xml
settings
If you use the App Engine Maven
skeleton-archetype
to create your project,
all of the required
pom.xml
settings are set for you in your project's
main
pom.xml
file (
myapp/pom.xml
), although you should
specify the latest App Engine SDK version for the
<appengine.target.version>
.
If you want to use JUnit dependencies (optional), you can do so by setting
them in
myapp/myapp-war/pom.xml
, as follows:
    <dependency>
        <groupId>junit</groupId>
        <artifactId>junit</artifactId>
        <version>4.10</version>
        <scope>test</scope>
    </dependency>
    <dependency>
        <groupId>org.mockito</groupId>
        <artifactId>mockito-all</artifactId>
        <version>1.9.0</version>
        <scope>test</scope>
    </dependency>
    <dependency>
        <groupId>com.google.appengine</groupId>
        <artifactId>appengine-testing</artifactId>
        <version>1.9.9</version>
        <scope>test</scope>
    </dependency>
    <dependency>
        <groupId>com.google.appengine</groupId>
        <artifactId>appengine-api-stubs</artifactId>
        <version>1.9.9</version>
        <scope>test</scope>
    </dependency>
Notice that the
scope
is set to
test
):
Adding the App Engine Maven plugin to an existing Maven project
To add the Google App Engine Maven plugin to an existing Maven project, add the
following into the
plugins
section in the project
pom.xml
file:
<plugin>
   <groupId>com.google.appengine</groupId>
   <artifactId>appengine-maven-plugin</artifactId>
   <version>1.9.9</version>
</plugin>
Specifying a port for local testing
When you run your app in the local development server, the default port is
8080
. You can change this default by modifying the plugin entry for
appengine-maven-plugin
(or adding it if it doesn't exist). For example, we
specify port and address in the following
<plugin>
entry within
<plugins>
inside the main app directory
pom.xml
file (
myapp/pom.xml
):
    <plugin>
         <groupId>com.google.appengine</groupId>
         <artifactId>appengine-maven-plugin</artifactId>
         <version>1.9.9</version>
         <configuration>
             <enableJarClasses>false</enableJarClasses>
             <port>8181</port>
             <address>0.0.0.0</address>
         </configuration>
    </plugin>
Notice that the
<port>
sets the port here to
8181
as shown, and the address
0.0.0.0
is specified, which means the development server will listen to
requests coming in from the local network.
Managing and running a project with the App Engine Maven plugin
The App Engine Maven plugin enables support for App Engine within Maven. It provides the ability to use the development server and the majority of the functionality of the appcfg tool.
The plugin also provides Google Cloud Endpoints goals for discovery doc generation and client library generation.
Once the App Engine Maven plugin is added to the project's
pom.xml
file,
several App Engine-specific Maven goals are available. To see all of the
available goals, invoke the command:
mvn help:describe -Dplugin=appengine
App Engine Maven plugin goals
The App Engine Maven plugin goals can be categorized as devserver goals, app and project management goals, and Endpoints goals.
Development server goals
These are the development server goals:
-
appengine:devserver -
Runs the App Engine development server. When the server is running, it continuously checks to determine whether
appengine-web.xmlhas changed. If it has, the server does a hot reload of the application. This means that you do not need to stop and restart your application because of changes toappengine-web.xml. The following parameters are available:-
<fullScanSeconds> -
<address> -
<disableUpdateCheck> -
<jvmFlags> -
<port> -
<server>
For example, to enable running the server in debug mode on port 8000 without suspending at start time, you can use the following flags:
<jvmFlags>
  <jvmFlag>-Xdebug</jvmFlag>
  <jvmFlag>-agentlib:jdwp=transport=dt_socket,address=8000,server=y,suspend=n</jvmFlag>
</jvmFlags>
By default, the
<fullScanSeconds>flag is set to 5 seconds, which means server is checking every 5 seconds for changes in the web application files, and reloads the application automatically. This is useful with IDEs that support the compile on save feature like NetBeans. In order to use this feature, you must configure the<build>section as follows:<build> <outputDirectory>target/${project.artifactId}-${project.version}/WEB-INF/classes</outputDirectory> <plugins> .... </plugins> </build> -
-
appengine:devserver_start -
Performs an asynchronous start for the devserver and then returns to the command line. When this goal runs, the behavior is the same as the
devservergoal except that Maven continues processing goals and exits after the server is up and running. -
appengine:devserver_stop -
Stops the development server. Available only if you started the development server with
appengine:devserver_start.
Application management goals
For application and project management, the goals are listed in the following table:
| Goal | Description |
|---|---|
appengine:backends_stop
|
This stops any running development server listening on the port as configured in your
pom.xml
file. This goal can be used in conjunction with the
devserver_start
command to do integration tests with the Maven plugin.
|
appengine:backends_configure
|
Configure the specified backend. |
appengine:backends_delete
|
Delete the specified backend. |
appengine:backends_rollback
|
Roll back a previously in-progress update. |
appengine:backends_start
|
Start the specified backend. |
appengine:backends_update
|
Update the specified backend or (if no backend is specified) all backends. |
appengine:enhance
|
Runs the App Engine Datanucleus JDO enhancer. |
appengine:rollback
|
Rollback an in-progress update. |
appengine:set_default_version
|
Set the default application version. |
appengine:update
|
Create or update an app version. |
appengine:update_cron
|
Update application cron jobs. |
appengine:update_dispatch
|
Update the application dispatch configuration. |
appengine:update_dos
|
Update application DoS protection configuration. |
appengine:update_indexes
|
Update application indexes. |
appengine:update_queues
|
Update application task queue definitions. |
appengine:vacuum_indexes
|
Delete unused indexes from application. |
appengine:start_module_version
|
Start the specified module version. |
appengine:stop_module_version
|
Stop the specified module version. |
Troubleshooting upload errors
If you use the update goal, your update attempt may fail with a message similar
to this one:
404 Not Found This application does not exist (app_id=u'your-app-ID')
.
This error will occur if you have multiple Google accounts and are using the
wrong account to perform the update.
To solve this issue, change directories to
~
, locate a file
named
.appcfg_oauth2_tokens_java
, and rename it. Then try updating
again.
Managing Versions with
versions-maven-plugin
command options
The
versions-maven-plugin
provides several useful command options for managing versions in your Maven
project. The following table lists useful activities supported by
versions-maven-plugin
:
| Command | Description |
|---|---|
mvn versions:display-dependency-updates
|
Shows dependency updates (including app engine libs) |
mvn versions:display-plugin-updates
|
Shows plugin updates (including appengine-maven-plugin) |
mvn versions:use-latest-versions
|
Automatically updates to the latest versions and makes a backup of the original
pom.xml
.
|
mvn versions:commit
|
Removes the backup and makes the change permanent. |
mvn versions:revert
|
Restores
pom.xml
with the contents of the backup
pom.xml
.
|
Cloud Endpoints goals
These are the Endpoints goals:
-
appengine:endpoints_get_client_lib -
Generate a zip file in the directory
${project.build.directory}/generated-sources/appengine-endpoints/WEB-INFfor the Java client library for your endpoints. -
appengine:endpoints_get_discovery_doc -
A combination of both
gen-api-configandgen-discovery-doccommands. The Endpoints API and discovery documents for both REST and RPC are generated in the${project.build.directory}/generated-sources/appengine-endpoints/WEB-INFdirectory. The sourceweb.xmlis automatically changed with the addition of the Endpoints servlet and the correct Endpoints classes. In order to use the generated artifacts, you need to configure the Maven WAR plugin as follows:<plugin> <groupId>org.apache.maven.plugins</groupId> <artifactId>maven-war-plugin</artifactId> <version>2.3</version> <configuration> <webXml>${project.build.directory}/generated-sources/appengine-endpoints/WEB-INF/web.xml</webXml> <webResources> <resource> <directory>${project.build.directory}/generated-sources/appengine-endpoints</directory> <includes> <include>WEB-INF/*.discovery</include> <include>WEB-INF/*.api</include> </includes> </resource> </webResources> </configuration> </plugin>
You can automatically call this goal as part of a Maven build by configuring the App Engine Maven plugin as follows:
    <plugin>
            <groupId>com.google.appengine</groupId>
            <artifactId>appengine-maven-plugin</artifactId>
            <version>1.9.9</version>
            <configuration>
              <enableJarClasses>false</enableJarClasses>
            </configuration>
            <executions>
              <execution>
                <goals>
                  <goal>endpoints_get_discovery_doc</goal>
                </goals>
              </execution>
            </executions>
          </plugin>
For a reference configuration, see the Endpoint sample application appengine-tictactoe-java-maven .