Use the Google Developers Console to perform simple storage management tasks on the Google Cloud Storage system. Some typical uses for Google Developers Console include:
- Enabling the Google Cloud Storage API for a project
- Creating and deleting buckets
- Uploading, downloading, and deleting objects
- Managing access control lists (ACLs) for objects and buckets
This guide discusses how to access Google Developers Console and how to use it to manage your data.
You can also accomplish all the tasks discussed here using the gsutil command line tool or any of the libraries that support Google Cloud Storage.
Contents
Accessing Google Developers Console
Google Developers Console requires no setup or installation and you can access it directly in a browser. Depending on your use case, you access Developers Console in slightly different ways. If you are:
- A project member
-
Use: https://console.developers.google.com/
In order to use Google Developers Console as a project member, you must be added to the project’s member list. A current project owner can give you owner, editor, or viewer access to the project which applies to all buckets defined in the project. For more information, see Adding a member to a project .
- A user granted read or write access to a bucket
-
Use:
              https://console.developers.google.com/storage/

               <bucket-name>

              /
In this use case, a project owner or editor gives you read or write access to a bucket and then sends you the bucket name which you substitute into the URI above. You will be able to only work with objects in the specified bucket. This use case is useful for users who are not project members, but who need to access a bucket. This URL will prompt you to authenticate with a Google account if you are not already signed in.
A variation of this use case is when a project owner or editor grants Reader permission to the bucket entity All Users . This creates a bucket whose contents are publicly readable.
- A user viewing or downloading a public object
-
Use:
              https://storage.cloud.google.com/

               <bucket-name>

              /

               <object-name>
In this use case, a project owner or editor configures an object as publicly viewable and sends you the URL to access the object. This URL will prompt you to authenticate with a Google account if you are not already signed in.
Compare the form of the URL above (
storage.cloud.google.com) with the one shown in the Sharing your data publicly instructions. When you share a link publicly, the URL is of the form:https://storage.googleapis.com/ <bucket-name> / <object-name>. This URL does not require a recipient to authenticate with Google and can be used for non-authenticated access to an object.
To access a storage project as a project member:
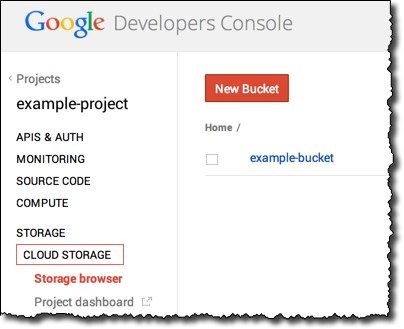
- Go to the Google Developers Console, https://console.developers.google.com/ .
- Select the name of the project to go to an overview of the project.
- If you haven't already, set up billing for a project by clicking Billing & Settings in the left sidebar, and then clicking Enable billing .
-
In the left sidebar, expand the
STORAGE
section, click
CLOUD STORAGE
, and then click
Storage browser
to list the buckets
for the project or create a new bucket.
Using Google Developers Console to Manage Your Data
Google Developers Console enables you to perform basic storage management tasks on your data through a simple interface, including:
- Creating a bucket
- Uploading data to a bucket
- Downloading data from a bucket
- Creating and using folders
- Deleting objects, folders, and buckets
- Sharing your data publicly
- Setting object permissions and metadata
- Filtering objects to view
- Adding a member to a project
Creating a bucket
Google Cloud Storage uses a flat namespace to store your data but you can use Google Developers Console to create folders and mimic a folder hierarchy. Your data isn't physically stored in a hierarchical structure, but is displayed like that in Developers Console.
Because Google Cloud Storage has no notion of folders, the folder suffix and object name delimiters are visible when you view your folders using gsutil or any other command-line tools that may work with Google Cloud Storage. You can use many tools to manage your data but there are some differences between Google Developers Console and command-line tools like gsutil that you should be aware of.
To create a bucket
-
In the
Developers Console
, click
New Bucket
.

-
In the
New Bucket
dialog, enter a name and click
Create
.
For information about acceptable bucket names, see Bucket Name Requirements .

Uploading data to a bucket
You can upload data to your bucket by uploading one or more files or a folder containing files. When you upload a folder, Google Developers Console maintains the same hierarchical structure of the folder, including all of the files and folders it contains. You can track the progress of uploads to Developers Console using the upload progress window. You can minimize the progress window and continue working with your bucket.
Before you upload objects to your bucket, review the Object Name Requirements .
To upload data to a bucket
-
In the
Developers Console
, click
New Bucket
.
-
In the
New Bucket
dialog, enter a name and click
Create
.
For information about acceptable bucket names, see Bucket Name Requirements .
To upload data to a bucket by dragging and dropping files
- In Google Developers Console, navigate to the location in the bucket where you want to put the content.
- From your desktop or file manager tool, select one or more files to upload.
-
Drag the selected items to the object list in Developers Console and release.
Downloading data from a bucket
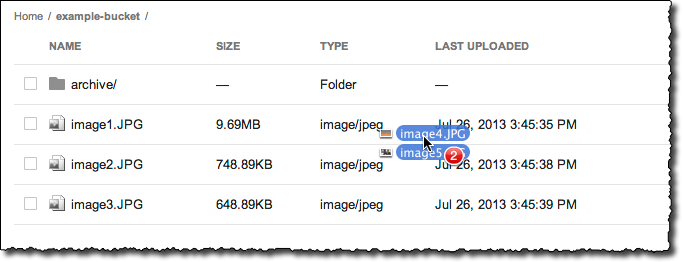
You can download data from your bucket, directly from your browser, by placing the cursor over the object's name, right clicking, and selecting the option to save the object. For example, the following example demonstrates downloading an image using the Google Chrome browser.

If you click an object's name, your browser will try to display the object if it can; otherwise, your browser will download the object or prompt you to download it.
Creating and using folders
Because the Google Cloud Storage system has no notion of folders, folders created in Google Developers Console are a convenience to help you organize objects in a bucket. As a visual aid, Google Developers Console shows folders with a folder icon image to help you distinguish folders from objects.
To create a folder
- In the Developers Console , navigate to a bucket or existing folder in a bucket where you want to create a new folder.
-
Click
New Folder
.

-
In the
New Folder
dialog, provide a name for the folder.

-
Click the folder icon to navigate into the folder.

-
At this point, you can:
- Upload data into the folder or create a new folder.
-
Navigate up to the container of the folder by clicking the container name in the
breadcrumb trail. In the following example, the container of the folder is
the bucket root.

Working with folders in gsutil
When you use other tools to work with your buckets and data, the presentation of folders may be different than in Google Developers Console. For example, when you list the same folder created in the preceding steps using gsutil , you see that the folder name is part of the object name.
$ gsutil ls gs://example-bucket
gs://example-bucket/archive
Deleting objects, folders, and buckets
You can delete any folder or object in Google Developers Console by selecting the checkbox next to it and clicking the delete button. When you delete a folder, you also delete all objects inside it. Note that even objects marked as SHARED PUBLICLY are deleted without a prompt from Google Cloud Storage to confirm your choice.
To delete objects and folders.
Deleting buckets
In order to delete a bucket, you need to delete all folders and objects within that bucket. Google Developers Console prevents you from deleting a bucket with existing objects and displays a warning if you try to.
Note: You can also use gsutil to delete objects and buckets, but you must use Google Developers Console to remove folders.
Sharing your data publicly
With Google Developers Console, you can share your objects easily with others by
making it publicly accessible. You do this by selecting the checkbook in
the
SHARED PUBLICLY
column for the object. When you share
an object publicly, a link appears in the
SHARED PUBLICLY
column which is suitable for sharing. The sharable link references your objects
using the
storage.googleapis.com
domain which is
different than the domain used in Developers Console to navigate in a bucket.
For example, for a bucket named
example-bucket
and an object named
image1.JPG
, the public link to share the object is
http://storage.googleapis.com/example-bucket/image1.JPG
.
Note: If you do not use the SHARED PUBLICLY link and instead right-click on an object and share the URL address to the object, then this URL will redirect users to sign in.
To share an object publicly
-
In the
Developers Console
, click
Upload
and select
Files
or
Folder
.

- In the file dialog, select one or more files or a folder to upload, depending on your selection in the previous step.
- Click Open to start the upload process.
-
A window showing the upload progress is displayed. You can minimize this window and the
upload will continue.

To stop sharing an object publicly
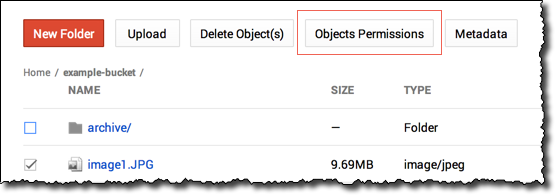
You can stop publicly sharing an object in two ways: by deselecting the checkbox in the SHARED PUBLICLY column or by accessing the Objects Permissions dialog box. The latter approach is shown below to highlight what permissions are changed when you stop sharing an object.
-
In Developers Console, select the object by selecting the checkbox
next to the object's name.
- Click Object Permissions .
-
In the permissions dialog, choose
None
for
All
Users
.
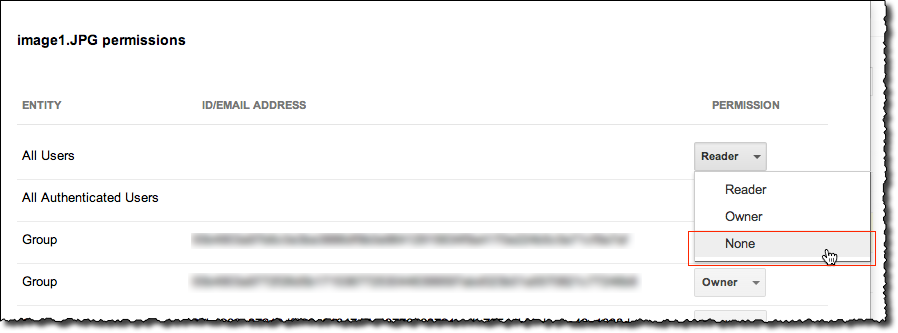
- Click Save .
Setting object permissions and metadata
You can control access to your Google Cloud Storage object data by using Access Control Lists (ACLs) and Signed URLs . In the Developers Console, you can view and configure an object's ACLs. In addition to ACLs, you can also configure an object's metadata in Developers Console. An object's metadata controls aspects of how requests are handled, including what type of content your data represents and how your data is encoded.
You can only set permissions and metadata on one object at a time. You cannot set permissions and metadata on a folder.
To view or change object permissions
- In Developers Console, select the object for which you want to set permissions by checking the box next to the object.
-
To view or change object permissions, select the
Object Permissions
.
-
In the permissions dialog, make changes to the permissions. For example,
you can change an existing ACL by changing its permission or add a new permission.
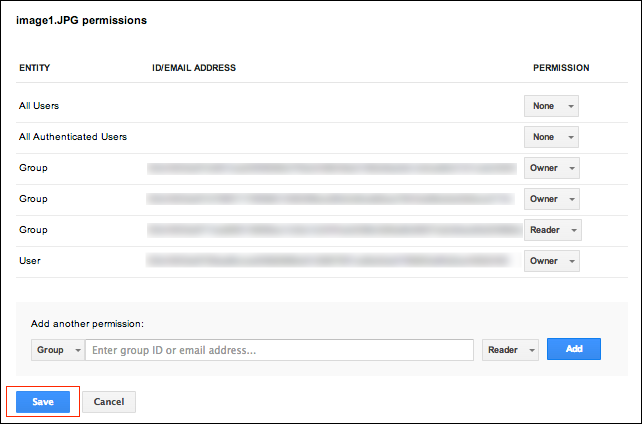
- Click Save to save your permission changes.
To view or change object metadata
- In Developers Console, select the object for which you want to set metadata by checking the box next to the object.
-
To view or change object metadata, select
Metadata
.

-
In the metadata dialog, make changes to the metadata. For example, you
can change values of existing metadata, add new metadata,
or remove existing metadata.
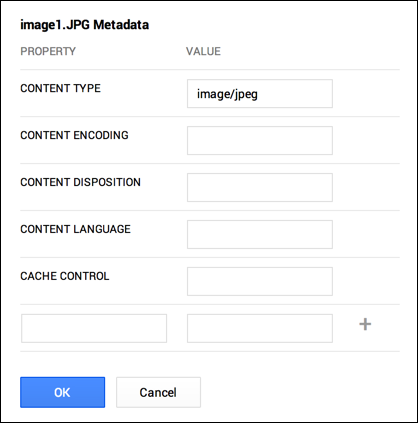
- Click OK to save your metadata changes.
Filtering objects to view
In the Google Developers Console, you can filter the objects you see by specifying a prefix that is used to match the names of objects to display. The prefix filters objects to display only for your current bucket view, that is, the prefix does not select for objects contained in folders.
To view or change object permissions
-
In Developers Console, type a prefix value in the filter box.
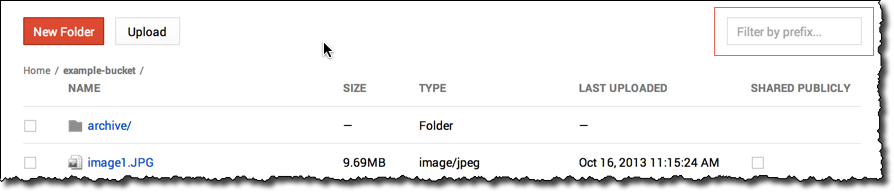
- To remove the filter, clear the filter box.
Adding a member to a project
If you are a not a project owner or a member of a project, you must be added to the project's member list in order to work with its associated buckets and objects. Once you have been added to the member list of the project, the project name appears in your list of projects. If you are an existing project owner, you can add a member to your project using the following steps.
To add a member to a project
- In a browser, navigate to https://console.developers.google.com/ .
- Select the project to which to add a member.
-
In the left sidebar, click
Permissions
.

- Click Add Member .
-
In the
Add Member
dialog specify the email address of the
new team member.
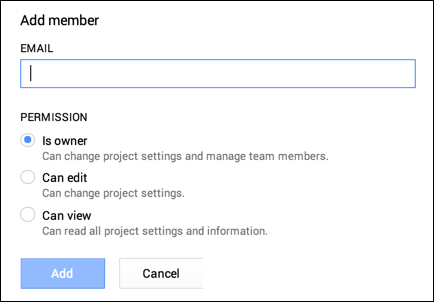
-
Set the appropriate permission for the team member.
In general, set the minimum permission possible while still giving the team member the required access. For example, if the team member needs to only read from a project's bucket, then select the Can view permission. Similarly, if the team member needs to read and write to a project's bucket, then select Can edit . Select the Is owner permission only if the team member needs to change project settings and manage team members.
- Click Add .