After performing the required Cloud SQL tasks to prepare for your web application, you are ready to use the App Engine wizard to create a new project in Eclipse that you can use to connect to a Google Cloud SQL instance.
Contents
- Creating a web application project
- Creating a general coding pattern for use in local and production environments
- Running your application locally
- Deploying your application
Creating a web application project
-
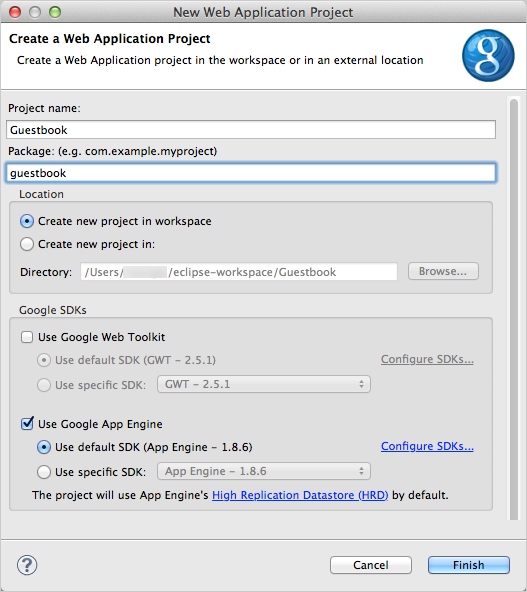
In Eclipse, select
File > New > Web Application Project
and provide a
Project name
,
Package
name, and an optional App ID.
For more detailed instructions, see Creating a Project .
-
Use the default version of the Google App Engine SDK if you don't have a reason to use an
older version. Also, The Google Web Toolkit is not required for the tasks in this section.

- Click Finish .
-
Add the
MySQL Connector/J
JAR to the project.
This library is used when you are connecting from your web application to a development MySQL instance, that is when you are using the The Java Development Server .
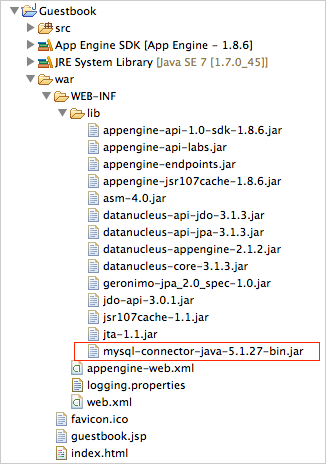
If you downloaded a compressed MySQL Connector/J archive file, extract it and make sure the connector Java JAR is on the build path for the project you just created. A simple way do this by copying the JAR to the /WEB-INF/lib folder of the project. JARs in the WEB-INF/lib folder are automatically included in the classpath for the web application. See the Running your application locally section for more information about to create a launch configuration that does not require putting the JAR into the /WEB-INF/lib folder.
An example project Guestbook is shown below with the MySQL Connector/J JAR added to war/WEB-INF/lib folder in the project.

Creating a general coding pattern for use in local and production environments
You can connect to your Cloud SQL instance from both Java code and Java Server Pages (JSP). Regardless of the code used to connect, you should follow a general pattern that uses the environment (development or production) to set up a connection. The pattern has the following behavior:
- If the application is running in development (i.e., locally), then use the com.mysql.jdbc.Driver to connect to a local database instance.
- If the web application is in production (i.e., the application has been deployed), then use com.mysql.jdbc.GoogleDriver to connect to your Cloud SQL instance.
The following code snippet shows the pattern for Java.
You must provide values for
<your-project-id>
,
<your-instance-name>
, and
<your-database-name>
in the code.
if (SystemProperty.environment.value() == SystemProperty.Environment.Value.Production) {
  // Load the class that provides the new "jdbc:google:mysql://" prefix.
  Class.forName("com.mysql.jdbc.GoogleDriver");
  url = "jdbc:google:mysql://<your-project-id>:<your-instance-name>/<your-database-name>?user=root";
} else {
  // Local MySQL instance to use during development.
  Class.forName("com.mysql.jdbc.Driver");
  url = "jdbc:mysql://127.0.0.1:3306/<your-database-name>?user=root";
}
The snippet can throw checked exceptions that must be declared in a
throws
clause of the surrounding method, or handled in a surrounding
try-catch
block.
The following code snippet shows the pattern for JSP.
<%
String url = null;
if (SystemProperty.environment.value() == SystemProperty.Environment.Value.Production) {
  // Load the class that provides the new "jdbc:google:mysql://" prefix.
  Class.forName("com.mysql.jdbc.GoogleDriver");
  url = "jdbc:google:mysql://<your-project-id>:<your-instance-name>/<your-database-name>?user=root";
} else {
  // Local MySQL instance to use during development.
  Class.forName("com.mysql.jdbc.Driver");
  url = "jdbc:mysql://127.0.0.1:3306/<your-database-name>?user=root";
}
%>
For an example that demonstrates the pattern in both Java and JSP code, see Using Google Cloud SQL with App Engine Java SDK .
Running your application locally
When you finish coding your web application, you can run your app locally in the dev server to test it.
In the Creating a web application project for Google Cloud SQL section, you added the MySQL Connector/J library for development use. When deploying, the library isn't needed because it is automatically available for use by deployed Google App Engine applications. Therefore, when your application is ready to be deployed, you can remove the Connector/J library from the war/WEB-INF/lib folder. It does not hurt to keep it, but it isn't used.
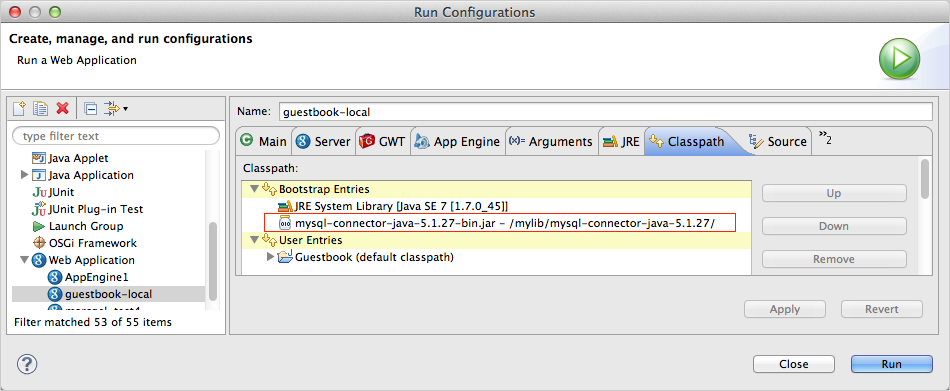
Alternatively, if you just want to use the MySQL Connector/J library for development, but not deploy it, then you can create a custom development launch configuration that links to the library. The example below shows a launch configuration that adds the MySQL Connector/J library to the classpath.

If you run your application locally and receive the error "java.lang.ClassNotFoundException: com.mysql.jdbc.Driver", make sure the MySQL Connector/J JAR is either in the war/WEB-INF/lib folder of your project or on the classpath of the run configuration you are using.
Deploying your application
When you finish testing your web application locally, deploy your web app to App Engine . The App Engine ID you use to deploy must be one that has been granted permission to connect to the Cloud SQL instance used in the web application. To grant permission to an App Engine application, see Configuring access control for App Engine applications .
To use the MySQL Connector/J library in production, add the <use-google-connector-j> element to the app's appengine-web.xml file. For more information see, Enabling MySQL Connector/J .
