Endpoints can be authenticated with Google Accounts using OAuth 2.0. This allows your Endpoint to verify and know the identity of the authenticated user. The instructions below will lead you through the process of adding Authentication to your Endpoints using the CloudNotes sample.
Note:
Android authentication code shown here
requires the
google-play-services.jar
file to be included in your
libs/
folder.
To add authentication support:
-
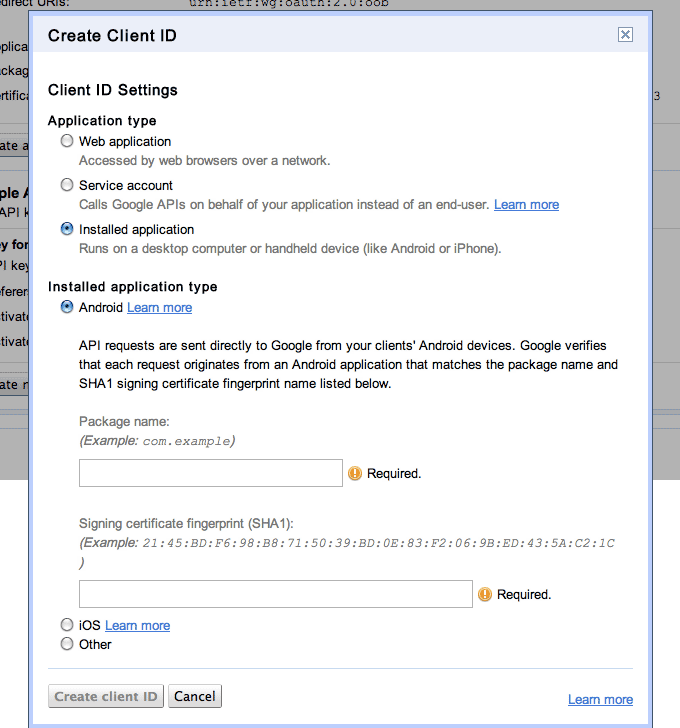
Register a client ID in the Google APIs Console for your Android
application, following the
Google
API Console
instructions on generating OAuth 2.0 client IDs. Be sure to
select
Installed application
(Android) as the Application type:
You use the generated client ID value as your
ANDROID_CLIENT_ID. -
Following that same procedure, create another client ID, but this time for
a Web application. This will be your
WEB_CLIENT_ID. - Create and register an App Engine app ID using the console .
- Add that app ID to your project appengine-web.xml .
-
In the Endpoint class, under the
@Apiannotation (or the@ApiMethodannotation), set theclientIdsattribute to the Android client ID that you generated above, and set theaudienceattribute to the Web client ID you generated above as well, as shown in the following code snippet:@Api(name = "noteendpoint", clientIds = {"<ANDROID_CLIENT_ID_HERE>"}, audiences = {"<WEB_CLIENT_ID_HERE>"}) public class NoteEndpoint {...} -
In your code, import
com.google.appengine.api.users.Userand then add aUserobject as an additional parameter to your method. For an authenticated call, App Engine automatically fills in this attribute with the logged on user. The following code shows adding a User parameter to thelistNote()method:public CollectionResponse<Note> listNote(User user, @Nullable @Named("cursor") String cursorString, @Nullable @Named("limit") Integer limit) {...} -
Modify any methods making Datastore queries to query by the logged
in User’s email address. The following code snippet shows querying for Notes
for a given User in the listNode method:
Query query = mgr.createQuery("select n from Note n where n.emailAddress = :emailAddress"); query.setParameter("emailAddress", user.getEmail()); -
Authenticate the user in the Android application. The credentials obtained
are used when communicating with the Endpoint.
-
In the sample
MainActivity.java
,
add the following variables to the class:
String accountName;
GoogleAccountCredential credential;
static final String WEB_CLIENT_ID = <WEB_CLIENT_ID_HERE>;
static final int REQUEST_ACCOUNT_PICKER = 1;
and these imports:import com.google.api.client.googleapis.extensions.android.gms.auth.GoogleAccountCredential; import android.content.Intent; import android.accounts.AccountManager;
-
Obtain the credentials in the
onCreatemethod. If there is a call toAsyncTaskin the code (which will be the case if your project was created through the App Engine Connected Android wizard), remove it. (AsyncTaskis done after the credentials are obtained.)credential = credential = GoogleAccountCredential.usingAudience(this,"server:client_id:" + WEB_CLIENT_ID); startActivityForResult(credential.newChooseAccountIntent(), REQUEST_ACCOUNT_PICKER);
-
Add the following method after
onCreate. This prepares the credentials once the user has picked the correct account in the UI, and makes a call to the AsyncTask that connects with the Endpoint:@Override protected void onActivityResult(int requestCode, int resultCode, Intent data) { super.onActivityResult(requestCode, resultCode, data); switch (requestCode) { case REQUEST_ACCOUNT_PICKER: if (data != null && data.getExtras() != null) { accountName = data.getExtras().getString(AccountManager.KEY_ACCOUNT_NAME); if (accountName != null) { credential.setSelectedAccountName(accountName); new EndpointsTask().execute(getApplicationContext()); } } break; } } -
Finally, make sure you pass the credentials when communicating with the
Endpoint. Just to demonstrate, we’ll also pass the e-mail address obtained from
the credentials as one of the parameters. In
AsyncTask,endpointBuildershould receive the credential obtained earlier:Noteendpoint.Builder endpointBuilder = new Noteendpoint.Builder( AndroidHttp.newCompatibleTransport(), new JacksonFactory(), credential); -
Just to demonstrate how to do this, let's also pass the e-mail address
obtained from the credentials as a field in the Note. ()The actual authentication
is done on the Endpoint in the backend, through the User object.)
note.setEmailAddress(credential.getSelectedAccountName());
-
In the sample
MainActivity.java
,
add the following variables to the class:
- Deploy the App Engine application to the server.
- Run the app as you usually would, selecting a USB-connected Android device as the target (currently OAuth2 on Android only works on a physical device). Authenticate by selecting an account when prompted to do so.
- Verify that the Notes were inserted in the Datastore Viewer of your App Engine app.
