No matter which method you choose for creating your Android project, you need to define entity classes and annotate them to be usable as Endpoints.
-
You first need to create your Entity class (POJO), which is a class
representing the Endpoint resource that has a set of class attributes with
corresponding setter and getter functions.
To this class, you add JPA annotations (@Entity, @Id etc) or JDO annotations to specify that this entity class needs to be persisted. (These annotations are fully described in the App Engine documentation under JDO or JPA.) For example, the following is a class representing a Note, which you could save as
Note.javaand place it in the sample CloudNotes-AppEngine/src/com/cloudnotes directory.package com.cloudnotes; import javax.persistence.Entity; import javax.persistence.Id; @Entity public class Note { @Id private String id; private String description; private String emailAddress; public Note() { } public String getId() { return id; } public String getDescription() { return description; } public String getEmailAddress() { return emailAddress; } public void setId(String idIn) { this.id = idIn; } public void setDescription(String description) { this.description = description; } public void setEmailAddress(String emailAddress) { this.emailAddress = emailAddress; } } -
Generate the Endpoint class for each Entity class. This generates an
Endpoint class that has the implementation for insert, update, remove, get, list
methods on the Endpoint class using JPA or JDO as specified in the Entity class.
The
@Apiannotation indicates that this is an Endpoint class. You can modify this class as per your needs. To add additional methods, you will need to add the@ApiMethodannotation for each method. For example: asearchNote(String note)method would have the annotation:@ApiMethod (httpMethod=”GET”, name=”note.search”)
Note> In the Endpoint methods, the return value type cannot be simple type such as String or int. The return value needs to be a POJO, an array or a Collection. Also,
list()andget()are exposed as HTTP GETs,insert()is exposed as a HTTP POST,update()is exposed as a HTTP PUT, andremoveNote()is exposed as a HTTP DELETE. -
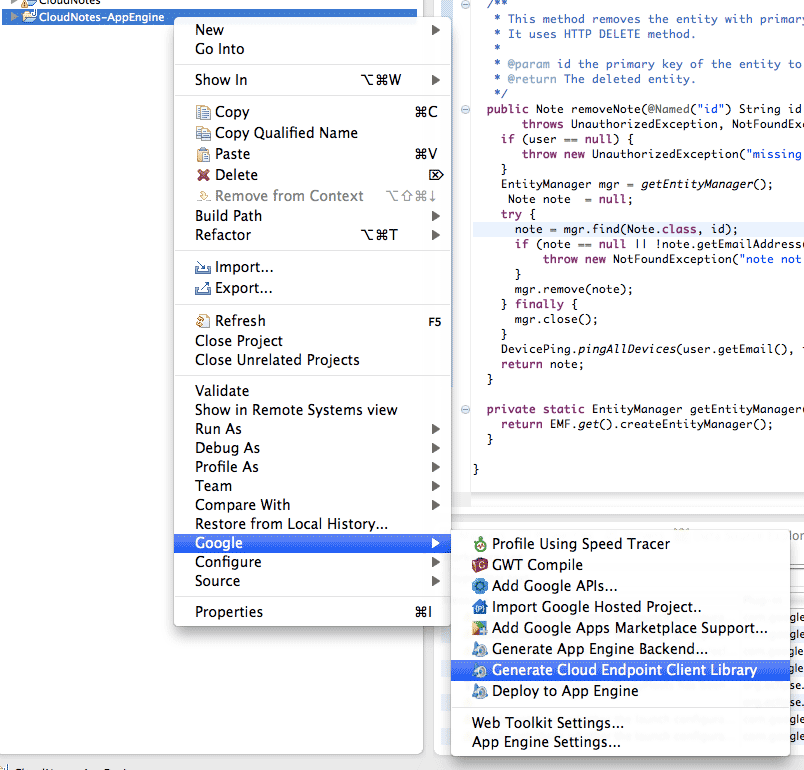
Generate a Cloud Endpoint client Library for the App Engine project by
right-clicking the App Engine project, and selecting
Google > Generate
Cloud Endpoint Client Library
.
You must repeat this every time you add new Endpoints or modify the fields or methods of an existing one.
-
Modify your Android Application to call into your defined Endpoint. You can
write a class that extends the Android AsyncTask to make sure that the network
call to the Endpoint does not block any UI thread, as shown in the following
example, which does an “insert” into a “Noteendpoint”:
-
Add the following lines to the import section of your
MainActivity.java
in the Android Application:
import java.io.IOException;
import java.util.Date;

import android.os.AsyncTask;
import android.content.Context;
import com.cloudnotes.noteendpoint.Noteendpoint;
import com.cloudnotes.noteendpoint.model.Note;
import com.google.api.client.extensions.android.http.AndroidHttp;
import com.google.api.client.http.HttpRequest;
import com.google.api.client.http.HttpRequestInitializer;
import com.google.api.client.json.jackson.JacksonFactory;
-
Add the following inner class within the
MainActivity.java
class
(after the
onCreateOptionsMenu). It create anAsyncTaskthat will create an insert a new Note:public class EndpointsTask extends AsyncTask<Context, Integer, Long> { protected Long doInBackground(Context... contexts) { Noteendpoint.Builder endpointBuilder = new Noteendpoint.Builder( AndroidHttp.newCompatibleTransport(), new JacksonFactory(), new HttpRequestInitializer() { public void initialize(HttpRequest httpRequest) { } }); Noteendpoint endpoint = CloudEndpointUtils.updateBuilder( endpointBuilder).build(); try { Note note = new Note().setDescription("Note Description"); String noteID = new Date().toString(); note.setId(noteID); note.setEmailAddress("E-Mail Address"); Note result = endpoint.insertNote(note).execute(); } catch (IOException e) { e.printStackTrace(); } return (long) 0; } } -
The last piece left is for us to call
AsyncTask. Let’s be sure to add it at the end of onCreate:new EndpointsTask().execute(getApplicationContext());
-
Add the following lines to the import section of your
MainActivity.java
in the Android Application:
At this point, you are ready to test and deploy .
MainActivity.java Source Code
The following is Source Code for
MainActivity.java
package com.cloudnotes;
import java.io.IOException;
import java.util.Date;
import android.os.AsyncTask;
import android.content.Context;
import com.cloudnotes.noteendpoint.Noteendpoint;
import com.cloudnotes.noteendpoint.model.Note;
import com.google.api.client.extensions.android.http.AndroidHttp;
import com.google.api.client.http.HttpRequest;
import com.google.api.client.http.HttpRequestInitializer;
import com.google.api.client.json.jackson.JacksonFactory;
import android.os.Bundle;
import android.app.Activity;
import android.view.Menu;
public class MainActivity extends Activity {
@Override
public void onCreate(Bundle savedInstanceState) {
super.onCreate(savedInstanceState);
setContentView(R.layout.activity_main);
new EndpointsTask().execute(getApplicationContext());
}
@Override
public boolean onCreateOptionsMenu(Menu menu) {
getMenuInflater().inflate(R.menu.activity_main, menu);
return true;
}
public class EndpointsTask extends AsyncTask<Context, Integer, Long> {
        protected Long doInBackground(Context... contexts) {

               Noteendpoint.Builder endpointBuilder = new Noteendpoint.Builder(
              AndroidHttp.newCompatibleTransport(),
              new JacksonFactory(),
              new HttpRequestInitializer() {
              public void initialize(HttpRequest httpRequest) { }
              });
      Noteendpoint endpoint = CloudEndpointUtils.updateBuilder(
      endpointBuilder).build();
      try {
          Note note = new Note().setDescription("Note Description");
          String noteID = new Date().toString();
          note.setId(noteID);

          note.setEmailAddress("E-Mail Address");
          Note result = endpoint.insertNote(note).execute();
      } catch (IOException e) {
        e.printStackTrace();
      }
          return (long) 0;
        }
    }
}
