The click-to-deploy process for Cassandra on Google Compute Engine is intended to help you get a development or test environment running quickly. This document provides the details that you might need regarding software installation and tuning in order to use your cluster. In addition, you can use this deployment approach as a starting point if you choose to launch and maintain your own production Cassandra cluster. You will learn the steps that were performed and a few best practices for bringing up any cluster on Google Compute Engine.
Objectives
- Learn about the click-to-deploy process and the optimizations that were made, such as running instances with the least privileges to ensure stability and security.
- Extend this knowledge to other applications and situations.
Deployment processing
The deployment of the Cassandra cluster is managed by Google Cloud Deployment Manager . Deployment Manager uses templates to help you deploy your configuration. These templates can include actions , which specify shell scripts that can contain specific deployment instructions. In the click-to-deploy templates, these scripts are specific to Cassandra and define the types of Compute Engine instances to create and how to install Cassandra on the instances.
The click-to-deploy templates define two modules:
- Deployment coordinator
- Cassandra server
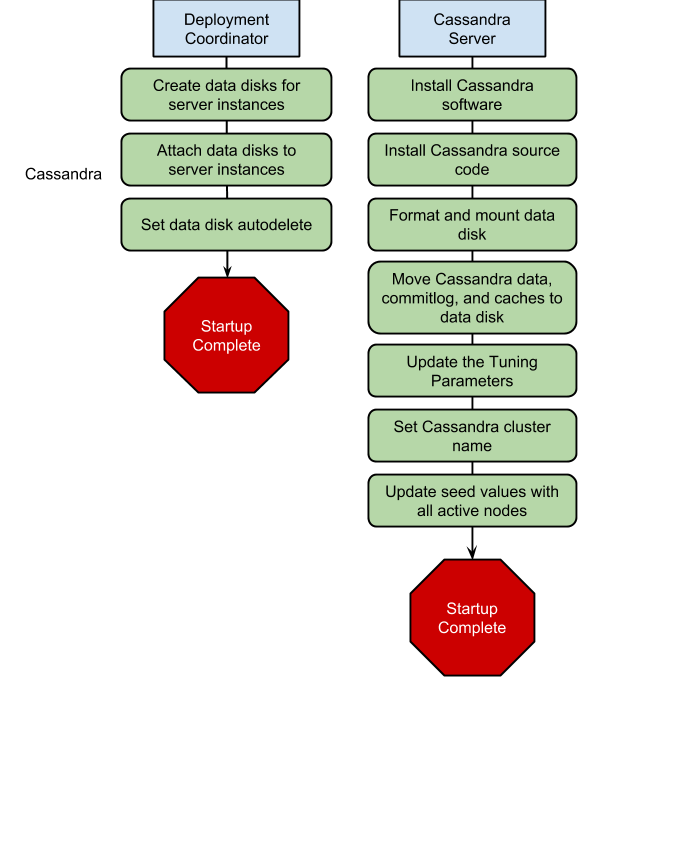
The Compute Engine instances that are associated with each of the modules start concurrently and coordinate the installation and configuration of the Cassandra cluster. Each module is described here and the deployment flow is represented visually below.
Deployment coordinator module
A single, short-lived deployment coordinator instance is created during the deployment. This instance exists to ensure that the long-running Cassandra server instances can run under the principle of least priviledge .
Automatically creating and attaching of
persistent disks
to Compute Engine
instances requires the authorization of the
https://www.googleapis.com/auth/compute
OAuth 2.0 scope. Service account
scopes are granted to a Compute Engine instances when it is created and exists
for the lifespan of that instance.
Rather than granting this scope to the long-running Cassandra server instances, the scope is granted to the deployment coordinator instance. The deployment coordinator creates and attaches a data disk for each Cassandra server instance.
Cassandra server module
When the Cassandra server instances are created, they complete the following steps:
- Download the Cassandra software and source code.
-
Install the Cassandra software and copy the source code to
/usr/src. - Wait for attachment of the data disk by the deployment coordinator.
- Format and mount the data disk.
- Move Cassandra data, commitlog, and saved_caches to the data disk.
-
Update the tuning parameters:
-
cassandra.yaml:-
max_hints_delivery_threads: 8 -
concurrent_writes: 8 * Cores -
commitlog_total_space_in_mb: 2048 -
memtable_flush_writers: 2 -
trickle_fsync: true -
trickle_fsync_interval_in_kb: 4096 -
rpc_server_type: hsha -
concurrent_compactors: 4 -
multithreaded_compaction: true -
compaction_throughput_mb_per_sec: 0 -
endpoint_snitch: GoogleCloudSnitch
-
-
cassandra-env.sh:-
MAX_HEAP_SIZE: defined by the size of box memory ~ 80% -
HEAP_NEWSIZE: 600M -
Stack size: -Xss256 -
SurvivorRatio: 4 -
CMSInitiatingOccupancyFraction: 70 -
Additional Java Options: TargetSurvivorRatio=50, +AggressiveOpts, MaxDirectMemorySize=5g, +UseLargePages
-
-
- Set the Cassandra cluster name in the configuration.
- Update the seed values with all of the active nodes.
On deployment, the Cassandra instances will automatically join the cluster given the cluster name and the list of seed nodes set up above.
Deployment work flow
The following graphic shows the work flow for each of the servers. Most of the steps occur independently. The only step that needs to be coordinated is that the individual Cassandra servers wait for the deployment coordinator to create and attach the data disk.

Next steps
- Configure your virtual machine instances
-
Use
gcutil sshto connect to the external IP addresses for your machines and perform any system configuration that you might need on each server. You can look up your IP addresses by using thegcutil listinstancescommand or you can find them in the Developers Console .
