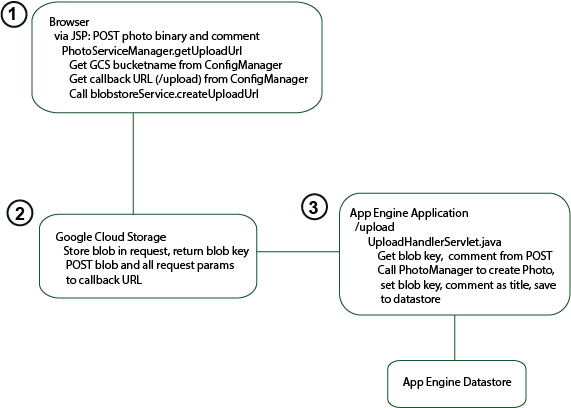
In the Photofeed sample, the user supplies a file and a comment in an file upload form and submits (POSTS) the form.

In this POST, the file is
saved directly to Google Cloud Storage by the
blobstoreService
,
which then POSTs the resulting blob key to the upload handler servlet
(
UploadHandlerServlet.java
), which saves to the datastore the
blob key, the original comment and other information such as timestamp and
the user who uploaded the photo. The diagram shows what
happens in the photo upload flow:

Adding UI Support to the JSP
The user clicks the
Choose an Image
button, which
invokes the
togglePhotoPost()
script to display the upload form
providing a file browser and a text input for a comment that will be
treated as the "title" for the photo.
The
/photo-sharing-demo/war/photofeed.jsp
shows how
the button and upload form are coded:
   <!-- /.account -->
        <a id="btn-choose-image" class="active btn" onclick="togglePhotoPost(true)">Choose an image</a>
        <div id="upload-form" style="display:none">
          <form action="<%= serviceManager.getUploadUrl() %>" method="post"
            enctype="multipart/form-data">
            <input class="inactive file btn" type="file" name="photo">
            <textarea name="title" placeholder="Write a description"></textarea>
            <input class="active btn" type="submit" value="Post">
            <a class="cancel" onclick="togglePhotoPost(false)">Cancel</a>
          </form>
        </div>
The main work of this button is done by the
PhotoServiceManager.getUploadUrl()
method, which is defined
in
PhotoServiceManager.java
as follows:
 public String getUploadUrl() {
    String bucket = configManager.getGoogleStorageBucket();
    BlobstoreService blobstoreService = BlobstoreServiceFactory.getBlobstoreService();
    UploadOptions uploadOptions = UploadOptions.Builder.withGoogleStorageBucketName(bucket);
    return blobstoreService.createUploadUrl(configManager.getUploadHandlerUrl(), uploadOptions);
  }
The
getUploadUrl()
method wraps the
blobstoreService
.
We chose the
blobstoreService
to do the file upload rather
than uploading the file to the App Engine application and using
Google
Cloud Storage
to write the file because the blobstore
feature is asynchronous and helps avoid request timeouts. App Engine
requests time out after 60 seconds or less, depending on use of system
resources. (In the form, notice that the enctype is set to
multipart/form-data, as required by the
blobstoreService
.)
Notice that the bucket used to store photos is obtained from the
configuration manager.
The
blobstoreService.createUploadUrl()
method uploads the
file POSTed from the multi-part form to the specified bucket and returns
(by POST) the resulting blob key and all other non-binary data in the
original request to the handler at the specified upload handler URL. In
our sample, the original request contained comment data (in the
title
param), so the return from
createUploadUrl()
contains the blob key for the uploaded
photo and the comment to be associated with it.
In our Photofeed sample, the upload handler servlet
src.com.google.cloud.demo.UploadHandlerServlet.java
is
running at
/upload
. This handler takes the blob key and the
passed-through comment (in the
title
param), writes them
to a Photo object, stores the Photo object in Datastore, and redirects to
the main Photofeed page displaying the photo that was just uploaded.
The following snippet from that handler
shows how to process the return POST from the uploading via the
blobstoreService
:
public void doPost(HttpServletRequest req, HttpServletResponse res) throws IOException {
    AppContext appContext = AppContext.getAppContext();
    DemoUser user = appContext.getCurrentUser();
    if (user == null) {
      res.sendError(401, "You have to login to upload image.");
      return;
    }
    BlobstoreService blobstoreService = BlobstoreServiceFactory.getBlobstoreService();
    Map<String, List<BlobKey>> blobs = blobstoreService.getUploads(req);
    List<BlobKey> keys = blobs.get("photo");
    String id = null;
    boolean succeeded = false;
    if (keys != null && keys.size() > 0) {
      PhotoManager photoManager = appContext.getPhotoManager();
      Photo photo = photoManager.newPhoto(user.getUserId());
      String title = req.getParameter("title");
      if (title != null) {
        photo.setTitle(title);
      }
      // . . .
      BlobKey blobKey = keys.get(0);
      photo.setBlobKey(blobKey);
// . . .
The code above shows how the blob key is extracted from the request
POSTed to the handler by the
blobstoreService
after
uploading the photo to Google Cloud Storage.
blobstoreService.getUploads()
returns a list of keys, which in our sample, only has one key for the
uploaded single photo. Hence to extract the key and store it in our
Photo object, we just take the first key in the list:
BlobKey blobKey = keys.get(0);
      photo.setBlobKey(blobKey);
The snippet above also shows how the comment supplied by the user for
the photo is saved in the
Photo
entity from the
title
param in the POST request.
Finally, the Photo object is saved to the Datastore and the user is redirected to the application main page with the just-added photo in the display:
      photo = photoManager.upsertEntity(photo);
      id = photo.getId().toString();
      succeeded = true;
    }
    if (succeeded) {
      res.sendRedirect(appContext.getPhotoServiceManager().getRedirectUrl(
          req.getParameter(ServletUtils.REQUEST_PARAM_NAME_TARGET_URL), user.getUserId(), id));
    } else {
      res.sendError(400, "Request cannot be handled.");
    }
  }
