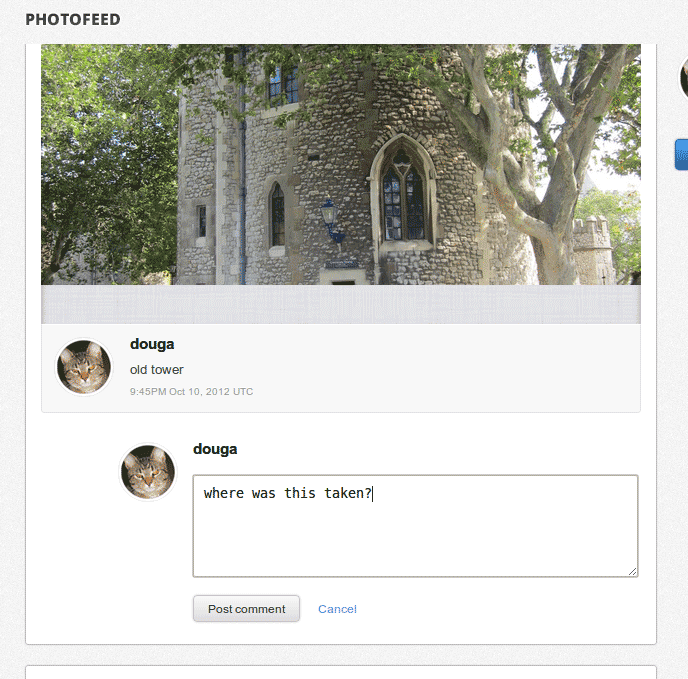
In the Photofeed sample, under the last comment for each picture is a text area field labeled Post a comment . Clicking in this input area displays the comment upload form:

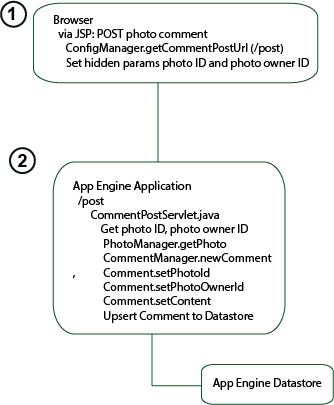
Logged-in users can enter a comment in the text area and click Post comment to save their comment so it is displayed under the photo. The diagram shows what happens in the comment upload flow:

In the comment POST, the comment POST request is sent to the servlet
running at the URL retrieved from the
ConfigManager
, which in
this case is
/post
. In
web.xml
, where we map
servlets to their URLs, we see that
CommentPostServlet
handles
requests POSTed to this URL.
CommentPostServlet
creates a
Comment
object
containing the comment from the request along with the photo ID and other
data and saves this object to the datastore, using
CommentManager
, which does the actual work on the data model
side.
Let's take a closer look at the code.
Adding Comment Support to the Photofeed JSP
The user clicks inside the text field labeled
Post a comment
button, which invokes the
toggleCommentPost()
script to display the upload form. The
comment upload form provides a text area for the comment along with a button
that POSTs the comment.
The
/photo-sharing-demo/war/photofeed.jsp
shows how
the button and comment upload form are coded:
         <div class="comment">
            <h3><%= ServletUtils.getProtectedUserNickname(currentUser.getNickname()) %></h3>
            <form action="<%= configManager.getCommentPostUrl() %>"
              method="post">
              <input type="hidden" name="user" value="<%= photo.getOwnerId()%>" />
              <input type="hidden" name="id" value="<%= photo.getId()%>" />
              <textarea id="comment-input-<%= count %>" class="post-comment collapsed" name="comment"
                placeholder="Post a comment" onclick="toggleCommentPost(<%= count%>, true)"></textarea>
              <input id="comment-submit-<%= count %>" class="inactive btn" style="display:none"
                type="submit" name="send" value="Post comment">
              <a id="comment-cancel-<%= count %>" class="cancel" style="display:none"
                onclick="toggleCommentPost(<%= count %>, false)">Cancel</a>
            </form>
          </div>
In the JSP code, the current user's name is obtained and displayed in the form. Notice that the Photo owner's ID and the Photo ID are sent back in the POST query string hidden, to prevent these values from being changed inadvertently or deliberately.
The comment and the photo ID and photo owner ID are POSTed to the
URL stored in the
ConfigManager
, which in this sample is
/upload
. Because this is an App Engine application, we
know that each servlet is mapped to its URL in the
/war/WEB-INF/web.xml
file, we see that the servlet
handling the POST is CommentPostServlet:
 <servlet-mapping>
    <servlet-name>CommentPostServlet</servlet-name>
    <url-pattern>/post</url-pattern>
  </servlet-mapping
The CommentPostServlet gets the request param values for the photo ID,
photo owner ID, and the comments, and sets them in the
Comment
object prior to supplying that object to the
CommentManager
,
which saves the comment to the datastore. Here is the code in
CommentPostServlet
:
@Override
  protected void doPost(HttpServletRequest req, HttpServletResponse res) throws IOException {
    AppContext appContext = AppContext.getAppContext();
    DemoUser currentUser = appContext.getCurrentUser();
    String id = req.getParameter(ServletUtils.REQUEST_PARAM_NAME_PHOTO_ID);
    String user = req.getParameter(ServletUtils.REQUEST_PARAM_NAME_PHOTO_OWNER_ID);
    String content = req.getParameter(ServletUtils.REQUEST_PARAM_NAME_COMMENT);
    boolean succeeded = false;
    Long photoId = ServletUtils.validatePhotoId(id);
    StringBuilder builder = new StringBuilder();
    if (photoId != null && currentUser != null && user != null && content != null) {
      content = content.trim();
      if (!content.isEmpty()) {
        PhotoManager photoManager = appContext.getPhotoManager();
        Photo photo = photoManager.getPhoto(user, photoId);
        if (photo != null) {
          CommentManager commentManager = appContext.getCommentManager();
          Comment comment = commentManager.newComment(currentUser.getUserId());
          comment.setPhotoId(photoId);
          comment.setPhotoOwnerId(user);
          comment.setTimestamp(System.currentTimeMillis());
          comment.setContent(content);
          comment.setCommentOwnerName(currentUser.getNickname());
          commentManager.upsertEntity(comment);
          succeeded = true;
        } else
In code above, notice the use of
ServletUtils.java
to
store the request param names in one place rather than dispersed in your
code, which is a good practice. Notice also the use of the AppContext
singleton to get context data, such as the current user, the
PhotoManager
, and the
CommentManager
being
used in this session to access photos and comments in the respective
data models.
Notice the explicit validation of the format of the incoming
photo ID value. Notice also how the incoming photo ID and photo owner ID
are used in a call to
PhotoManager
to make sure the photo
actually exists. If it has been deleted, you don't want to save any
comments for it.
If the comment was successfully added, the user is redirected to the main page to the photo and comment just added for that photo:
    if (succeeded) {
      res.sendRedirect(appContext.getPhotoServiceManager().getRedirectUrl(
          req.getParameter(ServletUtils.REQUEST_PARAM_NAME_TARGET_URL), user, id));
    } else {
      res.sendError(400, builder.toString());
    }
