These instructions describe how to get the iOS sample app running with the Mobile Backend. These instructions assume that you have already deployed the backend .
Setup Xcode, Apple certificates and a provisioning profile
These steps will be familiar to an experienced iOS developer, and are explained in more detail in Apple's documentation .
- Download and install Xcode 4.6 on a Mac computer.
- Create an App ID in the Apple iOS Developer Center, with Push Notifications enabled as an app Service.
-
Create an
Apple Push Notification service SSL Certificate
for your
App ID
.
- This will enable the backend to send push notifications to your app.
-
Create an
iOS App Development certificate
for your
App ID
.
- This identifies your app to Apple.
- Create a Provisioning Profile for the App ID using the iOS App Development Certificate and a valid SSL.
- Install both the certificates and the provisioning profile by downloading them from the Apple Developer Centre and double-clicking on them in Finder.
-
Export the Push Notification service SSL Certificate to a *.p12 file so you can upload it to the backend later:
- Open KeyChain Access.
- Browse My Certificates under category on the left.
- Expand the push certificate .
- Select both the push certificate and key.
- Right click and choose to export 2 items.
- Set a password on the certificate.
Create an iOS client ID
The client ID enables the app and the backend to identify each other.
- Open the Google API Console .
- Make sure your project is the currently active project. If it isn't, select it in the upper left project pulldown menu.
- Click API Access on the left hand menu.
- If this is the first client ID for this project, click Create an OAuth 2.0 client ID . If you have already created a client ID for this project, click Create another client ID .
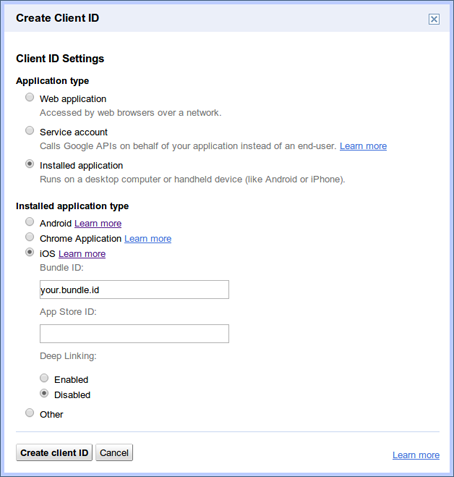
- In the Create Client ID dialog, select Installed application the application type, and iOS for the installed application type.
- Enter the Bundle ID used to create your provisioning profile in the textbox labeled Bundle ID .
-
Leave the App Store ID textbox blank.

-
Click Create client ID.

We will use the client ID in the next sections
Configure the backend to send Apple push notifications
-
Navigate to the Mobile Backend configuration page
https://your-project-id.appspot.com/admin/configure.jsp, replacingyour-project-idwith the Project ID you created when you deployed the backend. - Select Secured by Client IDs under Authentication/Authorization.
- Enter the client ID created in the previous section into the iOS Client ID textbox.
- Enable Google Cloud Messaging and iOS Push Notification .
- Click Select APNS Certificate and Save to upload the .p12 certificate.
-
Type the password you provided to export the Push Notification service SSL Certificate to a .p12 file.
-
Click Save .
Enable billing in App Engine
To enable billing for your project:
- Visit the App Engine Console .
- Click Billing Status on the sidebar.
- Click Enable Billing .
- Follow the billing instructions, including entering credit card details.
- Click on Backends on the sidebar.
-
Click Start for the worker backend instance.
Configure the iOS client app to run with the deployed backend
- Download the iOS client zip file (or clone from GitHub repository ) and unzip to a location of your choice.
-
Use a Finder window and navigate to sample client code. Double click on the
ClientBackendIOSClient.xcodeprojfile to open in Xcode. -
Update the bundle ID to match the ID used to create the SSL certificate and the Provisioning Profile:
-
Select
CloudBackendIOSClientin the project navigator. -
Update the current Bundle Identifier from
com.google.CloudPushSample.devto the bundle ID used to create the provisioning profile.

-
Select
-
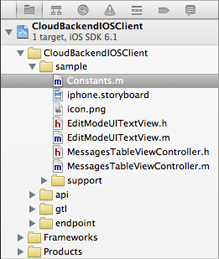
Locate the file
Constants.min the project navigator and open it.

-
Update the values based on the
Client ID
from the
API Console
created in the previous section:
-
Update
kCloudBackendClientIDto match with the Client ID . -
Update
kCloudBackendClientSecretto match the Client Secret . -
Replace { { {
INSERT APP ID}}}inkCloudBackendServiceURLto your Project ID .
-
Update
Update the code signing certificate
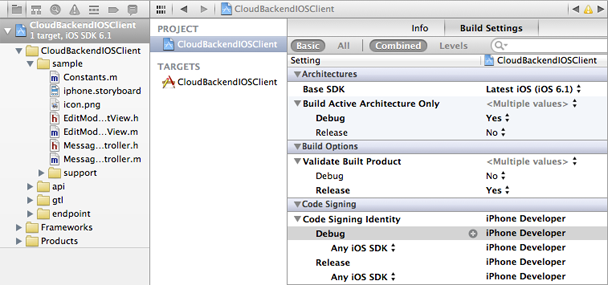
- Select the project in the Project Navigator .
- Click on the project in the Settings browser .
- Click on the Build Settings tab.
- Browse down to Code Signing Identity .
- Select a valid code signing certificate (APNS enabled provisioning profile).

Run the sample
- Select [Your bundle ID] > iOS Device on the top left corner of the toolbar.
-
Click the
Runbutton to execute the application. - Sign into your Google Account if the Google login page shows.
-
Click on the the "+" sign on the top right corner and enter a message. Hit return to send the message.
-
The app will refresh and show the latest message. You can also use the pull down gesture to refresh the list manually. Note that each time when there is a new message or update sent to the backend, this application will be notified by push notification which triggers this application to query against the backend. You can test this by entering a new message and immediately hitting the home key to navigate away from this application. Within seconds, you will receive a push notification alerting you that a message is received. When you navigate back to the application, you will see the latest message being queried and displayed.
This completes the setup for the Mobile Backend sample app.
