
To manage traffic to and from your instances, use Network and Firewall resources to create rules that dictate how your instances interact with each other and with the Internet.
Networks and firewalls are global resources .
Contents
Overview
Google Compute Engine offers a configurable and flexible networking system that enables you to permit connections between the outside world and instances. You can manage your Google Compute Engine network by configuring three objects: the Network object, Firewall objects, and individual instance settings.
Networks
A project can contain multiple networks and each network can have multiple
instances attached to it. A network object allows you to define a gateway IP and
the network range for the instances attached to that network. By default, every
project is provided with a
default
network with preset configurations and
firewall rules. You can choose to customize the default network by adding or
removing firewall rules, or you can also choose to create new network objects.
Generally, most users only need one network, although you can create up to five
networks by default.
A network belongs to only one project and each instance can only belong to one network. All Google Compute Engine networks use the IPv4 protocol. Google Compute Engine currently does not support IPv6. However, Google is a major advocate of IPv6 and it is an important future direction.
For more information, see the Networks section.
Egress throughput caps
Outbound (egress) traffic from a virtual machine is subject to maximum network egress throughput caps. These caps are dependent on the number of cores that a virtual machine has. Each core is subject to a 2 Gbits/second cap. Each additional core increases the network cap. For example, a virtual machine with 4 cores has a network throughput cap of 2 Gbits/sec * 4 = 8 Gbits/sec network cap.
Virtual machines that have 0.5 or less cores, such as shared-core machine types , are treated as having 0.5 cores, and a network throughput cap of 1 Gbit/sec. All caps are meant as maximum possible performance, and not sustained performance.
Network caps are the sum of persistent disk write I/O and virtual machine network traffic. Depending on your needs, you may need to make sure your virtual machine allows for your desired persistent disk throughput. For more information, see the Persistent Disk page.
Firewall
By default, all incoming traffic from outside a network is blocked and no packet is allowed into an instance without an appropriate firewall rule. To allow incoming network traffic, you need to set up firewalls to permit these connections. Each firewall represents a single rule that determines what traffic is permitted into the network. It is possible to have many firewall rules and to be as general or specific with this rules as you need. For example, you can create a firewall that allows all traffic through port 80 to all instances, or you can create a rule that only allows traffic from one specific IP or IP range to one specific instance.
Firewalls only regulate incoming traffic to an instance. Once a connection has been established with an instance, traffic is permitted in both directions over that connection. To prevent an instance from sending outgoing packets, use another technology such as iptables .
If the instance has an
external IP addresses
,
it can also send outgoing packets outside the network. By default,
gcloud compute instances create
assigns an ephemeral IP address to all new instances, unless otherwise
specified. If you are using the API to create new instances, you can explicitly
request an external IP address. All traffic through an external IP address,
including traffic between instances in the same network, will be billed
according to the
price sheet
.
Every instance also has a network IP that is addressable only within the network. Within the network, instances can also be addressed by instance name; the network will resolve an instance name into a network address transparently for you.
For more information, see the firewalls and instances and networks sections.
Blocked traffic
Google Compute Engine blocks or restricts traffic through all of the following ports/protocols between the Internet and virtual machines, as well as between two virtual machines when traffic is addressed to their public IP addresses (this also includes load-balanced addresses).
- All outgoing traffic to port 25 (SMTP) is blocked.
- Most outgoing traffic to port 465 or 587 (SMTP over SSL) is blocked. except for known Google IP addresses
- Traffic that uses a protocol other than TCP, UDP, and ICMP is blocked, unless explicitly allowed through Protocol Forwarding .
Routes
Every Google Compute Engine project has a Routes collection that contains all routes for that project. A route specifies how packets leaving a virtual machine instance should be handled. For example, a route may specify that packets destined for a particular network range should be handled by a gateway virtual machine instance that you configure and operate.
When you add a route to the Routes collection, you must also specify which instances the route should apply to. Each virtual machine instance in your project then pulls from this centralized Routes collection to create a read-only individual routes table which Google Compute Engine uses to direct outgoing packets for those instances.
A single route is made up of a route name, a destination range, a next-hop specification, any instance tags, and a priority value. By default, every network has two default routes: a route that directs traffic to the Internet and a route that directs traffic to other instances within the network.
Routes allow you to implement more advanced networking functions in your virtual machines, such as creating VPNs (virtual private networks), setting up many-to-one NAT (networking address translation), and setting up transparent proxies. If you do not need any advanced routing solutions, the default routes should be sufficient for handling most outgoing traffic.
For more information, see the Routes Collection section.
Networks
Every instance is a member of a single network. A network performs the same function that a router does in a home network: it describes the network range and gateway IP address, handles communication between instances, and serves as a gateway between instances and callers outside the network. A network is constrained to a single project; it cannot span projects. Any communication between instances in different networks, even within the same project, must be through external IP addresses. In the API, a network is represented by the Network object.
The Network object exposes the following properties, which can also be set using
the
gcloud compute networks create
command.
- IPv4Range
-
The network address range for this Network object, in CIDR notation . You can change these, but you must use one of the standard private network addresses ranges . For example:
"IPv4Range": "10.0.0.0/16" - gatewayIPv4
-
The gateway address for the network. The default value is
10.0.0.1. For example:"gatewayIPv4": "10.0.0.1" - name
-
The name must be unique in this project, from 1-63 characters long and match the regular expression:
[a-z]([-a-z0-9]*[a-z0-9])?which has the following meaning:- The first character must be a lowercase letter,
- All following characters must be a dash, lowercase letter, or digit,
- The last character must be a lowercase letter or digit.
All projects include a default Network object named
default
with
the following values:
- IPv4Range - 10.240.0.0/16
- gatewayIPv4 - 10.240.0.1
-
name -
default
The
default
network also has the following firewalls:
-
default-allow-internal - Allows network connections of any protocol and port between instances on the network.
-
default-allow-ssh - Allows TCP connections from any source to any instance on the network, over port 22.
-
default-allow-icmp - Allows ICMP traffic from any source to any instance on the network.
If you do not explicitly assign your instances to a network, all instances added
to the project are automatically assigned this default network in the instance's
networkInterfaces.network
property. Currently, an instance can be assigned
only one network. However, you can create up to five networks per project by
default, including the
default
network, and assign instances to different
networks using the
--network
flag:
$ gcloud compute networks add NETWORK
$ gcloud compute instances create INSTANCE --network NETWORK
You can also choose to request more quota if you need more than five networks for your project.
Several firewalls can be applied to the same network to describe which instances can accept what kinds of incoming connection requests. A Firewall object has a reference to the Network object but a Network object does not have a list of Firewall objects.
Example
The following example requests information about the
default
network.
You can also use the
--format
flag to choose how the output
appears:
$ gcloud compute networks describe default --format json
{
  "IPv4Range": "10.240.0.0/16",
  "description": "Default network for my-project",
  "gatewayIPv4": "10.240.0.1",
  "id": "18446744031643681077",
  "kind": "cloud#network",
  "name": "projects/my-project/networks/default",
  "selfLink": "https://www.googleapis.com/compute/v1/projects/my-project/global/networks/default"
}
Useful
gcloud compute
commands:
Note that there is no way to modify an existing network using
gcloud compute
.
Adding a network
Every project starts with one network called
default
. The default network is
automatically created for you, and you do not need to take any action to
initialize it. For many Google Compute Engine users, the default network is all
that is needed. The
default
network functions just like any network you would
create, so you can add or remove firewalls from it or delete it altogether.
However, you can create up to four additional networks for a single project to help manage your instances. Creating multiple networks for a project can help you isolate sets of instances, so that instances in different networks can only communicate with each other through external IP addresses. For example, you might want to isolate instances in your testing and production systems from one another. Establishing those instances on different networks is an effective way of achieving this protection.
When creating instances in multiple networks, note that instance names are
unique across a project. You cannot use the same instance name for two instances
in the same project, even if they are in different networks. To add a new
network to a project, use the
gcloud compute
tool with the
networks create
command:
$ gcloud compute networks create NETWORK
For example, to add networks called production execute the following:
$ gcloud compute networks create production
To list the networks for your project, execute the
networks list
command:
$ gcloud compute networks list
NAME        IPV4_RANGE    GATEWAY_IPV4
default     10.0.0.0/8    10.0.0.1
gce-network 10.0.0.0/16   10.0.0.1
network-1   10.120.0.0/16 10.120.0.1
network-2   10.240.0.0/16 10.240.0.1
When adding a network, you can optionally specify the address range and/or
gateway address for the network to the
networks create
command. To see a
full list of values that you can set, run
gcloud compute networks --help
. If
you don't specify a default gateway address or range,
gcloud compute
uses the
default IPv4 gateway (10.0.0.1) and the IPv4 Range (10.0.0.0/16).
Each network has its own set of firewalls controlling connectivity. When you
create a new network, there are no firewalls permitting connections of any type.
After creating a new network, you should create firewalls for it. To create a
firewall for the example-network network that allows all traffic between the instances
on the network, execute
firewalls-rules create
$ gcloud compute firewall-rules create internal --network example-network --source-ranges 10.0.0.0/16 --allow tcp udp icmp
You can also create a firewall that allows HTTP traffic to all instances on the example-network network. Execute the following:
$ gcloud compute firewall-rules create web --network example-network --allow tcp:80
For more information on firewalls, see the Firewalls section .
In order for your network to be useful, you need to add instances to it. To add
an instance to a network, use the
--network
flag during instance creation. For
example, to add an instance named
example-instance
to the example-network network,
execute the following:
$ gcloud compute instances create example-instance --network example-network
Deleting a network
Before you can delete a network, you must first delete all firewalls attached to that network, all instances that use that network, and delete all manually-created routes that apply to the network.
If you try to delete a network that still has firewalls, manually-created routes, or instances attached, Google Compute Engine returns an error indicating that the network is in use.
After you delete all firewalls and instances attached to the network, run the
networks delete
command to delete the network:
$ gcloud compute networks delete NETWORK
Setting up a network proxy
You can design your network so that only one instance has external access, and all other instances in the network use that instance as a proxy server to the outside world. This is useful if you want to control access into or out of your network, or reduce the cost of paying for multiple external IP addresses.
This particular example discusses how to set up a network proxy on Google Compute Engine instances that use a Debian image. It uses a gateway instance as a Squid proxy server but this is only one way of setting up a proxy server.
To set up a Squid proxy server:
- Set up one instance with an external (static or ephemeral) IP addresses . For this example, name your instance gateway-instance.
-
Set up one or more instances without external IP addresses by specifying
gcloud compute instances create ... --no-address. For this example, call this instance hidden-instance. - Learn how to ssh from one instance to another because you will not be able to ssh directly into your internal-only instances.
-
Add a firewall to allow traffic on tcp:3128:
$ gcloud compute firewall-rules create FIREWALL_RULE --network NETWORK --allow tcp:3128 -
Install Squid on gateway, and configure it to allow access from any machines on the shared network. This assumes that gateway-instance and hidden-instance are both connected to the default network, which enables them to connect to each other:
user@gateway:~$ sudo apt-get install squid3 # Enable any machine on the local network to use the Squid3 server sed -i 's:#\(http_access allow localnet\):\1:' /etc/squid3/squid.conf sed -i 's:#\(http_access deny to_localhost\):\1:' /etc/squid3/squid.conf sed -i 's:#\(acl localnet src 10.0.0.0/8.*\):\1:' /etc/squid3/squid.conf sed -i 's:#\(acl localnet src 172.16.0.0/12.*\):\1:' /etc/squid3/squid.conf sed -i 's:#\(acl localnet src 192.168.0.0/16.*\):\1:' /etc/squid3/squid.conf sed -i 's:#\(acl localnet src fc00\:\:/7.*\):\1:' /etc/squid3/squid.conf sed -i 's:#\(acl localnet src fe80\:\:/10.*\):\1:' /etc/squid3/squid.conf # Prevent proxy access to metadata server user@gateway:~$ sudo cat <<EOF >>/etc/squid3/squid.conf acl to_metadata dst 169.254.169.254 http_access deny to_metadata EOF # Start Squid user@gateway:~$ sudo service squid3 start -
Configure hidden-instance to use gateway-instance as its proxy. ssh into hidden-instance and define its proxy URL addresses to point to gateway on port 3128 (the default Squid configuration) as shown here:
user@gateway:~$ ssh hidden-instance user@hidden:~$ sudo -s echo "export http_proxy=\"http://gateway.$(dnsdomainname):3128\"" >> /etc/profile.d/proxy.sh echo "export https_proxy=\"http://gateway.$(dnsdomainname):3128\"" >> /etc/profile.d/proxy.sh echo "export ftp_proxy=\"http://gateway.$(dnsdomainname):3128\"" >> /etc/profile.d/proxy.sh echo "export no_proxy=169.254.169.254,metadata,metadata.google.internal" >> /etc/profile.d/proxy.sh # Update sudoers to pass these env variables through cp /etc/sudoers /tmp/sudoers.new chmod 640 /tmp/sudoers.new echo "Defaults env_keep += \"ftp_proxy http_proxy https_proxy no_proxy"\" >>/tmp/sudoers.new chmod 440 /tmp/sudoers.new visudo -c -f /tmp/sudoers.new && cp /tmp/sudoers.new /etc/sudoers -
Exit sudo, load the variables, and run apt-get on hidden-instance. It should now work using gateway as a proxy. If gateway were not serving as a proxy, apt-get would not work because hidden-instance has no direct connection to the Internet.
root@hidden:~$ exit
user@hidden:~$ source ~/.profile
user@hidden:~$ sudo apt-get update
....
Setting up an external HTTP connection
The default network does not include a firewall that enables HTTP connections to your instances. However, it is fairly simple to add a firewall to your network that allows HTTP connections. Note that an instance must have an external IP address before it can receive traffic from outside its network.
You can easily add a firewall to allow HTTP connections through
gcloud compute
or the
Google Developers Console
. You can also add a firewall rule through the
API
.
gcloud compute
If you want to allow HTTP or HTTPS traffic to all virtual machines in a project, the following command creates a firewall that allows incoming HTTP requests from anywhere, to any instance connected to this network.
$ gcloud compute firewall-rules create FIREWALL_RULE --allow tcp:80 tcp:443
Example
$ gcloud compute firewall-rules create sample-http --description "Incoming http allowed." \
         --allow tcp:80 tcp:443
...
$ gcloud compute firewall-rules describe sample-http
allowed:
- IPProtocol: tcp
  ports:
  - '80'
  - '443'
creationTimestamp: '2014-06-13T13:27:12.206-07:00'
id: '5057780722612413546'
kind: compute#firewall
name: sample-http
network: https://www.googleapis.com/compute/v1/projects/my-project/global/networks/default
selfLink: https://www.googleapis.com/compute/v1/projects/my-project/global/firewalls/samplehttp
sourceRanges:
- 0.0.0.0/0
Developers Console
In the Developers Console, you can allow individual instances access to HTTP and HTTPS connections by selecting the respective option when you create that instance.
- Go to the Google Developers Console .
- Select your Compute Engine project.
- In the sidebar on the left, click VM instances .
- Click New instance .
- In the options for creating a new instance, select the appropriate checkboxes for HTTP and HTTPS traffic ( Allow HTTP or Allow HTTPS respectively). You can select both checkboxes if you would like access to both types of traffic.
- Create your instance.
By selecting these checkboxes, Compute Engine automatically
creates a
default-http
or
default-https
rule that applies to all
instances with either the
http-server
or
https-server
tags. Your new
instance is also tagged with the appropriate tag depending your checkbox
selection.
If you already have existing
default-http
and
default-https
firewall
rules, you can apply the firewall rule to existing instances by enabling the
Allow HTTP
or
Allow HTTPS
options on the instance's details page.
- Go to the Google Developers Console
- Select your Compute Engine project.
- In the sidebar on the left, click on VM instances .
- Click on the name of the desired instance.
- Scroll down to the Network section.
- Check the Allow HTTP or Allow HTTPS options under your desired network.
- Click Save .
In a similar manner, you can also disable external HTTP or HTTPS access for an instance by unchecking one or both checkboxes.
By allowing specific instances to be tagged for HTTP and HTTPS traffic rather than creating an overall firewall rule that applies to all instances, Compute Engine limits the possible security implications of allowing external traffic to all virtual machines in a project. However, if you would like to create a firewall that allows HTTP or HTTPS traffic to all virtual machine instances, you can create your own firewall rule:
- Go to the Google Developers Console .
- Select your Compute Engine project.
- In the sidebar on the left, click on Networks .
- Select the network where you would to apply the firewall rule.
- Click Create new next to Firewall rules .
-
Name your firewall rule, and add
tcp:80in the Protocols & Ports box, ortcp:443for HTTPS traffic. - Click Create .
Sending e-mail through the mail gateway
This topic has moved .
Advanced networking details
This section provides some low-level details not covered in the previous sections. You do not need to read this for typical usage, but it provides more insight about how networking works in Google Compute Engine.
The following image describes a similar network to the overview diagram above, but with some additional details:
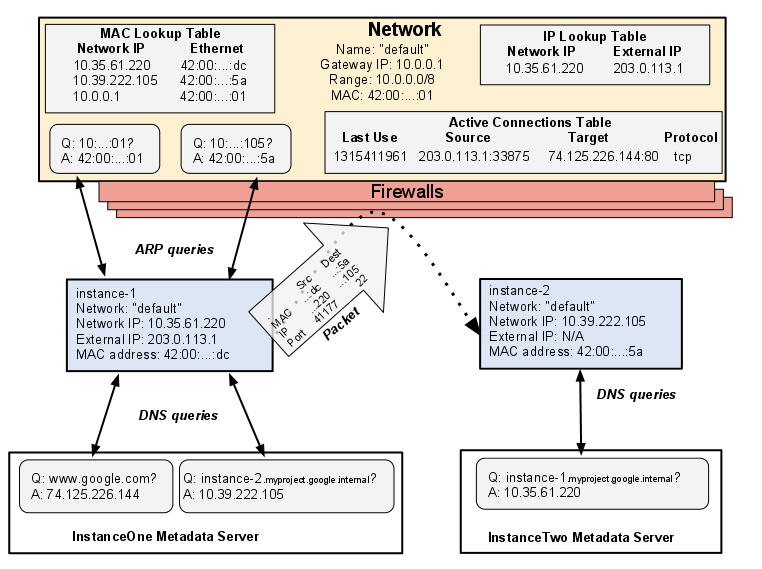
Network
- Stores a lookup table that tracks every active connection. When a packet arrives that is part of an active connection, it will be sent to the destination without consulting any other firewall rules.
- Stores a lookup table that associates external IP addresses with instances. All packets to the external IP are routed to the network, which looks up the internal IP corresponding to that address, and forwards it to the instance.
- Performs MAC address lookups ( proxy ARP ) for a given IP address.
- Routes packets between instances on the same network.
- Routes packets externally (billing involved).
Firewalls
- Google Compute Engine uses firewalls that can block packets into an instance; they cannot block outgoing packets. If you want to block outgoing packets from an instance, you must configure another technology, such as iptables, on your instances.
- Every instance has a "hidden" firewall rule saying that once a connection has been made, all calls and replies will be permitted over that source+target+port+protocol connection until it expires after about 10 minutes of inactivity. However, if a reply is sent to a different port, for example if an FTP request asks for a response on another port, the response is not automatically allowed; there must be a firewall rule permitting a connection over the new port.
Instances
- Each instance's metadata server also acts as a DNS lookup service ( DNS resolver ) for that instance. DNS lookups are performed for instance names. The metadata server itself stores all DNS information for the local network, and queries Google's public DNS server for any addresses outside of the local network.
- An instance is not aware of any external IP address assigned to it; the Network stores a lookup table that lists the network IP of every instance with an external IP address, and the corresponding external IP address.
Who Handles What
Under the covers, different networking features are handled by different parts of the Google Compute Engine system. Some of these are standard networking features that are well documented, and some of them are specific to Google Compute Engine. Some features you can configure, and some you cannot. Google Compute Engine uses Linux's VIRTIO network module to model Ethernet card and router functionality, but higher levels of the networking stack, such as ARP lookups, are handled using standard networking software.
- ARP lookup
- The instance kernel issues ARP requests ; the Network issues ARP replies. The mapping between MAC addresses and IP addresses is handled by the instance kernel.
- MAC lookup table, IP lookup table, active connection table
- These tables are hosted on the underlying network and cannot be inspected or configured.
- DNS server
-
Each instance's metadata server acts as a DNS server. It stores locally the
DNS entries for all network addresses in the local network, and calls into
Google's public DNS server for entries outside the network. You cannot
configure this DNS server, however you can set up your own DNS server if you
like, and configure your instances to use that server instead by editing the
/etc/resolv.conffile. - Packet handling between the network and the outside
- Packets coming into or out of the network are handled by network code that examines the packet against firewalls, against the IP lookup table, and against the active connections table. The network also performs NAT on packets coming into and out of the network.
- Packets received by an instance
- These packets are received and turned into a stream by the instance kernel in standard fashion.
- Packets sent by an instance
- Packets are sent using the instance kernel to Google's network implementation.
Detailed connection walkthroughs
Here are more details about what happens when an instance makes a network call.
An instance makes a call:
- If the target address is an instance name or a URL such as www.google.com, the instance calls the DNS service on its metadata server and gets back the equivalent IP address. You can configure your instance to consult another DNS service, although then you will not be able to resolve instance names.
-
The destination IP address is examined against the network's IP address range, which every instance knows.
-
If the IP address is outside the network address range:
-
The instance sends the packet to the network's gateway MAC address with the destination set to the packet's final destination. The instance might need to make an ARP request to resolve the gateway's MAC address.
-
The network receives the packet, and rewrites the IP header to declare the instance's external IP address as the source. If the instance has no external IP address, the call is not allowed, and the network drops the packet without informing the sender.
-
The network records the outgoing packet, and adds the source and destination to the active connections table.
-
The network sends the packet on to its destination.
-
The destination gets the packet and responds if it chooses.
-
The network receives the response, consults the active connections table, notes that this is an active connection, and allows it. The network consults its network/external IP lookup table and replaces the instances' external IP address with the equivalent network address and sends the packet to the source instance.
-
The instance receives the packet.
-
-
If the destination IP address is within the network address range:
-
The instance makes a standard ARP request to the network to learn the equivalent MAC address for this network IP, unless it has cached the MAC address for this IP as part of a previous request.
-
The instance sends the packet to the network, with the target MAC and IP address set to the destination instance.
-
The network checks for a firewall rule that permits a connection to this target: if so, it sends it on; if not, it simply drops the packet without informing the sender.
-
If the packet is allowed, the network records or updates the status of this connection in a table of active connections.
-
The target instance gets the packet, and optionally sends a reply to the network, addressed to the source instance. It performs a standard ARP request similar to that done by the source, if the MAC address is not cached.
-
The network consults the active connection table, sees that the reply is part of active connection, and routes it on to the destination. If the reply had been over a different port, the reply would not match a known connection and the network would again examine the firewalls for a rule allowing the connection, and if a firewall rule exists, the network logs the connection and sends the reply to the source. An example of when this might occur is if this had been an FTP request that specified a different reply port.
-
The source instance receives the reply.
-
-
An external instance or computer calls an instance:
-
The external caller sends a packet to an instance's external IP address, which is owned by the network.
-
The network compares the packet against the active connections table to see whether this is an existing connection:
- If it is not an existing connection, then the network looks for a firewall rule to allow the connection.
- If there is no firewall, the network drops the packet without informing the sender.
-
If there is an existing connection or valid firewall, the network examines its lookup table and replaces the external IP with the corresponding network IP in the packet, logs the incoming packet in the active connections table and sends the packet to the target instance.
-
The instance receives the packet and responds as described in 2.2.1 above when sending a packet outside the network range.
-
The network receives the reply, finds the matching incoming request in the active connections table, and allows the packet through. Before sending, it modifies the source IP address by replacing the instance's network IP with the corresponding external IP from its lookup table.
Firewalls
A firewall is a rule that defines what incoming connections are accepted by which instances. Each firewall contains one rule , which specifies a permitted incoming connection request, defined by source, destination, ports, and protocol. When a request is sent to an instance, whether internally or from another network or the Internet, Google Compute Engine allows the request if any firewall in the network permits the connection.
Firewalls do not restrict outgoing packets between instances within the same network. Any instance can send packets to any other instance in its network. However, whether that packet is accepted is determined by the firewalls associated with the target instance. To regulate outgoing requests, use another system, such as iptables .
Only instances with an external IP address can send packets outside the network. Only instances with an external IP address and a permitting firewall rule can be addressed from outside the network or you could route packets through an externally-addressable proxy server .
You cannot share firewalls between projects. You cannot modify an existing firewall, or overwrite a firewall with the same name; you must delete a similarly named firewall before adding a new one.
A Firewall resource exposes the following properties, which can also be set
using the
gcloud compute firewall-rules create
command. Each rule is
composed of several elements, most of which must be defined before a connection
is allowed:
-
network -
[
Required
] The network that this firewall
is assigned to. Each firewall can be associated with one and only one network.
You must provide a network when making an API call to create a firewall.
However, if you use
gcloud computeand do not specify a network, the firewall will automatically be assigned to thedefaultnetwork. -
sourceRanges -
[ Required if
sourceTagsis not specified ] Identifies permitted callers by a list of IP address blocks expressed in CIDR notation . If neithersourceRangesnorsourceTagsare specified, the default is 0.0.0.0/0, which means that all incoming connections will be accepted from inside or outside the network. For example:"sourceRanges": [ "198.51.100.0/24", "203.0.113.0/25" ] -
sourceTags -
[ Required if
sourceRangesis not specified ] If the source is within this network and has one of the specified tags, the connection will be accepted. If bothsourceRangesandsourceTagsare specified, an inbound connection is allowed if either the range or the tag of the source matchessourceRangesorsourceTags. For example:"sourceTags": [ "management" ] -
targetTags -
[ Optional ] A list of instance tags that specify which instances on the network can accept requests from the specified sources. If not specified, this firewall rule applies to all instances on this network. For example:
"targetTags": [ "web", "database" ] -
allowed -
[ Required ] An array of allowed connections permitted by this firewall rule. Each object contains an IP protocol and an optional range of ports (for TCP and UDP traffic) that should be allowed to the instances specified by
targetTags.-
IPProtocol -
[
Required
] The protocols allowed over this connection. This can be the
(case-sensitive) string values
"tcp","udp","icmp", or any IP protocol number. -
ports -
[
Optional
] An array of target ports allowed for this connection. This is
only applicable for TCP and UDP connections. Each value is a string that is
either a single port or a port range. If not specified, all ports are
allowed.
Example
: [
"80", "160","300-500"]
For example:
"allowed": [ { "IPProtocol": "tcp", "ports": [ "22" ], }, { "IPProtocol": "17", "ports": [ "161" ], } ] -
-
name -
[ Required ] The firewall name. The name must be unique in this project, from 1-63 characters long and match the regular expression:
[a-z]([-a-z0-9]*[a-z0-9])?which means the first character must be a lowercase letter, and all following characters must be a dash, lowercase letter, or digit, except the last character, which cannot be a dash.
Google Compute Engine provides the following standard firewalls in every project,
assigned to the
default
network. You can add, modify, or delete your own as
desired.
-
default-allow-internal - Allows network connections of any protocol and port between any two instances.
-
default-allow-ssh - Allows TCP connections from any source to any instance on the network, over port 22.
-
default-allow-icmp - Allows ICMP traffic from any source to any instance on the network.
-
default-allow-rdp - Allows remote desktop protocol traffic to port 3389.
The default firewall rules above do not allow external HTTP traffic. To learn how to allow external HTTP traffic to your instances, see Setting Up an External HTTP Connection .
Example
The following example describes the
default-allow-ssh
firewall. The source
CIDR of
0.0.0.0/0
means that the connection can come from anywhere, inside or
outside of the network.
$ gcloud compute firewall-rules describe default-allow-ssh
allowed:
- IPProtocol: tcp
  ports:
  - '22'
creationTimestamp: '2014-07-08T10:32:46.214-07:00'
description: Allow SSH from anywhere
id: '13715544083725015625'
kind: compute#firewall
name: default-allow-ssh
network: https://www.googleapis.com/compute/v1/projects/my-project/global/networks/default
selfLink: https://www.googleapis.com/compute/v1/projects/my-project/global/firewalls/default-allow-ssh
sourceRanges:
- 0.0.0.0/0
Useful
gcloud compute
commands:
-
gcloud compute firewall-rules list -
gcloud compute firewall-rules describe -
gcloud compute firewall-rules create -
gcloud compute firewall-rules update -
gcloud compute firewall-rules delete
Adding a firewall
To add a firewall, create a Firewall object describing the permitted source,
target, and protocol, and network. Any instance connected to the specified
network will have that firewall applied. In
gcloud compute
, use the
firewall-rules create
command:
$ gcloud compute firewall-rules create FIREWALL_RULE \
         --allow PROTOCOL[:PORT[-PORT]] [PROTOCOL:[PORT[-PORT]]]... \
         [--source-ranges CIDR_RANGE [CIDR_RANGE]]
Example
The following example adds a firewall that supports HTTP connections over port 80 from any source to any instance in the network that exposes an external IP address.
$ gcloud compute firewall-rules create allow-http --description "Incoming http allowed." \
         --allow tcp:80 --format json

{
  "allowed": [
    {
      "IPProtocol": "tcp",
      "ports": [
        "80"
      ]
    }
  ],
  "creationTimestamp": "1234-56-78T09:12:34.567",
  "description": "Incoming http allowed.",
  "id": "13AAA70BBBB5639CCCC9",
  "kind": "compute#firewall",
  "name": "allow-http",
  "network": "https://www.googleapis.com/compute/v1/projects/my-project/global/networks/default",
  "selfLink": "https://www.googleapis.com/compute/v1/projects/my-project/global/firewalls/allowhttp",
  "sourceRanges": [
    "0.0.0.0/0"
  ]
}
Deleting a firewall
To delete a firewall, run the 'firewall-rules delete` command:
$ gcloud compute firewall-rules delete FIREWALL_RULE
Routes collection
Every project has a Routes collection that determines how packets leaving an
instance should be handled. The Routes collection contains all routes for that
project and each route is a single rule that specifies which network object
should handle a packet leaving a virtual machine instance. For example, a route
may specify that packets leaving any instances in the
default
network whose
destination range matches
0.0.0.0/0
should be routed to another virtual
machine instance first, before it can be sent on to its final destination.
By default, every network has two default routes: a route that directs traffic to the Internet and a route that directs traffic to other instances within the network. These default routes are generally sufficient for most projects.
Routes allow you to implement more advanced networking functions in your virtual machines, such as creating VPNs (virtual private networks), setting up many-to-one NAT (networking address translation), and setting up transparent proxies. If you do not need any advanced routing solutions, the default routes should be sufficient for handling most outgoing traffic.
Instance routing tables
Each route in the Routes collection may apply to one or more instances. A route applies to an instance if the network and instance tags match. If the network matches and there are no instance tags specified, the route applies to all instances in that network. Google Compute Engine then uses the Routes collection to create individual read-only routing tables for each instance.
A good way to visualize this is to imagine a massively scalable virtual router at the core of each network. Every virtual machine instance in the network is directly connected to this router, and all packets leaving a virtual machine instance are first handled at this layer before they are forwarded on to their next hop. The virtual network router selects the next hop for a packet by consulting the routing table for that instance. The diagram below describes this relationship, where the green boxes are virtual machine instances, the router is at the center, and the individual routing tables are indicated by the tan boxes.
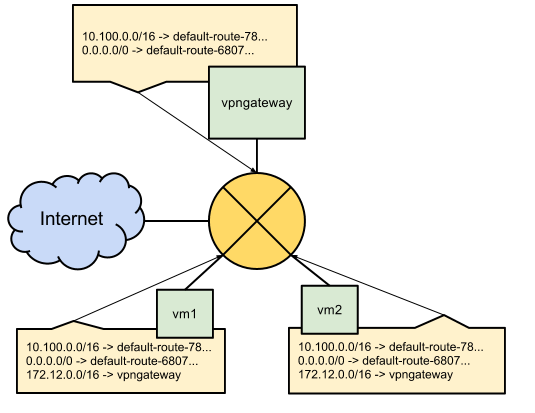
The Routes collection for the network in the diagram might look like this:
NAME                           NETWORK DEST_RANGE    NEXT_HOP                 PRIORITY
default-route-68079898SAMPLEe7 default 0.0.0.0/0     default-internet-gateway   1000
default-route-78SAMPLEd2bc5762 default 10.0.0.0/16                              1000
vpngateway                     default 172.12.0.0/16 us-central1-a/instances/vpngateway  1000
A closer look at the vpngateway route exposes the vpn tag on the route:
$ gcloud compute routes describe vpngateway
creationTimestamp: '2014-07-28T15:26:27.023-07:00'
destRange: 172.12.0.0/16
id: '12304245498973864442'
kind: compute#route
name: vpngateway
network: https://www.googleapis.com/compute/v1/projects/my-project/global/networks/default
nextHopGateway: https://www.googleapis.com/compute/v1/projects/my-project/zones/us-central1-a/instances/vpngateway
priority: 1000
selfLink: https://www.googleapis.com/compute/v1/projects/my-project/global/routes/vpngateway
tags:
- vpn
The vpngateway route ensures that any instances with the vpn tag automatically
has a routing table that contains the vpngateway alongside the two default routes.
In the diagram, both vm1 and vm2 have these routes in their routing table, so
all outgoing traffic destined for the
172.12.0.0/16
external IP range is
handled by the vpngateway instance.
An instance's routing table is a read-only entity. You cannot directly edit these tables. If you want to add, remove, or edit a route, you must do so through the Routes collection.
Individual routes
A single route is made up of the following:
-
name -
[
Required
] The user-friendly name for this route. For example,
internetroutefor a route that allows access to the Internet. -
network -
[
Required
] The name of the network this route
applies to. For example, the
defaultnetwork. -
destRange -
[
Required
] The destination IP range that this route applies to. If the
destination IP of a packet falls in this range, it matches this route. For
example,
0.0.0.0/0. See the Route Selection section to understand how Google Compute Engine uses all matching routes to select a single next hop for a packet. -
instanceTags -
[
Required
] The list of instance tags this route applies to. If this is
empty, this route applies to all instances within the specified network. In
the API, this is a required field. In
gcloud compute, this is an optional field andgcloud computeassumes an empty list if this field is not specified.
Exactly one of the following next hop specifications is required:
-
nextHopInstance -
The fully-qualified URL of the instance that should handle matching packets. The instance must already exist and have IP forwarding enabled. For example:
https://www.googleapis.com/compute/v1/projects/<project-id>/zones/<zone>/instances/<instance>If a next hop instance crashes and is restarted by the system, or if you delete an instance and recreate it with the same name, in the same zone, Google Compute Engine will continue to route matching packets to the new instance.
-
nextHopIp -
The network IP address of an instance that should handle matching packets. The IP address must lie within the address space of the network. For example, if your network is
10.240.0.0/16, you cannot specifynextHopIp=1.1.1.1. The instance must already exist and have IP forwarding enabled. If the next hop instance crashes and is later restarted by the system with the same IP address or if the user deletes the instance and recreates it with the same IP address, Google Compute Engine continues routing matching packets to the new instance. -
nextHopNetwork -
[ Read-Only ] The URL of the local network handling matching packets. This is only available to the default local route. You cannot manually set this field.
-
nextHopGateway -
The URL of a gateway that should handle matching packets. Currently, there is only the Internet gateway available:
/projects/<project-id>/global/gateways/default-internet-gateway -
priority -
[ Required ] The priority of this route. Priority is used to break ties in the case where there is more than one matching route of maximum length. A lower value is higher priority; a priority of
100is higher than200. For example, the following routes are tied because the destination range is the same, and they are in the same network bu are differentiated by the priority:NAME NETWORK DEST_RANGE NEXT_HOP PRIORITY vpnroute default 192.168.0.0/16 ZONE/instances/vpninstance 1000 vpnroute-backup default default 192.168.0.0/16 ZONE/instances/vpninstance-backup 2000Under this configuration, VPN traffic would normally be handled by vpninstance, but would fall back to vpninstance-backup in case vpnroute is deleted.
In the API, this is a required field. In
gcloud compute, this is an optional field andgcloud computeassumes default priority of1000if the field is not specified.
Default routes
By default, every network you create comes with two routes in the Routes collection:
- A local route that handles packets destined within the network.
- An Internet route that sends all other packets to the Internet gateway.
These default routes are assigned unique names generated by the server and can look similar to the following:
NAME                           NETWORK DEST_RANGE    NEXT_HOP                 PRIORITY
default-route-17937a9d507c5897 default 0.0.0.0/0     default-internet-gateway 1000
default-route-1949ae767c041c44 default 10.240.0.0/16                          1000
The Internet route is identifiable by the next hop Internet gateway, while the
local route is identifiable by the next hop network field. You can choose to
edit or delete the default Internet route for a network, but you cannot delete
the local route. It is also not possible to create routes that override the
local route. For example, if your network address space is
10.240.0.0/16
, you
can create a route with a destination range of
10.0.0.0/8
because it is less
specific than the local route and therefore doesn't override it. However, you
cannot create routes that are as specific or more specific than the local route,
such as a route with a destination range of
10.240.128.0/17
.
If you have multiple networks in your project, there will also be multiple sets of default routes:
NAME                           NETWORK   DEST_RANGE       NEXT_HOP                 PRIORITY
default-route-17937a9d507c5897 default   0.0.0.0/0     default-internet-gateway 1000
default-route-1949ae767c041c44 default   10.240.0.0/16                          1000
default-route-6d248c6dcd28c489 network-2 0.0.0.0/0     default-internet-gateway 1000
default-route-957c297a50eb5b7e network-2 10.240.0.0/16                          1000
The example above shows two sets of default routes. Each set applies
to a different network. For example, the first two routes apply to the default
network
default
, and the last two routes apply to the
network-2
network. The
Routes collection lists all routes that apply to your project, so it is possible
to see multiple routes with similar criteria, such as the same destination range
and next hop, that apply to different networks.
Route selection
When an outgoing packet leaves a virtual machine instance, Google Compute Engine uses the following steps to decide which route to use and where to forward the packet:
-
Google Compute Engine discards all but the most specific routes that match the packet’s destination address. For example, if
destinationRange=10.1.1.1and there is a route for10.1.1.0/24and a route for10.0.0.0/8, Google Compute Engine selects the10.1.1.0/24route because it is more specific. -
If there are multiple specific routes, Google Compute Engine discards all routes but leaves the routes with the smallest priority value (smallest priority value indicates highest priority).
-
Google Compute Engine computes a hash value of the IP protocol field, the source and destination IP addresses, and the source and destination port, if applicable. Google Compute Engine uses this hash value to select a single next hop from the remaining ties.
-
If a next hop is found, Google Compute Engine forwards the packet. If a next hop is not found, the packet is dropped and Google Compute Engine replies with an ICMP destination or network unreachable error.
It is important to note that Google Compute Engine does not consider network distance when selecting a next hop. The next hop instance or gateway could be in a different zone than the instance sending the packet, so you should engineer your routing tables to control locality. For example, you can use instances tags to direct packets for instances in different zones to prefer a local transparent proxy or VPN gateway. By tagging instances by zone, you can assure that packets leaving an instance in one zone, will only be sent to a next hop in the same zone.
Listing routes
To see a list of routes for a project using
gcloud compute
, run the
routes list
command:
$ gcloud compute routes list
For example:
$ gcloud compute routes list
NAME                           NETWORK   DEST_RANGE    NEXT_HOP                 PRIORITY
default-route-17937a9d507c5897 default   0.0.0.0/0     default-internet-gateway 1000
default-route-1949ae767c041c44 default   10.240.0.0/16                          1000
default-route-6d248c6dcd28c489 network-2 0.0.0.0/0     default-internet-gateway 1000
default-route-957c297a50eb5b7e network-2 10.240.0.0/16                          1000
Adding a route
To add a route to the routing table using
gcloud compute
, use the
routes create
command:
$ gcloud compute routes create ROUTE --destination-range DEST_RANGE --network NETWORK NEXT_HOP
To add a route through the RESTful API, construct a
HTTP POST
request to the
following URI:
https://www.googleapis.com/compute/v1/projects/<project-id>/global/routes
Your request body must be constructed similar to the following, replacing
nextHopGateway
with your desired next hop:
{ "name": "mynewroute",
  "description": "new,
  "tags": [],
  "destRange": "192.168.0.0/16",
  "priority": 1000,
  "nextHopGateway": "https://www.googleapis.com/compute/v1/projects/<project-id>/global/gateway/default-internet-gateway",
  "network": "https://www.googleapis.com/compute/v1/projects/<project-id>/global/networks/<network-name>"
}
Deleting a route
To delete a route, run the
routes delete
command:
$ gcloud compute routes delete
To delete a route in the API, make a
HTTP DELETE
request to the following URI,
with an empty request body:
https://www.googleapis.com/compute/v1/projects/<project-id>/global/routes/<route-name>
Consistency of route operations
Similar to firewalls, when you make changes to the Routes collection, these
changes are eventually consistent. This means that after you update, add, or
remove a route, the changes are only guaranteed to have taken affect on all
applicable instances once your operation object returns a status of
DONE
. A
PENDING
or
RUNNING
operation means that the change may have taken effect on
some instances but has not taken effect on all instances.
If you make a sequence of changes, these changes may be applied to your instances
in any order. There is no guarantee that the order in which you make your requests
will be the order in which these requests are processed. Since routing changes
do not take affect instantaneously, different instances may observe different
changes at different times. However, your operation object will move to a
DONE
state once the changes have been observed by all affected instances.
Enabling IP forwarding for instances
By default, Google Compute Engine instances are not allowed to send packets whose
source IP address does not match the IP address of the instance sending the packet.
Similarly, Google Compute Engine won't deliver a packet whose destination IP
address is different than the IP address of the instance receiving the packet.
However, both capabilities are required if you want to use instances to help route
packets. To disable this source and destination IP check, enable the
canIpForward
field, which allows an instance to send and receive
packets with non-matching destination or source IPs.
To set the
canIpForward
field in
gcloud compute
, use the
--can-ip-forward
flag when creating your instance:
$ gcloud compute instances create ... --can-ip-forward
In the API, set the
canIpForward
field to
true
when
you construct the request body to create a new instance:
{
  "name": "myinstance",
  "description": "",
  "image": "https://www.googleapis.com/compute/v1/projects/debian-cloud/global/images/debian-X-wheezy-vYYYYMMDD",
  "machineType": "https://www.googleapis.com/compute/v1/projects/<project-id>/global/machineTypes/n1-standard-2",
  "networkInterfaces": [
      ...
  ],
  "canIpForward": true
}
You can only set this field at instance creation time. After an instance is created, the field becomes read-only.
Interacting with firewall rules
Just creating a route does not ensure that your packets will be received by the specified next hop. Firewall rules still determine whether incoming traffic is allowed into a network or instance. For example, if you create a route that sends packets through multiple instances, each instance must have an associated firewall rule to accept packets from the previous instance.
For tag-based firewall rules, the source tag list will continue to be matched
against the virtual machine instance sending the packet, and the target tags
list will be matched against the virtual machine instance receiving the packet.
For IP address matching, only the source IP address of the packet is used,
rather than the IP address of the instance sending the packet. For example, if
you have a firewall rule that specifies only packets from
10.240.2.3
are
accepted, all packets that have a source IP address that match the rule are
accepted, regardless of the IP address of instance that sends the packet.
For more information, see Firewalls .
Routing packets to the Internet
Currently, any packets sent to the Internet must be sent by an instance that has an external IP address . If you create a route that sends packets to the Internet from a particular instance, that instance must also have an external IP. If you create a route that sends packets to the Internet gateway, but the source instance doesn't have an external IP address, the packet will be dropped.
Configuring a NAT gateway
You can create more complicated networking scenarios by making changes to the Routes collection. This section describes how you can set up a network address translation (NAT) gateway instance that can route traffic from internal-only virtual machine instances to the Internet. This allows you to use one external IP address to send traffic from multiple virtual machine instances but only expose a single virtual machine to the Internet.
-
To start, create a Compute Engine network to host your virtual machine instances for this scenario. In this example, the network range used is
10.0.0.0/16with a gateway of10.0.0.1. However, you can select your own IPv4 range and gateway address as well.$ gcloud compute networks create gce-network --range 10.0.0.0/16 -
Create a virtual machine to act as a NAT gateway on gce-network or the default network.
$ gcloud compute instances create nat-gateway --network gce-network --can-ip-forward \ --zone us-central1-a \ --image debian-7 \ --tags nat -
Tag any virtual machine instances without an external IP address that will use the gateway instance with the tag
no-ip.$ gcloud compute instances add-tags example-instance --tags no-ip -
Create a route to send traffic destined to the Internet through your gateway instance.
$ gcloud compute routes create no-ip-internet-route --network gce-network \
         --destination-range 0.0.0.0/0
         --next-hop-instance us-central1-a/instances/nat-gateway
         --tags no-ip --priority 800
Setting the priority of this route ensures that this route wins if there are any other conflicting routes. 1000 is the default priority and a value lower than 1000 will take precedent.
-
Next, log onto your gateway instance and configure iptables to NAT internal traffic to the Internet.
user@local:~$ gcloud compute ssh nat-gatewayOn your instance, configure iptables:
user@nat-gateway:~$ sudo sh -c "echo 1 > /proc/sys/net/ipv4/ip_forward"
user@nat-gateway:~$ sudo iptables -t nat -A POSTROUTING -o eth0 -j MASQUERADE
The first
sudocommand tells the kernel that you want to allow IP forwarding. The secondsudocommand masquades packets received from internal instances as if they were sent from the NAT gateway instance.
Setting up a VPN gateway
This section describes an example scenario that connects a VPN gateway instance in Google Compute Engine to a Debian-based VPN gateway in your non-Cloud network. This scenario is just an example and may or may not be suitable for your network. Consult with your network administrator for more information.
-
To start, create a Google Compute Engine network to connect via VPN.
$ gcloud compute networks create gce-network --range 10.120.0.0/16 -
Create a VPN gateway virtual machine on gce-network.
$ gcloud compute instances create vpn-gateway --can-ip-forward \ --network gce-network \ --zone us-central1-a \ --image debian-7 \ --tags vpn -
Make note of your newly-created virtual machine's internal IP address by running the following command:
$ gcloud compute instances describe vpn-gatewayNote the address next to
networkIp(notnatIp). It should begin with10.120.x.xor10.240.x.x. -
Create a "plain old" non-VPN gateway virtual machine to talk to your local network.
$ gcloud compute instances create povm-1 --network gce-network --image debian-7 --zone us-central1-a -
Create a route in gce-network to route traffic through vpn-gateway if it is destined for your local network.
$ gcloud compute routes create gce-network-via-gateway LOCAL_NETWORK_ADDRESS_SPACE \
         --next_hop_ip VPN_GATEWAY_NETWORK_IP \
         --network gce-network \
         --tags vpn
The
VPN-GATEWAY-NETWORK-IPvalue should be thenetworkIpthat you noted from step 3. -
Add the following Google Compute Engine firewall rules for your Google Compute Engine network to accept incoming traffic.
$ gcloud compute firewall-rules create ssh --source-ranges 0.0.0.0/0 --allow tcp:22 --network gce-network
$ gcloud compute firewall-rules create  allow-internal --source-ranges 10.0.0.0/8 --allow tcp:1-65535 udp:1-65535 icmp \
         --network gce-network --target-tags vpn
$ gcloud compute firewall-rules create allow-ipsec-nat --source-ranges IP_LOCAL_VPN_GATEWAY/32 \
         --allow udp:4500 --network gce-network --target-tags vpn
$ gcloud compute firewall-rules create allow-all-peer --source-ranges LOCAL_NETWORK_ADDRESS_SPACE \
         --allow tcp:1-65535 udp:1-65535 icmp --network gce-network --target-tags vpn
You might also need to set up firewall settings in your local network to accept incoming traffic from the Google Compute Engine network. Depending on your network, this process can vary.
-
Install VPN software and configure gateway guest OS. You will need your VPN gateway machine's external IP address. Run the following command:
$ gcloud compute instances describe vpn-gatewayCopy the external IP address and create a file named
ipsec.confon your virtual machine gateway instance. Populate it with the following contents:conn myconn authby=psk auto=start dpdaction=hold esp=aes128-sha1! forceencaps=yes ike=aes128-sha1-modp2048! keyexchange=ikev2 mobike=no type=tunnel left=%any leftid=<vpn-vm-gateway-external-address> leftsubnet=<internal-ip-subnet> leftauth=psk leftikeport=4500 right=<public-ip-of-your-local-vpn-gateway-machine> rightsubnet=<your-local-network-address-space> rightauth=psk rightikeport=4500Your
<internal-ip-subnet>value should be either10.120.0.0/16or10.240.0.0/16, based on the internal-ip value that you noted in step 3.Then, run the following commands, replacing
<secret-key>with a secret key you choose:$ sudo apt-get install strongswan -y $ echo "%any : PSK \"<secret-key>\"" | sudo tee /etc/ipsec.secrets > /dev/null $ sudo sysctl -w net.ipv4.ip_forward=1 $ sudo cp ipsec.conf /etc $ sudo ipsec restart $ sudo ipsec up myconnAssuming your local gateway machine is running a Debian-based operating system, you can use the same steps to install VPN on your local machine. Make a copy of your
ipsec.conffile with the following changes on your local gateway machine:conn myconn authby=psk auto=start dpdaction=hold esp=aes128-sha1! forceencaps=yes ike=aes128-sha1-modp2048! keyexchange=ikev2 mobike=no type=tunnel left=%any leftid=<public-ip-of-local-VPN-gateway-machine> leftsubnet=<your-local-network-address-space> leftauth=psk leftikeport=4500 rightid=<vpn-vm-gateway-external-address> rightsubnet=10.120.0.0/16 rightauth=psk rightikeport=4500Run the same commands described above on your local VPN gateway machine.
-
Try it out:
$ gcloud compute ssh povm-1 --command 'ping -c 3 LOCAL_NETWORK_EXTERNAL_ADDRESS'
Troubleshooting
If you are experiencing issues with your VPN setup based on the instructions above, try these tips to troubleshoot your setup:
-
Determine whether the two VPN endpoints are able to communicate at all.
Use netcat to send VPN-like traffic (UDP, port 4500). Run the following command on your local VPN endpoint:
$ echo | nc -u <vpn-vm-gateway-external-address> 4500Run
tcpdumpon the receiving end to determine that your Google Compute Engine instance can receive the packet on port 4500:$ tcpdump -nn -n host <public-ip-of-local-VPN-gateway-machine> -i any -
Turn on more verbose logging by adding the following lines to your
ipsec.conffiles:config setup charondebug="ike 3, mgr 3, chd 3, net 3" conn myconn authby=psk auto=start ...Next, retry your connection. Although the connection should still fail, you can check the log for errors. The log file should be located at
/var/log/charon.logon your Google Compute Engine instance.
Glossary
- Connection
- A communication channel between a specific address and port on one computer and a specific address and port on a second computer (the address and port do not need to be the same), where all packets use a common protocol, for example TCP or UDP.
- DNS Resolver
-
A service on a computer that converts a friendly name, for example,
instance-one.project.google.internalinto an IP address. Sometimes called a DNS lookup service. - Host
- A computer that sends a packet