This is a Limited Preview release of HTTP Load Balancing. As a result, it might be changed in backward-incompatible ways and is not recommended for production use. It is not subject to any SLA or deprecation policy. Request to be whitelisted to use this feature .
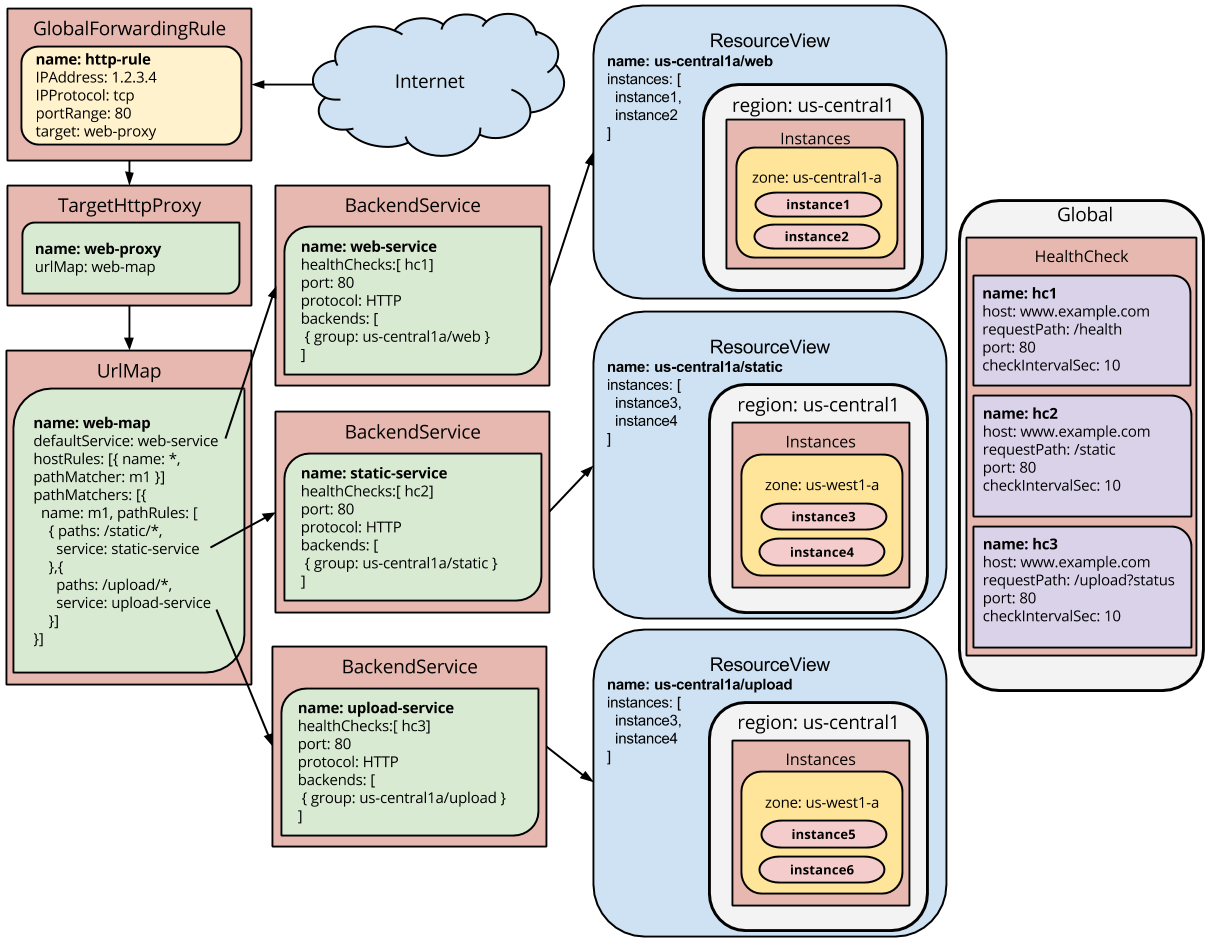
This guide demonstrates how to configure content-based or content-aware load
balancing using HTTP load balancing to distribute traffic to different
instances based on the incoming HTTP URL. You will configure the load balancing
service to serve static content (CSS, images), dynamic content, and video
uploads to different virtual machine instances based on the URLs.
Scenario
You need to load balance traffic for site
www.example.com
and serve different
types of content from different backend services. You can optimize the
instances that will serve the various types of traffic for the given task. This
guide will not cover how to best optimize the instances for the different types
of requests. By the end of this guide, you will have a configuration in place
that routes traffic based on the incoming HTTP URL as shown in the following
graphic:
Configure Google Compute Engine
For this load balancing scenario, you will create three Compute Engine
instances: one for static resources, one for video uploads, and one for the
remaining requests. On each instance, you will create a startup script that you
will pass to the
gcloud compute instances create
command that will install
Apache on each instance when the instances start. You will add a firewall rule
that allows HTTP traffic to reach the instances.
The commands below are all run on your local system and assume a bash command prompt.
If you haven't run the
gcloud
command previously, first run
gcloud auth login
to authenticate and
configure your default project.
-
Create startup scripts for each your new instances. Depending on your operating system, your startup script contents might differ:
Debian
$ echo "apt-get update && apt-get install -y apache2 && hostname > /var/www/index.html && mkdir /var/www/static \
  && echo 'body { background: red; }' > /var/www/static/main.css" > $HOME/lb_startup-static.sh
$ echo "apt-get update && apt-get install -y apache2 && hostname > /var/www/index.html && mkdir /var/www/video \
  && echo 'video-service' > /var/www/video/index.html" > $HOME/lb_startup-video.sh
$ echo "apt-get update && apt-get install -y apache2 && echo 'www-service' > /var/www/index.html" > \
  $HOME/lb_startup-web.sh
CentOS
$ echo "yum -y install httpd && service httpd restart && echo \"\`/bin/hostname\`\" > /var/www/html/index.html \ && mkdir /var/www/html/static && echo 'body { background: red; }' > /var/www/html/static/main.css" > \ $HOME/lb_startup-static.sh $ echo "yum -y install httpd && service httpd restart && echo \"\`/bin/hostname\`\" > /var/www/html/index.html \ && mkdir /var/www/video && echo 'video-service' > /var/www/html/video/index.html" > $HOME/lb_startup-video.sh $ echo "yum -y install httpd && service httpd restart && echo \"\`/bin/hostname\`\" > /var/www/html/index.html" > \ $HOME/lb_startup-web.sh -
Create a tag for your future virtual machines, so you can apply a firewall to them later:
$ TAG="www-tag" -
Choose a zone and a region for your virtual machines:
$ ZONE="us-central1-b" $ REGION="us-central1" -
Create three instances and specify their respective startup scripts:
$ gcloud compute instances create www-static \ --tags $TAG --zone $ZONE \ --metadata-from-file startup-script=$HOME/lb_startup-static.sh $ gcloud compute instances create www-video \ --tags $TAG --zone $ZONE \ --metadata-from-file startup-script=$HOME/lb_startup-video.sh $ gcloud compute instances create www \ --tags $TAG --zone $ZONE \ --metadata-from-file startup-script=$HOME/lb_startup-web.sh -
Create a firewall rule to allow external traffic to your virtual machine instances:
$ gcloud compute firewalls create www-firewall \
    --target-tags $TAG --allow tcp:80
Now that your virtual machine instances are prepared, you can start setting up
your load balancing configuration. You can verify that your instances are
running by sending a curl request to each instance's external IP address.
Each server should respond with the name of its hostname to
curl
requests to
its root URL:
$ curl IP_ADDRESS
To get the IP addresses of your instances:
$ gcloud compute instances describe
The external IP address is listed as the value of the
natIP
key.
Next, you will begin configuring the load balancing service, which will provide you with a global IP address and a mapping of requests to that global IP address to their respective backend services.
Configure the load balancing service
Next, you will set up the load balancing service.
The following commands use the
gcloud preview
component. To install,
run
gcloud components update preview
.
-
Create a resource view for each of your groups of backends that will serve specific traffic types.
$ gcloud preview resource-views create static-resources --zone $ZONE $ gcloud preview resource-views resources --resourceview static-resources addinstance www-static --zone $ZONE $ gcloud preview resource-views create video-resources --zone $ZONE $ gcloud preview resource-views resources --resourceview video-resources addinstance www-video --zone $ZONE $ gcloud preview resource-views create www-resources --zone $ZONE $ gcloud preview resource-views resources --resourceview www-resources addinstance www --zone $ZONE -
Retrieve the full URIs for these new resource views:
$ gcloud preview resource-views list --zone $ZONEThe URIs look similar to:
https://www.googleapis.com/resourceviews/v1beta1/projects/<project-id>/zones/us-central1-b/resourceViews/static-resources
https://www.googleapis.com/resourceviews/v1beta1/projects/<project-id>/zones/us-central1-b/resourceViews/video-resources
https://www.googleapis.com/resourceviews/v1beta1/projects/<project-id>/zones/us-central1-b/resourceViews/www-resources
Copy the URIs; you'll need them in a later step.
-
Create a basic HTTP health check:
$ gcloud compute http-health-checks create basic-check -
Create backend service objects for each content provider and associate them with their respective health checks.
$ gcloud compute backend-services create static-service \ --http-health-check basic-check $ gcloud compute backend-services create video-service \ --http-health-check basic-check $ gcloud compute backend-services create www-service \ --http-health-check basic-check -
Edit each backend service to update the backend values:
$ gcloud compute backend-services edit static-serviceYour text editor is launched with the resource information. The health check specified during creation is listed, along with sample resources:
healthChecks:
- https://www.googleapis.com/compute/v1/projects/<project-id>/global/httpHealthChecks/static-check
port: 80
timeoutSec: 30

# Example resource:
# -----------------
<snip>
Uncomment the following lines and replace the
groupvalue with the resource view URIs you set aside earlier (to retrieve them again, rungcloud preview resource-views list --zone $ZONE):backends: - balancingMode: RATE group: https://www.googleapis.com/resourceviews/v1beta1/projects/<project-id>/zones/us-central1-b/resourceViews/static-resources maxRate: 100The file format treats indentation strictly; make sure that the
backendsobject is indented identically to the existinghealthChecksobject.Save and exit your text editor. Repeat these steps for the
video-serviceandwww-servicebackend service objects, using the appropriate resource view URI for each. -
Create a URL map to route the incoming requests to the appropriate backend services.
-
Create the
UrlMapobject:$ gcloud compute url-maps create www-map \ --default-service www-service -
Edit the URL map to add the following host and path rules.
$ gcloud compute url-maps edit www-mapYour text editor is launched with the resource information. The default service specified during creation is listed, along with an example resource:
defaultService: https://www.googleapis.com/compute/v1/projects/<project-id>/global/backendServices/www-service

# Example resource:
# -----------------
<snip>
On the line below
defaultService:add the following definitions. Make sure to update PROJECT_ID to your actual project ID:hostRules: - hosts: ["*"] pathMatcher: pathmap pathMatchers: - name: pathmap defaultService: https://www.googleapis.com/compute/v1/projects/<project-id>/global/backendServices/www-service pathRules: - paths: ["/video", "/video/*"] service: https://www.googleapis.com/compute/v1/projects/<project-id>/global/backendServices/video-service - paths: ["/static", "/static/*"] service: https://www.googleapis.com/compute/v1/projects/<project-id>/global/backendServices/static-serviceSave and exit your text editor.
-
-
Create a target HTTP proxy to route requests to your
UrlMapobject.$ gcloud compute target-http-proxies create www-proxy --url-map www-map -
Create a global forwarding rule to handle and route incoming requests.
$ gcloud compute forwarding-rules create content-rule --global \
    --target-http-proxy www-proxy --port-range 80
After creating the global forwarding rule, it can take several minutes for your configuration to propagate. You can check the progress of the configuration propagation using the
gcloud compute backend-services get-healthcommand.
Now that you have configured your load balancing service, you can start sending traffic to the forwarding rule and watch the traffic be dispersed to different instances.
Send traffic to your instances
To send traffic to your forwarding rule, you need the global
forwarding rule's external IP address, which was printed when you ran
gcloud compute forwarding-rules create
. You can also find it with
gcloud compute forwarding-rules describe content-rule
.
-
Assign the forwarding rule's external IP address to the IP variable:
$ IP="<n.n.n.n>" -
Use the
curlcommand to test the response for various URLs for your services and check that the responses print the instance name for the matching URL, for example:$ curl http://$IP/static/main.css www-static $ curl http://$IP/video/index.html www-video $ curl http://$IP/ www-service
If your response is initially unsuccessful, you may need to wait up to two minutes for the configuration to be fully loaded and for your instances to be marked healthy before trying again.
Next steps
Now that you are familiar with content-based load balancing, you can build your own configuration to match your services and your requirements. The first step in that direction might be to point your domain to your global load balanced IP address with DNS. For a high performance, global DNS solution built on Google's infrastructure, see Google Cloud DNS .