Christina Ilvento
March 2012
Although Google App Engine provides a rich, useful set of APIs, we know that many developers are also interested in using other Google APIs and services to complement their applications. This article shows how to use one such service, the Google Prediction API . This API gives you access to some of the same powerful machine learning technologies that are used at Google. You can train your own predictive models for recommendations or classification using your own data, or use one of several hosted models provided by Google.
In this article, we'll cover both how to use a pretrained, publicly hosted predictive model and how to train your own predictive model, using an App Engine Service Account for easy authentication. Building on the Python version of the Guestbook application from the App Engine Getting Started Guide , which allows users to post messages, we'll modify the program to use the Prediction API to classify each message as having a positive or negative sentiment, first using a publicly hosted model and then, with a language identifier (for English, Spanish, or French), using a model that we'll train using sample data.
Before You Start
This article assumes that you have a working knowledge of the App Engine development environment and are using the latest App Engine Python SDK. Before starting on the demo project, you should do the following preliminary steps:
-
If you aren't familiar with App Engine, take a look at the Getting Started Guide and familiarize yourself with the development environment.
-
Install the Google API Python Client library by executing
easy_install --upgrade google-api-python-client
in a terminal window. See the library's Installation Guide for more information.
Step 1: Create an App Engine application
The first step in the demo project is to create an App Engine application:
-
Create a new application in the App Engine Administration Console . (From this point on, replace
your_app_idwith the application ID you choose.) -
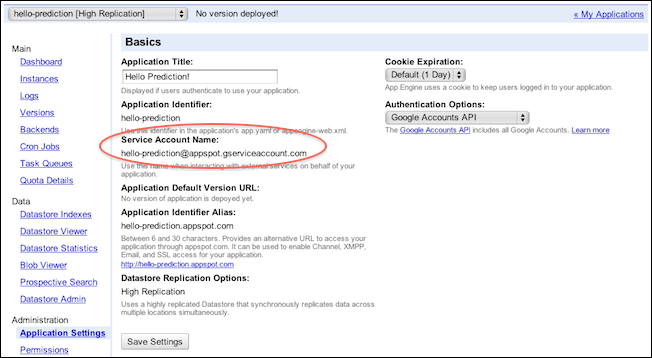
Go to your Application Settings page in the Administration Console at
             https://appengine.google.com/settings?&app;_id=

              your_app_id
and find the service account name, which should be similar to
                your_app_id

               @appspot.gserviceaccount.com
This is how your application will identify itself to the Prediction API.
Step 2: Set up a Google Developers Console project
Set up a Google Developers Console project to get access to the Prediction API:
-
In the Google Developers Console , create a new project and name it
prediction demo project. -
Click the project name. Under the APIs and auth option on the left menu, turn on Prediction API and Google Cloud Storage.
-
Even though this demo application will not exceed the free quota of 5 MB, you will have to enter billing information in order to enable Google Cloud Storage.
To enable billing for your project, do the following:
- Go to the Google Developers Console .
- Select a project, or create a new one.
- In the sidebar on the left, select Billing & Settings .
- In the Billing section, click Enable billing .
- Select your location, fill out the form, and click Submit and enable billing .
Note: If you later want to change your budget, you can do so under the Cloud Storage page.
-
On the APIs and auth tab, select Registered Apps . If your app is not listed, register it by selecting the Register App button. Then note the API key listed under Server Key.
Step 3: Download and set up the skeleton project
You'll start with a demo project that's similar to the Guestbook example application from the App Engine Getting Started Guide . The project contains several stub classes and methods, which you'll fill in as you go:
-
Download and unzip the starter code. This creates a directory containing the completed version of the tutorial application as well as the skeleton.
-
From the parent directory of the
prediction-demo-skeletonfolder, run the command line tool
enable-app-engine-project prediction-demo-skeleton
(part of the Google APIs Python Client Library ) to add the necessary client libraries. -
Look through the files
main.py,index.html, andapp.yamlin theprediction-demo-skeletondirectory. You'll see that the functionality matches that of the Guestbook application, with several additional stub classes and methods added. -
Set the value of the global variable
api_keyat the top ofmain.pyto your API key from step 2.5 . -
Replace the application ID in the
app.yamlfile with the value ofyour_app_idfrom step 1.1 .
Step 4: Use a publicly hosted model to predict whether a comment is positive or negative
First you'll modify the application to use a publicly hosted model for sentiment analysis to tag greetings as positive or negative:
-
In
main.py, add the following line (marked in bold) to include a sentiment field in theGreetingclass. This will be used to store the sentiment retrieved from the predictive model:class Greeting(db.Model): """Models an individual Guestbook entry with an author, content, and date.""" author = db.UserProperty() content = db.StringProperty(multiline=True) date = db.DateTimeProperty(auto_now_add=True) positive = db.BooleanProperty()
-
Create the Prediction API service by filling in the
TODOcomment at the top ofmain.pywith the following code. This creates the service from the Prediction API client library that the demo application will be using:# Set up the Prediction API service credentials = AppAssertionCredentials( scope='https://www.googleapis.com/auth/prediction') http = credentials.authorize(httplib2.Http(memcache)) service = build("prediction", "v1.5", http=http, developerKey=api_key) -
Fill in the
GetSentimentmethod to determine whether the sentiment of a message is positive or negative. Add the following code to the skeleton method, to call the Prediction API using a publicly hosted model for sentiment analysis:def GetSentiment(message): """Returns true if the predicted sentiment is positive, false otherwise.""" body = {"input": {"csvInstance": [message]}} output = service.hostedmodels().predict( body=body, hostedModelName="sample.sentiment").execute() prediction = output["outputLabel"] # Model returns either "positive", "negative" or "neutral". if prediction == "positive": return True else: return False -
Add a line to the
Guestbookclass'spostmethod to set the newpositiveproperty of theGreetingobject:class Guestbook(webapp.RequestHandler): def post(self): guestbook_name = self.request.get('guestbook_name') greeting = Greeting(parent=guestbook_key(guestbook_name)) if users.get_current_user(): greeting.author = users.get_current_user() greeting.content = self.request.get('content') greeting.positive = GetSentiment(greeting.content) greeting.put() self.redirect('/?' + urllib.urlencode({'guestbook_name': guestbook_name}))Caution: This sample doesn't do any error handling, so be sure to add checks for error conditions and timeouts in any code you derive from it.
-
Looking at the
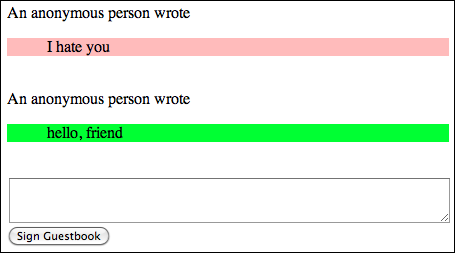
index.htmlfile, notice that the following lines of code change the text background color depending on whether the comment is positive or negative:{% if greeting.positive %} <div style="background: #009933"> {% else %} <div style="background: #FF0000"> {% endif %} -
Start the Google App Engine Launcher (or use
appcfg.py). Choose File > Add Existing Application and enter the path for theprediction-skeleton-demodirectory. -
Click Deploy . Once the code is finished uploading, go to
             your_app_id

            .appspot.com
to test how the sentiment analysis works on greetings like "hello, friend" and "I hate you":
Step 5: Train a model to predict the language of a comment
Now you'll train your model from some example training data to detect comments written in your guestbook in different languages:
-
Create a training file and upload it to Google Cloud Storage:
-
Download the training file
language_id.txt.Note: When you're ready to create your own training file, see the Google Prediction API Developer's Guide for detailed instructions.
- In the Google Developers Console , click Cloud Storage in the navigation pane on the left.
-
Create a new bucket by clicking
New Bucket
in the upper-right corner. Name the bucket
               your_app_id

              -demo-bucket
. -
Upload the
language_id.txtfile to the bucket by clicking on the bucket and then clicking Upload.
-
Download the training file
-
Now modify your code. First, add a
languageproperty to theGreetingclass:class Greeting(db.Model): """Models an individual Guestbook entry with an author, content, and date.""" author = db.UserProperty() content = db.StringProperty(multiline=True) date = db.DateTimeProperty(auto_now_add=True) positive = db.BooleanProperty() language = db.StringProperty()
-
Fill in the values of
datafileandmodel_idat the top ofmain.pyby replacingyour_app_id. Be sure thatyour_app_id -demo-bucketis the same name you gave to the bucket you created in step 5-1c :# Global variables datafile = "your_app_id-demo-bucket/language_id.txt" model_id = "your_app_id-model"
-
Fill in the stub
TrainModelclass with the following code. This method creates the predictive model by specifying the location of the training file and the model name to use and then redirects to check the status of the training:class TrainModel(webapp.RequestHandler): def get(self): # train the model on the file payload = {"id": model_id, "storageDataLocation": datafile} service.trainedmodels().insert(body=payload).execute() self.redirect("/checkmodel")Note: This method need be called only once, and is protected in
app.yamlso that only administrative users can access it. In general, you should restrict access to the handlers that can modify your predictive models to administrators only. You should also include error-handling code in case of typos or configuration mistakes for your model ID and data file locations. -
Fill in the stub
CheckModelclass with the following code to check whether the model is finished training and display the status:class CheckModel(webapp.RequestHandler): def get(self): # checks if a model is trained self.response.out.write("Checking the status of the model.<br>") status = service.trainedmodels().get(id=model_id).execute() self.response.out.write(status["trainingStatus"])Note: This method need be called only to verify that the model is finished training, and is protected in
app.yamlso that only administrative users can access it. -
Fill in the stub
PredictLanguage()method with the following code to predict the language of a given piece of text:def PredictLanguage(message): payload = {"input": {"csvInstance": [message]}} resp = service.trainedmodels().predict(id=model_id, body=payload).execute() prediction = resp["outputLabel"] return prediction -
Modify the
Guestbookclass to add thelanguageproperty to each greeting as it's created:class Guestbook(webapp.RequestHandler): def post(self): guestbook_name = self.request.get('guestbook_name') language = self.request.get('lang') greeting = Greeting(parent=guestbook_key(guestbook_name)) if users.get_current_user(): greeting.author = users.get_current_user() greeting.content = self.request.get('content') greeting.positive = GetSentiment(greeting.content) greeting.language = PredictLanguage(greeting.content) greeting.put() self.redirect('/?' + urllib.urlencode({'guestbook_name': guestbook_name})) -
Modify
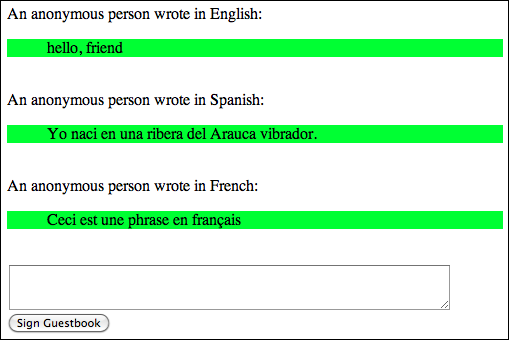
index.htmlto show the language of each greeting by adding the following bolded code:{% for greeting in greetings %} {% if greeting.author %} <b>{{ greeting.author.nickname }}</b> wrote {% else %} An anonymous person wrote {% endif %} in {{ greeting.language }}: {% if greeting.positive %} <div style="background: #009933"> {% else %} <div style="background: #FF0000"> {% endif %} <blockquote>{{ greeting.content|escape }}</blockquote></div><br> {% endfor %}
Step 6: Train and use your model
Now that you've added all the needed code, you're ready start training your model and trying it out:
-
Deploy the code to App Engine, as described in steps 4.6 and 4.7 above.
-
Once the code has finished uploading, go to
              your_app_id

             .appspot.com/trainmodel
to train the model. Note that to prevent accidental access by your users, you must be logged in as an administrator to access this page. -
Go to
              your_app_id

             .appspot.com/checkmodel
to check the status of the model training. Depending on the size and complexity of the training file, you may need to refresh the page a few times until the model has completed training and the status returns asDONE. Typically, the training shouldn't take more than a minute. -
The predictive model is now ready for use in your application. Try adding greetings like
"hola","bonjour", and"hello"to see the language classification in action:
Next Steps
Now that you've mastered the basics of using the Prediction API, you can start creating your own training files (from log data or other sources) to train models tailored to your needs. Although our example here was relatively simple, there are many applications for the Prediction API. For more information, see the Prediction API and Google Cloud Storage documentation. Happy coding!
