Takashi Matsuo
June 2012
Preface
Java Persistence API (JPA) is a Java programming language framework managing relational data in applications using Java. Google Plugin for Eclipse supports JPA facets, so it is very easy to get started with JPA and Cloud SQL. This article shows how to create a simple guestbook application with Cloud SQL, using JPA and the EclipseLink implementation.
Prerequisites
- App Engine SDK 1.6.4 or later
- Eclipse IDE 3.6 or later
- The Eclipse Web Tools Platform (WTP) plugin needs to be installed. If you are using the Java EE Eclipse IDE, the WTP plugin should already be included in Eclipse by default, and you do not have to install it again. You can install WTP from the main Eclipse software repositories (such as for the Eclipse Helios Release , or the Eclipse Indigo Release ).
Create a JPA-enabled Cloud SQL web application
To create a JPA-enabled Cloud SQL web application,
- Create a new web application project and configure Cloud SQL for the project by following these instructions .
-
Create a database and table in your Cloud SQL instance with the following SQL commands:
CREATE DATABASE guestbook CHARSET utf8;
CREATE TABLE `POST` (
  `ID` bigint(20) NOT NULL AUTO_INCREMENT,
  `BODY` varchar(255) DEFAULT NULL,
  `TIMESTAMP` date DEFAULT NULL,
  `TITLE` varchar(255) DEFAULT NULL,
  PRIMARY KEY (`ID`)
) ENGINE=InnoDB DEFAULT CHARSET=utf8;
-
Right-click the GPE project and under
Properties > Project Facets
, select the JPA facet and version as 2.0 or above.

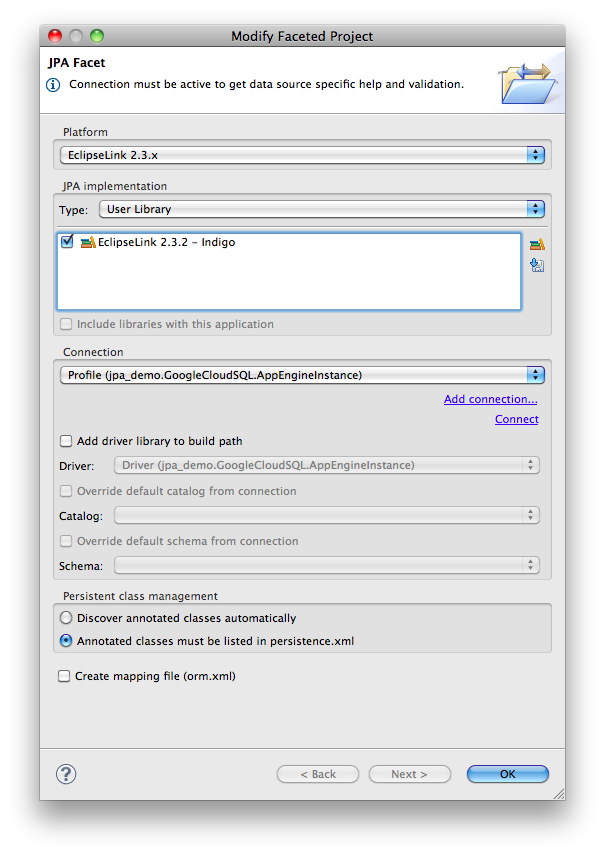
- Click Further configuration available as shown above.
- Configure JPA Facet:
- Select the appropriate Platform (such as EclipseLink 2.3.x below).
- Select the JPA implementation type as User Library
- Choose a JPA implementation of your choice. You can click on the down-arrow button to download the EclipseLink JPA implementation.
- Select the Cloud SQL connection for the App Engine SQL instance (its name is suffixed by AppEngineInstance and it is populated by GPE when you configure Cloud SQL).
-
Click on
Connect
.
Note: Make sure you click on Connect to verify if the database connection is valid. If not, entries in persistence.xml may not be filled in automatically by GPE. - Click OK to save the configuration.

Guestbook implementation
Create your POJO class
Create Post class in your package directory with the following content:
package com.google.cloudsqldemo;

import java.util.Date;

import javax.persistence.Entity;
import javax.persistence.GeneratedValue;
import javax.persistence.GenerationType;
import javax.persistence.Id;
import javax.persistence.Table;
import javax.persistence.Temporal;
import javax.persistence.TemporalType;

@Entity
@Table(name = "POST")
public class Post {
    // A Post entity represents one guestbook entry.
    @Id
    @GeneratedValue(strategy = GenerationType.SEQUENCE)
    private Long id;
    private String title;
    private String body;
    @Temporal(TemporalType.DATE)
    private Date timestamp;

    public Post() {
        // This is used by JPA
    }

    public Post(String title, String body, Date timestamp) {
        this.title = title;
        this.body = body;
        this.timestamp = timestamp;
    }

    public Long getId() {
        return id;
    }

    public void setId(Long id) {
        this.id = id;
    }

    public String getTitle() {
        return title;
    }

    public void setTitle(String title) {
        this.title = title;
    }

    public String getBody() {
        return body;
    }

    public void setBody(String body) {
        this.body = body;
    }

    public Date getTimestamp() {
        return timestamp;
    }

    public void setTimestamp(Date timestamp) {
        this.timestamp = timestamp;
    }

}
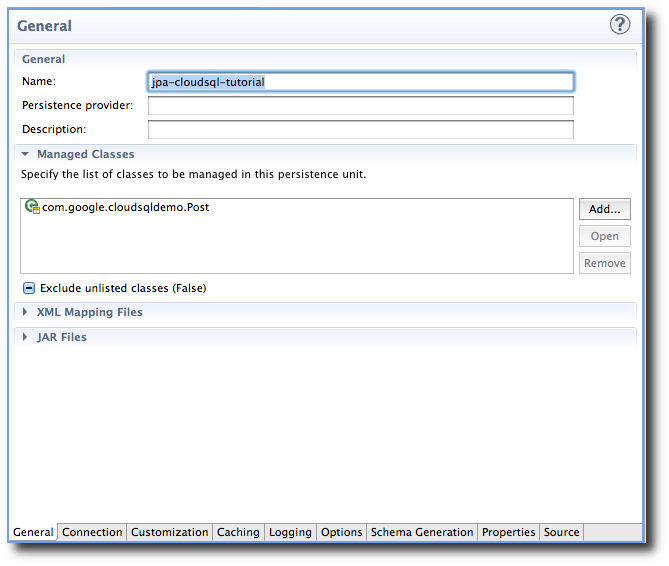
You might notice there are still few errors on this file, it's because you need to specify your POJO class in your persistence.xml file. Please open src/META-INF/persistence.xml, click 'Managed Class' section, then click 'Add' button, and add your POJO class here.
Additionally, copy the name of the persistence unit for later use(in a screenshot bellow, 'jpa-cloudsql-tutorial' is the name of the persistence unit).

Create EntityManagerFactory
Then, create EMF class with the following content, replacing persistence_unit with the name of the persistence unit (which you learned in the previous step):
package com.google.cloudsqldemo;

import javax.persistence.EntityManagerFactory;
import javax.persistence.Persistence;

public final class EMF {
    private static final EntityManagerFactory emfInstance = Persistence
        .createEntityManagerFactory("persistence_unit");

    private EMF() {
    }

    public static EntityManagerFactory get() {
        return emfInstance;
    }
}
This way, you can cache the instance of EntityManagerFactory to avoid reading the config file every time.
Create your web form
Then create a UI part of this application, which just list the messages and display a web form to post new messages. In your war/ directory, create a new file called guestbook.jsp with the following code:
<%@ page contentType="text/html;charset=UTF-8" language="java" %>
<%@ page import="javax.persistence.EntityManager" %>
<%@ page import="com.google.cloudsqldemo.Post" %>
<%@ page import="com.google.cloudsqldemo.EMF" %>
<%@ taglib prefix="fn" uri="http://java.sun.com/jsp/jstl/functions" %>

<html>
  <body>

    <table style="border: 1px solid black">
      <tbody>
        <tr>
          <th style="background-color: #CCFFCC; margin: 5px">Title</th>
          <th style="background-color: #CCFFCC; margin: 5px">Body</th>
          <th style="background-color: #CCFFCC; margin: 5px">ID</th>
        </tr>
<%
EntityManager em = EMF.get().createEntityManager();
em.getTransaction().begin();
for (Object obj: em.createQuery("SELECT p from Post p").getResultList()) {
    Post post = (Post) obj;
    pageContext.setAttribute("title", post.getTitle());
    pageContext.setAttribute("body", post.getBody());
    pageContext.setAttribute("id", post.getId()); %>

        <tr>
          <td>${fn:escapeXml(title)}</td>
          <td>${fn:escapeXml(body)}</td>
          <td>${fn:escapeXml(id)}</td>
        </tr>

<% }
em.getTransaction().commit();
em.close(); %>
      </tbody>
    </table>
    <br />
    No more messages!
    <p><strong>Sign the guestbook!</strong></p>
    <form action="/sign" method="post">
      <div>Title: <input type="text" name="title"></input></div>
      <div>Body:
      <br /><textarea name="body" rows="3" cols="60"></textarea>
      </div>
      <div><input type="submit" value="Post Greeting" /></div>
      <input type="hidden" name="guestbookName" />
    </form>
  </body>
</html>
Store the message
Next, create a new servlet for storing the messages to the MySQL table. This servlet is supposed to perform the following actions:
- Create a Post object from data posted via the web form
- Get an instance of EntityManager, and store it to the database
- Redirect the user to guestbook.jsp
package com.google.cloudsqldemo;

import java.io.IOException;
import java.util.Date;
import java.util.logging.Level;
import java.util.logging.Logger;

import javax.persistence.EntityManager;
import javax.persistence.EntityTransaction;
import javax.servlet.ServletException;
import javax.servlet.http.HttpServlet;
import javax.servlet.http.HttpServletRequest;
import javax.servlet.http.HttpServletResponse;

import com.google.cloudsqldemo.EMF;
import com.google.cloudsqldemo.Post;

@SuppressWarnings("serial")
public class GuestbookServlet extends HttpServlet {

    @Override
    protected void doPost(HttpServletRequest req, HttpServletResponse resp)
            throws ServletException, IOException {
        String title = req.getParameter("title");
        String body = req.getParameter("body");
        Post post = new Post();
        post.setTitle(title);
        post.setBody(body);
        post.setTimestamp(new Date());

        EntityManager em = EMF.get().createEntityManager();
        EntityTransaction tx = em.getTransaction();
        try {
            tx.begin();
            em.persist(post);
            em.getTransaction().commit();
        } catch (Exception e) {
            Logger log = Logger.getLogger("GuestbookServlet");
            log.log(Level.WARNING, "Rolling Back:", e);
            tx.rollback();
        } finally {
            em.close();
        }
        resp.setHeader("Refresh", "0; url=/guestbook.jsp");
    }

}
Servlet mapping
Lastly, override your web.xml with the following code:
<?xml version="1.0" encoding="utf-8"?>
<web-app xmlns:xsi="http://www.w3.org/2001/XMLSchema-instance"
        xmlns="http://java.sun.com/xml/ns/javaee"
        xmlns:web="http://java.sun.com/xml/ns/javaee/web-app_2_5.xsd"
        xsi:schemaLocation="http://java.sun.com/xml/ns/javaee
        http://java.sun.com/xml/ns/javaee/web-app_2_5.xsd" version="2.5">
    <servlet>
        <servlet-name>guestbook</servlet-name>
        <servlet-class>com.google.cloudsqldemo.GuestbookServlet</servlet-class>
    </servlet>
    <servlet-mapping>
        <servlet-name>guestbook</servlet-name>
        <url-pattern>/sign</url-pattern>
    </servlet-mapping>
    <welcome-file-list>
        <welcome-file>guestbook.jsp</welcome-file>
    </welcome-file-list>
</web-app>
That’s it. Now you can try your application.
Summary
As you can see, it is very easy to get started with App Engine and Cloud SQL, especially if you use JPA Tools which provides a user interface for editing persistence.xml. The actual working project of this tutorial is hosted at Google Code Repository .
Happy coding :)
